Skip to content

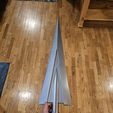
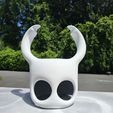
Kids Cosplay - Hollow Knight Mask and Needle

Advertising
Advertising
?
Creation quality: 5.0/5 (1 vote)
Evaluation of members on the printability, utility, level of detail, etc.

  • 10.2k views
  • 88 likes
  • 51 downloads
  • 3 collections
  • 2 comments
  • 1 make

License
3D design format
ZIP Folder details Close
  • Hollow Knight Cosplay.zip
    • HK Head/HK_HEAD_BOTTOM.stl
    • HK Sword/bottom.stl
    • HK Sword/handle.stl
    • HK Sword/middle.stl
    • HK Sword/top.stl
    • Allignment Pin.stl
    • HK Head/HK_HEAD_TOP.stl
  • Hollow Knight Helmet - Split.zip
    • Horn_left.stl
    • Horn_Right.stl
    • Lower_left.stl
    • Lower_right.stl
    • Upper_left.stl
    • Upper_right.stl

Learn more about the formats

Last update 2023-09-26 at 20:49
Publication date 2023-09-18 at 18:14
Design number 1458984

3D printer file info

3D model description

This is a Mask and sword designed for kids (or adults if you resize!)

3D printing settings

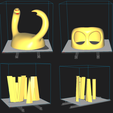
The Head is cut into 2 pieces and the sword is cut into 4.
A large format printer would be best (350x350mm).

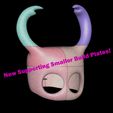
UPDATE: I have added a new version with the helmet split into 6 sections. It should just BARELY fit on a print bed of 235x235mm!

Print settings:
Layer height: .2mm
Infill: 10%-15%
Walls: 2-3 (adding an extra wall increases weight and material cost but you will negate the risk of sanding through the wall when post-processing)
Supports: EVERYWHERE on the Head pieces / NONE on the Sword

I have also included printable alignment pins but you can also use any 5mm dowels. The internal dimensions of the alignment holes are 5mm x 20mm. I would give yourself some wiggle room on the length and shoot for 5mm x 18mm to prevent a gap.

To achieve a smooth surface like in the pictures:
- Sand all parts with 120grit (palm sander) until all heavy layer lines are pretty smooth
- Fill any larger holes or cracks with woodfiller putty
- When dry, use 120grit to sand woodfiller smoot
- Clean and apply 2-3 coats of Auto Body Gray Filler Primer.
- Wait 48 hours and sand with 400grit
- Clean and apply 3-4 LIGHT coats of top coat paint. Waiting a few min in between (or manufacturer recommended recoat time)
- If you goof up, just wait 24-48 hours and sand with 400 grit and re-apply coats

Let me know if you have any problems and I will work things out with you!

Advertising


Issue with this design? Report a problem.

Would you like to support Cults?

You like Cults and you want to help us continue the adventure independently? Please note that we are a small team of 3 people, therefore it is very simple to support us to maintain the activity and create future developments. Here are 4 solutions accessible to all:

  • ADVERTISING: Disable your banner blocker (AdBlock, …) and click on our banner ads.

  • AFFILIATION: Make your purchases online by clicking on our affiliate links here Amazon.

  • DONATE: If you want, you can make a donation via Ko-Fi πŸ’œ.

  • WORD OF MOUTH: Invite your friends to come, discover the platform and the magnificent 3D files shared by the community!


Sharing and downloading on Cults3D guarantees that designs remain in makers community hands! And not in the hands of the 3D printing or software giants who own the competing platforms and exploit the designs for their own commercial interests.

Cults3D is an independent, self-financed site that is not accountable to any investor or brand. Almost all of the site's revenues are paid back to the platform's makers. The content published on the site serves only the interests of its authors and not those of 3D printer brands who also wish to control the 3D modeling market.


100% secure payment by credit card, PayPal, Apple Pay, Google Pay, etc.
View all payment options.