Skip to content

4" Hydroponic Adapters

Advertising
Advertising
?
Creation quality: 5.0/5 (1 vote)
Evaluation of members on the printability, utility, level of detail, etc.

  • 2.5k views
  • 7 likes
  • 5 downloads
  • 1 collection

License
3D design format
STL, TXT, and ZIP Folder details Close
  • 47mm Pod Adapter.stl
  • 47mm Pod Adapter.stl
  • 47mm Pod.stl
  • 47mm Pod.stl
  • 49mm Pod Adapter.stl
  • 49mm Pod Adapter.stl
  • 49mm Pod.stl
  • 49mm Pod.stl
  • 4in Hydro Adapters.zip
    • 107mm - 4in Hydro Adapters/47mm Pod Adapter.stl
    • 107mm - 4in Hydro Adapters/47mm Pod.stl
    • 107mm - 4in Hydro Adapters/49mm Pod Adapter.stl
    • 107mm - 4in Hydro Adapters/49mm Pod.stl
    • 107mm - 4in Hydro Adapters/LOCKING PIN x2.stl
    • Readme.txt
    • Hydro Tower Instructions new.pdf
    • 107mm - 4in Hydro Adapters/Water Diverter.stl
    • 107mm - 4in Hydro Adapters/x2 - 3 107mm (4in) pod guide.stl
    • 107mm - 4in Hydro Adapters/x2 - 4 107mm (4in) pod guide.stl
  • LOCKING PIN x2.stl
  • LOCKING PIN x2.stl
  • Readme.txt
  • x2 - 3 107mm (4in) pod guide.stl
  • x2 - 3 107mm (4in) pod guide.stl
  • x2 - 4 107mm (4in) pod guide.stl
  • x2 - 4 107mm (4in) pod guide.stl

Learn more about the formats

Publication date 2023-04-02 at 14:27
Design number 1147694

3D printer file info

3D model description

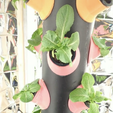
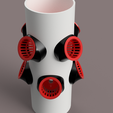
Simple guide and drill to add Hydroponic adapters to a PVC or IPEX piping for indoor gardens and grow systems

directions:

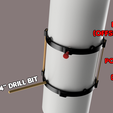
1 - Simply line up the adapter of your choosing (3 or 4 pods per run) where you would like to drill and use a 1/4" bit to start for 1st set of holes:

2 - Get x2 popsicle sticks and mark on them the desired spacing (4" is usually a normal spacing) and insert them into opposite sides.

3 - rotate the drill adapter so the unused popsicle adapters are over the holes and use the locking pins to secure it.

4 - drill the new holes (they should be offset from the row below) and drill your new holes.

5 - repeat until completed

6 - once done install the hose from the bottom pump (1/2" diameter) up to the top adapter, securing it in place with silicone then installing the top PVC capping the prevent water from coming out the top.

7 - finish with rocks in you bottom bucket and fill with water and test the flow and seals

8 - install soil lining into pods and either stuff with soil or moss with your seeds tucked inside

9 - install pods and enjoy growing your own in home garden

3D printing settings

lots of walls 3-4

print in a PETG or ABS/ASA material

Advertising


Issue with this design? Report a problem.

Would you like to support Cults?

You like Cults and you want to help us continue the adventure independently? Please note that we are a small team of 3 people, therefore it is very simple to support us to maintain the activity and create future developments. Here are 4 solutions accessible to all:

  • ADVERTISING: Disable your banner blocker (AdBlock, …) and click on our banner ads.

  • AFFILIATION: Make your purchases online by clicking on our affiliate links here Amazon.

  • DONATE: If you want, you can make a donation via Ko-Fi πŸ’œ.

  • WORD OF MOUTH: Invite your friends to come, discover the platform and the magnificent 3D files shared by the community!


Sharing and downloading on Cults3D guarantees that designs remain in makers community hands! And not in the hands of the 3D printing or software giants who own the competing platforms and exploit the designs for their own commercial interests.

Cults3D is an independent, self-financed site that is not accountable to any investor or brand. Almost all of the site's revenues are paid back to the platform's makers. The content published on the site serves only the interests of its authors and not those of 3D printer brands who also wish to control the 3D modeling market.

100% secure payment by credit card, PayPal, Apple Pay, Google Pay, etc.
View all payment options.