Skip to content

Garten of BanBan drone with spring action button remote

Advertising
Advertising
?
Creation quality: 5.0/5 (1 vote)
Evaluation of members on the printability, utility, level of detail, etc.

  • 6.2k views
  • 7 downloads

License
3D design format
STL Folder details Close
  • drone bottom (1).stl
  • dronesmall1.stl
  • dronetop (1).stl
  • propbottom (1).stl
  • proptop (1).stl
  • remote1.stl
  • remoteback.stl
  • remotebutton.stl

Learn more about the formats

Publication date 2023-05-01 at 14:03
Design number 1196910

3D printer file info

3D model description

Make your own Garten of BanBan drone with a spring action button remote! The drone does not fly of course.

It measures about 12 inches x 12 inches. If you don't have a large enough printer simply print 4 of the 1/4 sections and super glue together.

Steps:
-Print the drone top or print 4 of the 1/4 drone top sections and glue them together with super glue.
-Print the drone bottom (it completes the center globe) and super glue it in place.
-Print the propellers you will need to print 4 prop tops and 4 prop bottoms.
-Apply super glue to a prop top along the mating surface and glue the other half of the prop to it with the drone prop post in the middle. The props will not clip on the posts if you glue the prop halves together first.
-Print the 3 parts for the remote.
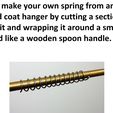
-Buy a spring off amazon like in the picture or make one free yourself with wire from an old coat hanger like in the picture.
-place the button through the remote top and set the spring inside the hollow button.
-Super glue the remote back tray in. You may need to temporarily tape the back until the glue sets because the spring should be pushing on the back tray to hold the button up.
-Paint it and enjoy

Settings I used:
-I printed the drone top with my big printer with a .6mm nozzle and .6mm layer height and width.
-use supports for the drone top because the prop shaft is elevated
-I printed the drone remote parts and drone bottom half circle piece on my smaller Ender 3 with a .4mm nozzle and .4mm layer height and width lines.
-Printed the remote parts solid.
-Use supports to print the remote front. I printed it face down and the support was for the remote's antennae.
-I print Overture PLA at 210 degrees with a 65 degree bed temp and no cooling.
-I print slow at 30mm/second
-I used 6 wall line count and 20% infill density because my 8 year old plays with it.

Disclaimer: This is fan art and not official. It doesn't fly or have spinning props. small parts are choking hazards. I'm not responsible for injury, harm, or damages.

Advertising


Issue with this design? Report a problem.

Would you like to support Cults?

You like Cults and you want to help us continue the adventure independently? Please note that we are a small team of 3 people, therefore it is very simple to support us to maintain the activity and create future developments. Here are 4 solutions accessible to all:

  • ADVERTISING: Disable your banner blocker (AdBlock, …) and click on our banner ads.

  • AFFILIATION: Make your purchases online by clicking on our affiliate links here Amazon.

  • DONATE: If you want, you can make a donation via Ko-Fi πŸ’œ.

  • WORD OF MOUTH: Invite your friends to come, discover the platform and the magnificent 3D files shared by the community!


Sharing and downloading on Cults3D guarantees that designs remain in makers community hands! And not in the hands of the 3D printing or software giants who own the competing platforms and exploit the designs for their own commercial interests.

Cults3D is an independent, self-financed site that is not accountable to any investor or brand. Almost all of the site's revenues are paid back to the platform's makers. The content published on the site serves only the interests of its authors and not those of 3D printer brands who also wish to control the 3D modeling market.

100% secure payment by credit card, PayPal, Apple Pay, Google Pay, etc.
View all payment options.