ENDER 3 SERIES FILAMENT CHANGE AUTOMATION G-CODE SCRIPTS (ONLY TESTED FOR ENDER 3 PRO BUT SHOULD ALSO WORK WITH OTHER PINTERS USING APPROPRIATE PARAMETERS)
The following G-codes will make life easier for sure. And if you also use my "Double Spool Holder for Ender 3 Series" project at the same time, life will be much easier.
These G-Codes take the filament out and put the new filament into the extruder/nozzle automatically using the extruder motor and minimize the human interface during filament changes.
The project is a remix of https://www.thingiverse.com/thing:4705178 by Thorlab. Thanks for his inital gcode which was designed only for filament change while the printer is idle. I also included the filament change process during print (CURA).
So, there are two situations for filament changes. You can do this either when the printer is idle (without printing anything) or during printing:
1) "FILAMENT CHANGE ON IDLE" AUTOMATION G-CODE SCRIPTS
Watch the video:
https://www.youtube.com/watch?v=FgKO03NPouU
These G-codes do not require slicing. You need to keep them on your SD card under a separate subfolder (i.e., Filament Change) and use them when you want to make any filament change but only when the printer is idle (i.e., when you turn on your printer or when a print is finished).
I have designed 4 kinds of filament changes for my own use but they can be increased/decreased based on your own requirements:
PLA to PLA filament change (initial nozzle temp: 210, final nozzle temp: 210, bed temp: 65)
PETG to PETG filament change (initial nozzle temp: 230, final nozzle temp: 230, bed temp: 65)
PLA to PETG filament change (initial nozzle temp: 210, final nozzle temp: 230, bed temp: 65)
PETG to PLA filamnet change (initial nozzle temp: 230, final nozzle temp: 210, bed temp: 65)
The only attributes changed in each procedure is the nozzle heat (ie I used 210 for PLA and 230 for PETG). So, you can simply modify the G-Codes by only changing these heat values based upon your own needs. Just find all heat values and replace them with new heat values using a simple text editor. And do not forget to save them with a ".gcode" extenion.
These G-Codes also heat both the nozzle and the bed while simultaneously saving time and letting you print something just after filament change (the printer will remain hot even after the filament change process is finished unless you manually cool it down).
Filament Change Process:
When the printer is on and idle, just select and "print" the G-Code you need from your SD Card for filament change.
The printer will first "auto home" and start heating both the nozzle and the bed to the defined temperatures.
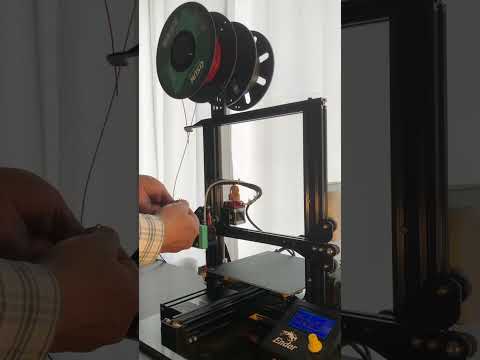
When the heating reaches to (above) defined values, the filament inside (the nozzle and the PTEF tube) will be fully pulled back by the extruder for about 480mm (until it's out of extruder).
There will 4 beeps to warn you that the pull-back is over (and the filament is out of the extruder).
Meanwhile, the nozzle and the bed will standby at the (above) defined temperatures.
Now it's your turn:
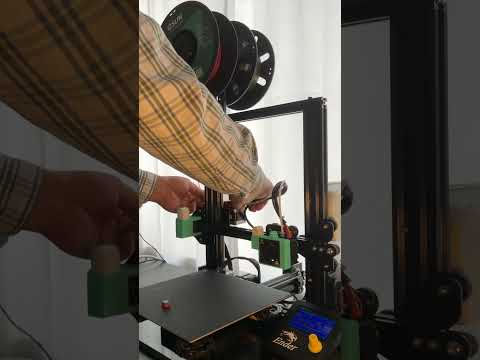
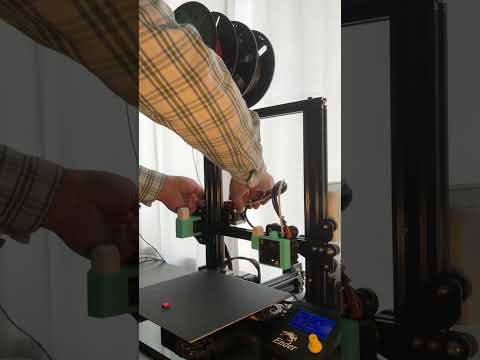
Cut the melted end of the used filament and secure it to its spool holder.
Manually insert the new filament to the extruder until it reaches the beginning of the PTEF tube. To avoid over or under-insertion I would highly recommend you to detach the pneumatic connector of the PTEF tube on extruder side and check the filament coming out from the extruder side for a max 1cm. Then insert the connector again and screw it to the extruder.
Click the control button on the LCD panel and hear another beep.
The extruder will now start pushing the filament until it reaches the nozzle (sometimes it may push a little bit more and you can hear forcing of the xtruder just because you have over inserted the filament, as explained above).
The extruder will then continue purging the filament approximately 50 mm more (but at a lower speed) to clean the nozzle and allow the new filament come out of the nozzle.
When the purge is completed, it will beep once more. Clean the filament hanging from the nozzle before starting to print another object.
The printer is now ready to print with the new filament, as usual. As the printer also standsby hot, you can either go and print something from your SD card or manually cool down the printer and turn it off.
2) "FILAMENT CHANGE DURING PRINT" AUTOMATION SCRIPTS (ONLY FOR CURA SLICER):
Watch the videos:
https://www.youtube.com/watch?v=UedAFRHJEBo
https://www.youtube.com/watch?v=pQ0cZq7aNbU
Below, G-Code scripts should be inserted into your slice by using CURA for each pause where you will change your filament (each one is one unique line, starting with "M117...", ending with "...G4 P500"):
################################## GCODE BEFORE PAUSE #######################################
M117 Filament Removal : G1 Z50 : G92 E0 : G1 E-200 F2000 : M400 : G92 E0 : G1 E-200 F2000 : M400 : G92 E0 : G1 E-80 F2000 : M400 : M117 Insert New Filament : M300 S400 P300 : G4 P500 : M300 S400 P300 : G4 P500 : M300 S400 P300 : G4 P500 : M300 S400 P300: G4 P500 : M300 S400 P300 : G4 P500
#############################################################################################
################################## GCODE AFTER PAUSE ########################################
M117 Click to continue : M0 S900 : M300 S400 P400 : G4 P400 : M300 S400 P400 : G4 P400 : G92 E0 : G1 E200 F2000 : M400 : G92 E0 : G1 E200 F2000 : M400 : G92 E0 : G1 E20 F2000 : M400 : M117 Purge : G92 E0 : G1 E30 F100 : M400 : M117 Filament Changed : M300 S400 P300 : G4 P500 : M300 S400 P1000 : G4 P500
#############################################################################################
NOTE: These two G-Code lines are also attached to this project as separate txt files for easy use.
DO NOT RUN THEM STAND ALONE (they will not work or may harm your printer).
Follow the instructions below:
First open your STL file in CURA and slice it with your own preferences.
In CURA:
Goto Extensions/Post Processing/Modify G-Code/Post Processing Scripts/Add a script/Pause at Height. Modify the atttributes as follows:
Pause at --> Layer Number
Pause layer --> [Enter the layer number where you will make a Filament Change] Please note that the printer will pause AT THE END OF THE LAYER you entered.
Method --> Marlin (M0)
Keep motors engaged --> [Checked)
Park Print --> [Checked)
Park Print Head X --> 220mm
Park Print Head Y --> 220mm
Retraction --> 4.0mm
Retraction Speed --> 25.0mm/m
Extrude Amount --> 0.0mm
Extrude Speed --> 3.3333mm/m
Redo Layer --> [Unchecked)
Use M109 for standby etc. --> [Checked)
Standby Temperature --> [Enter the material temperature you use (ie 200-210 for PLA]. This is the nozzle temperature to standby during filament change (pause).
Display text --> Null
Beep at pause --> [Checked)
Beep length --> 1000
G-Code before pause --> [Copy and Paste the script "GCODE BEFORE PAUSE" above, as a unique line here (only the script as a whole, not the seperation lines ###)]
G-Code after pause --> [Copy and Paste the script "GCODE AFTER PAUSE" above, as a unique line here (only the script as a whole, not the seperation lines ###)]
You can add as many "Pause at height" scripts as you want in CURA in the same way, only changing the layer number for each filament change.
TIP: If you want to keep them in CURA for future use, do not delete these "pause at height" scripts even if you won't do any filament change during another print. Just increase the Pause Layer number to a number larger than the total number of layers of your object. And CURA will ignore them when the object is sliced.
Print:
Slice the object with these settings as usual and print it.
When the filament change layer is reached the printer will:
Beep
The print head will park to right-back corner (X:220; Y:220)
It will go up to 50 mm (Z) for easy change and purging of the filament.
The filament inside will be pulled back by the extruder for approximately 480 mm (until it is out of the extruder).
There will 4 beeps to warn you that the pull-back is over (and the filament is out of the extruer).
Meanwhile, the hotend/nozzle will standby at the defined temperature.
Now it's your turn:
Cut the melted end of the used filament and secure it to its spool holder.
Manually insert the new filament to the extruder until it reaches the beginning of the PTEF tube. To avoid over or under-insertion I would highly recommend you detaching the pneumatic connector of the PTEF tube on the extruder side and see the filament coming out of the extruder for a max 1cm. Then insert the connector again and screw it to the extruder.
Click the control button on the LCD panel and hear the beep.
The extruder will now start pushing the filament until it reaches the nozzle (sometimes it may push a little bit more and you can hear forcing of the extruder, but it is not a problem for 1-2 seconds. This is just because you have over-inserted the filament, as explained above).
The extruder will then continue purging the filament approximately 50 mm more (but at a low speed) to clean the nozzle and make the new filament come out of the nozzle.
When the purge is finished, it will beep once more, and you should immediately pull the extruded/dirty filament hanging from the nozzle before the hotend goes down and continues printing the object from the point starting the next layer. Otherwise this trash filament may stick to your object and cause problems in due course.
The printer will now print with the new filament as usual until the next filament change layer is reached (if any) or finish printing the object as normal.
TESTING:
You can test filament changes (PLA to PLA) by running the attached FC_Test_Cube.gcode where you will experience 3 filament changes during 1 small print. 1cm X 1cm cube, total print time 9 mins (excluding filament change processes).
Finally, I would highly recommend to you to print and use my "Double Spool Holder (PIP) for Ender 3 Series" project which makes the filament change much easier.
Download it free from https://www.thingiverse.com/thing:6003353
In case of questions or concerns please let me know.
Happy printings :)
:format(webp)/https://fbi.cults3d.com/uploaders/16688082/illustration-file/1d07580e-58d1-4476-b436-e8cf53814134/G-Code.jpg)

/https://preview3d-images.cults3d.com/3hce99mc2k14m4ngaqdc7exveecy)


