Time for one of the big projects I teased on my Instagram for a bit! A Custom Big Buckle from Kamen Rider Geats that fully works in the Desire Driver!
CONTEXT: One of my favorite things to do with modern rider is, if I want to make an original character, I use an already existing item to create them sense modern rider has a pension for introducing a LOT of gimmicks early on in the show and then discarding 90% of them after the first power up.
Originally, this was just a personal project I was doing and even then it was just going to be art.
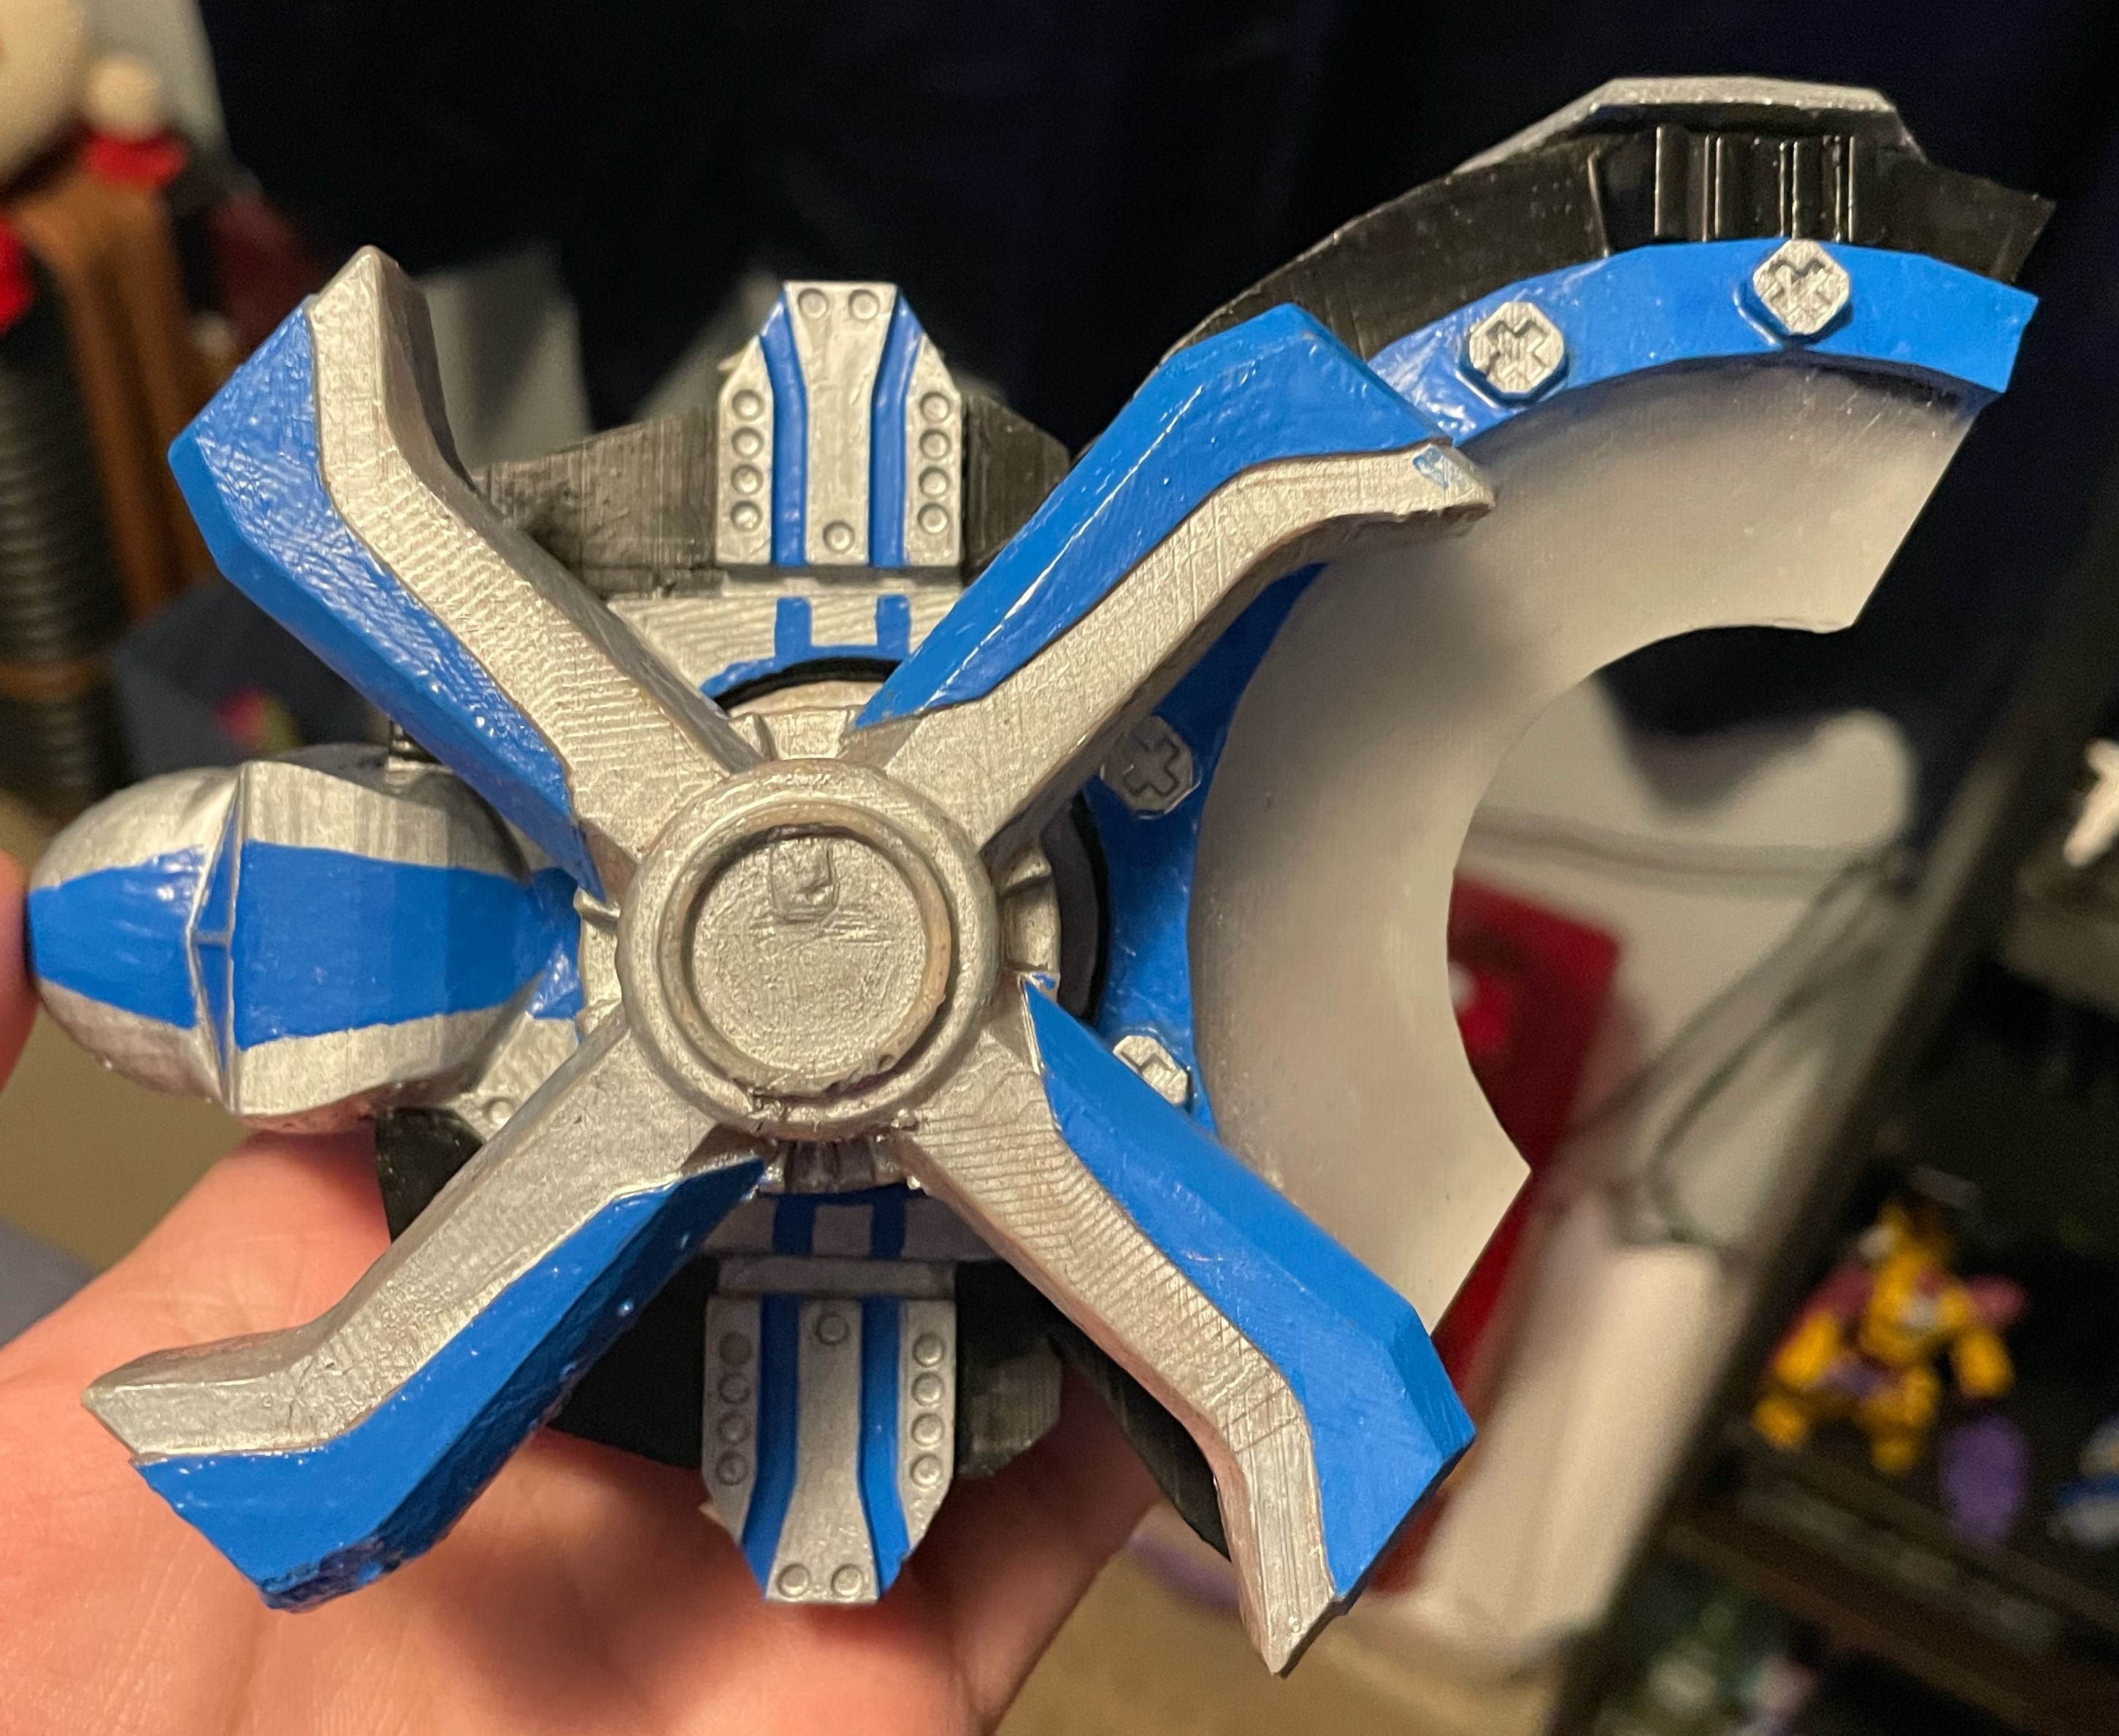
The idea was simple, deriving from the comment from Geats that every Rider in the show has a buckle they are most compatible with and can use better then others, that led down the rabbit hole of designing Riders based the underused Small Buckles, and then further led to making Large Buckle versions of them, which led me to now with the Heli Propellor Buckle which I initially designed for my own character.
But with how much time and effort I put into this, I thought I would share it with the rest of the community. One of the things people loved about the Desire Driver was the customization with the things you could put on it, so now this can add further customization to it!
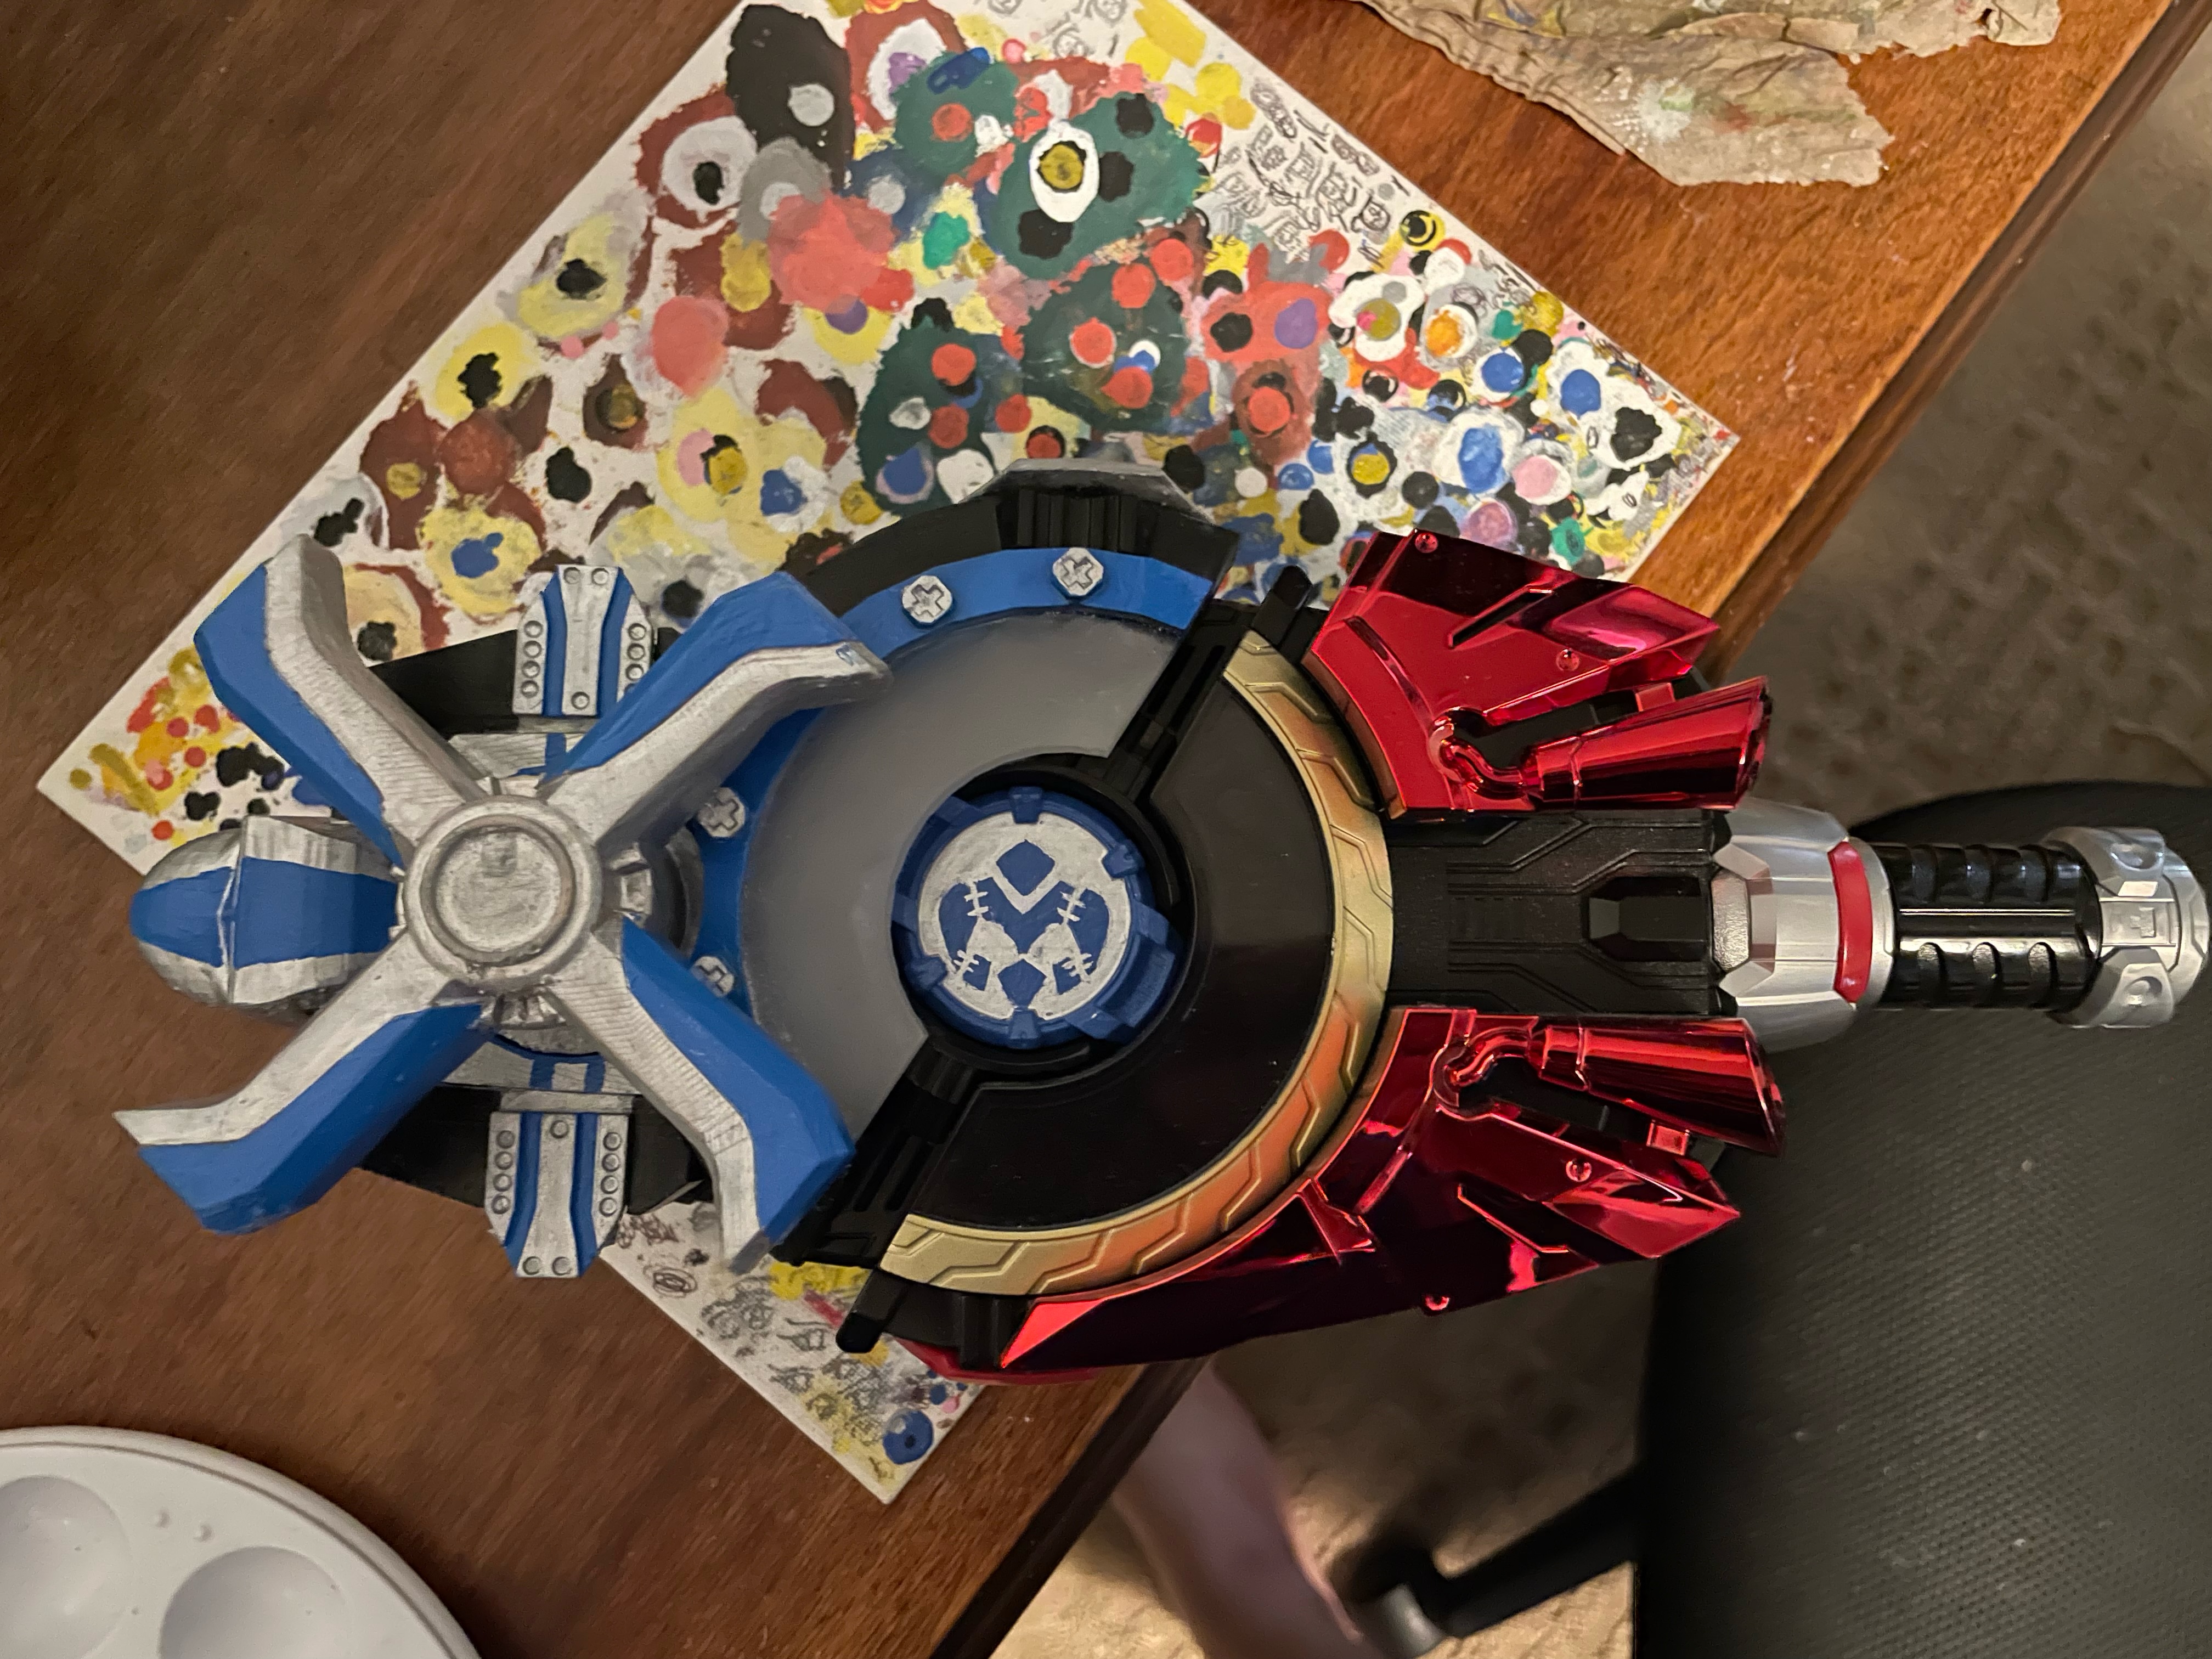
COMPATIBILITY: As already stated, YES, this buckle 100% works in the DX Desire Driver and reuses the Armed Propellor Rail Code, so those will be the sounds coming out of the belt with it. There shouldn't be any issue of it working with other items, but I do not currently own them to test. So I cannot 100% confirm how well this buckle would fit in the Magnum Shooter 40X or the Glare Driver.
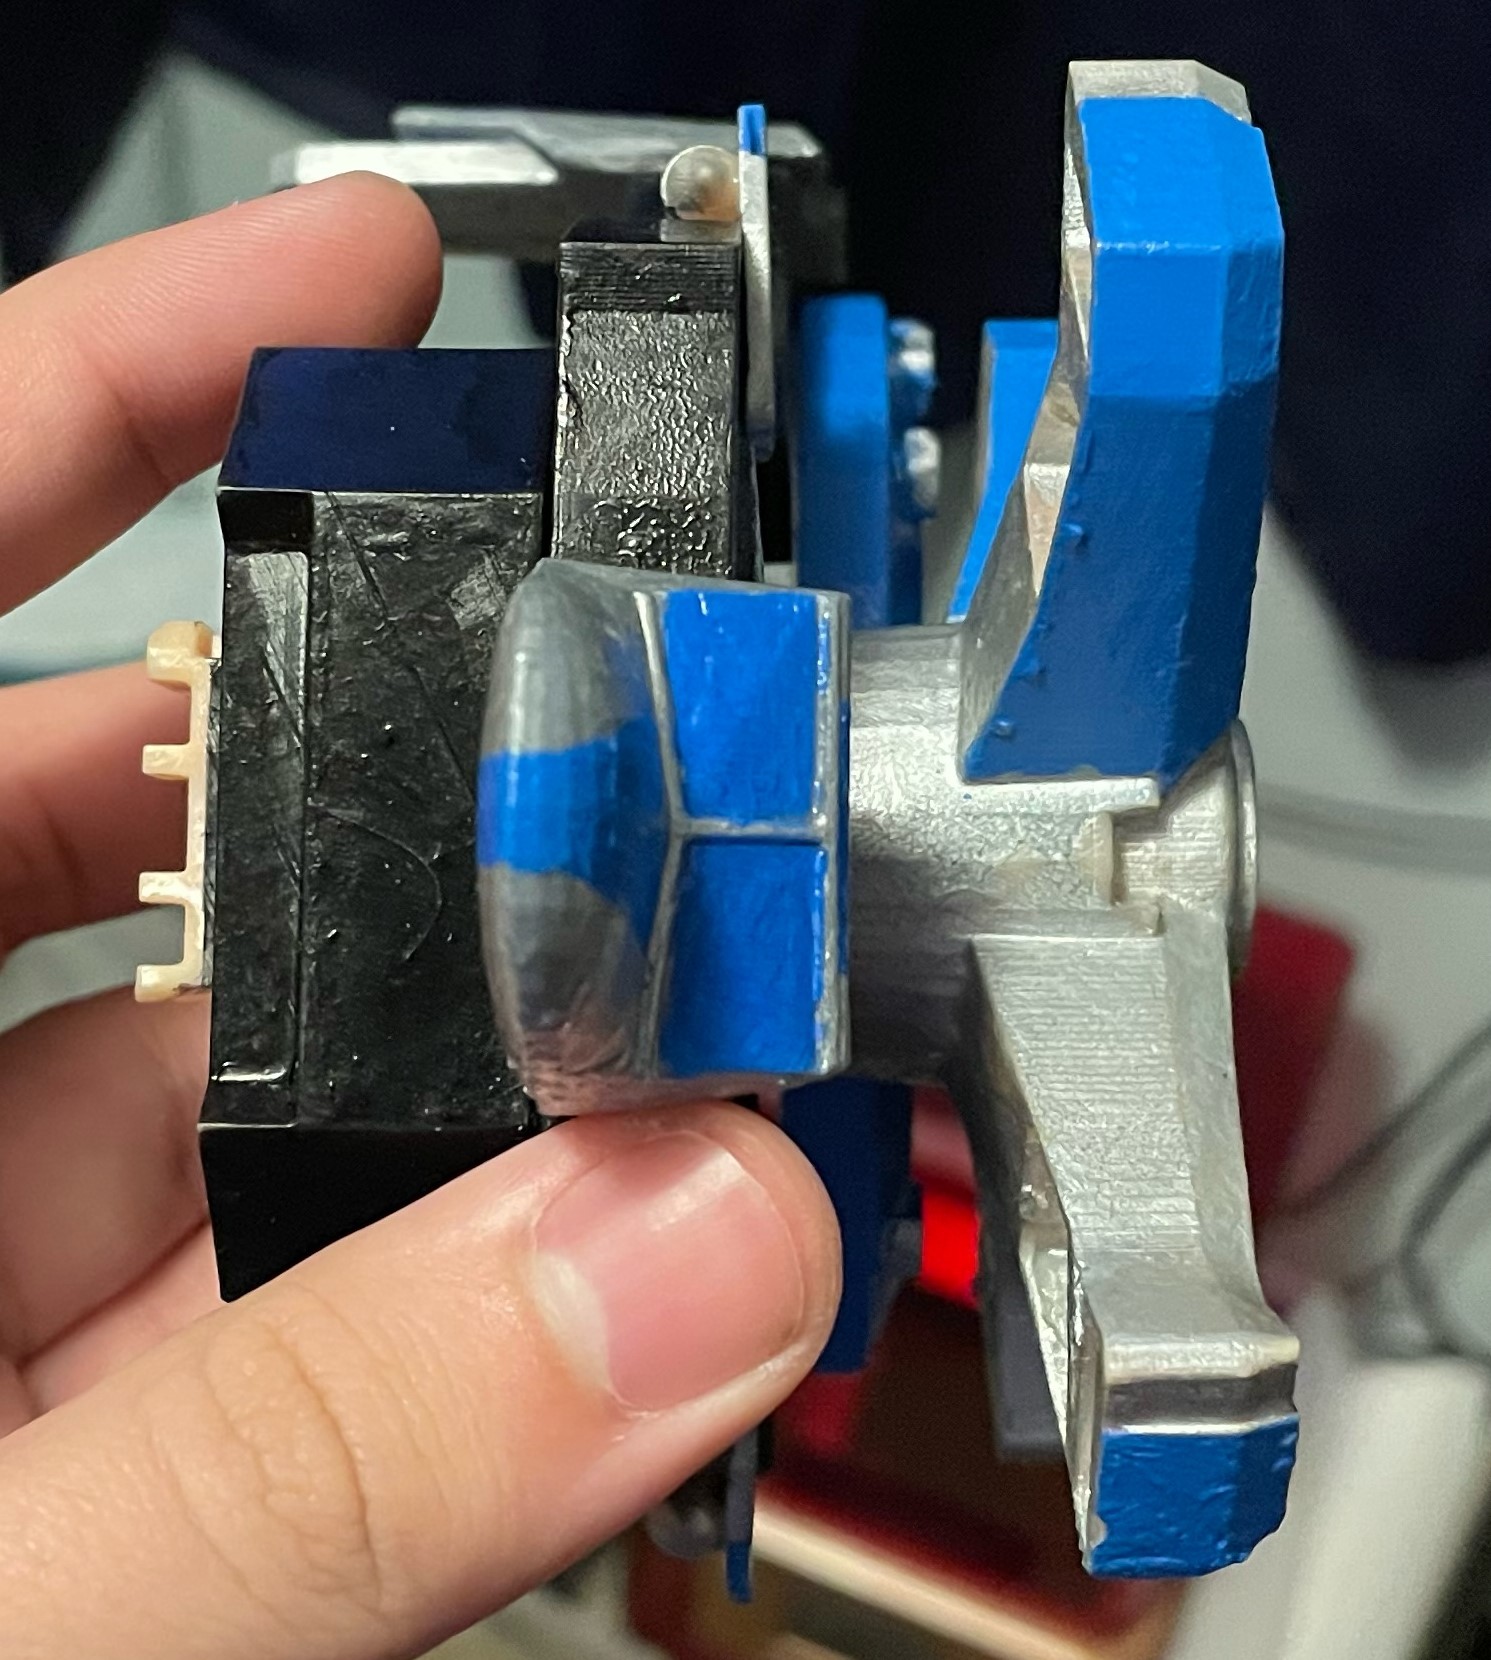
PARTS & ASSEMBLY: When purchased, you will receive 9 separate models that comprise of 10 total parts. I did not design this with screws in mind so you will have to use something like super glue to get everything together EXCEPT for the Propellor Piece.
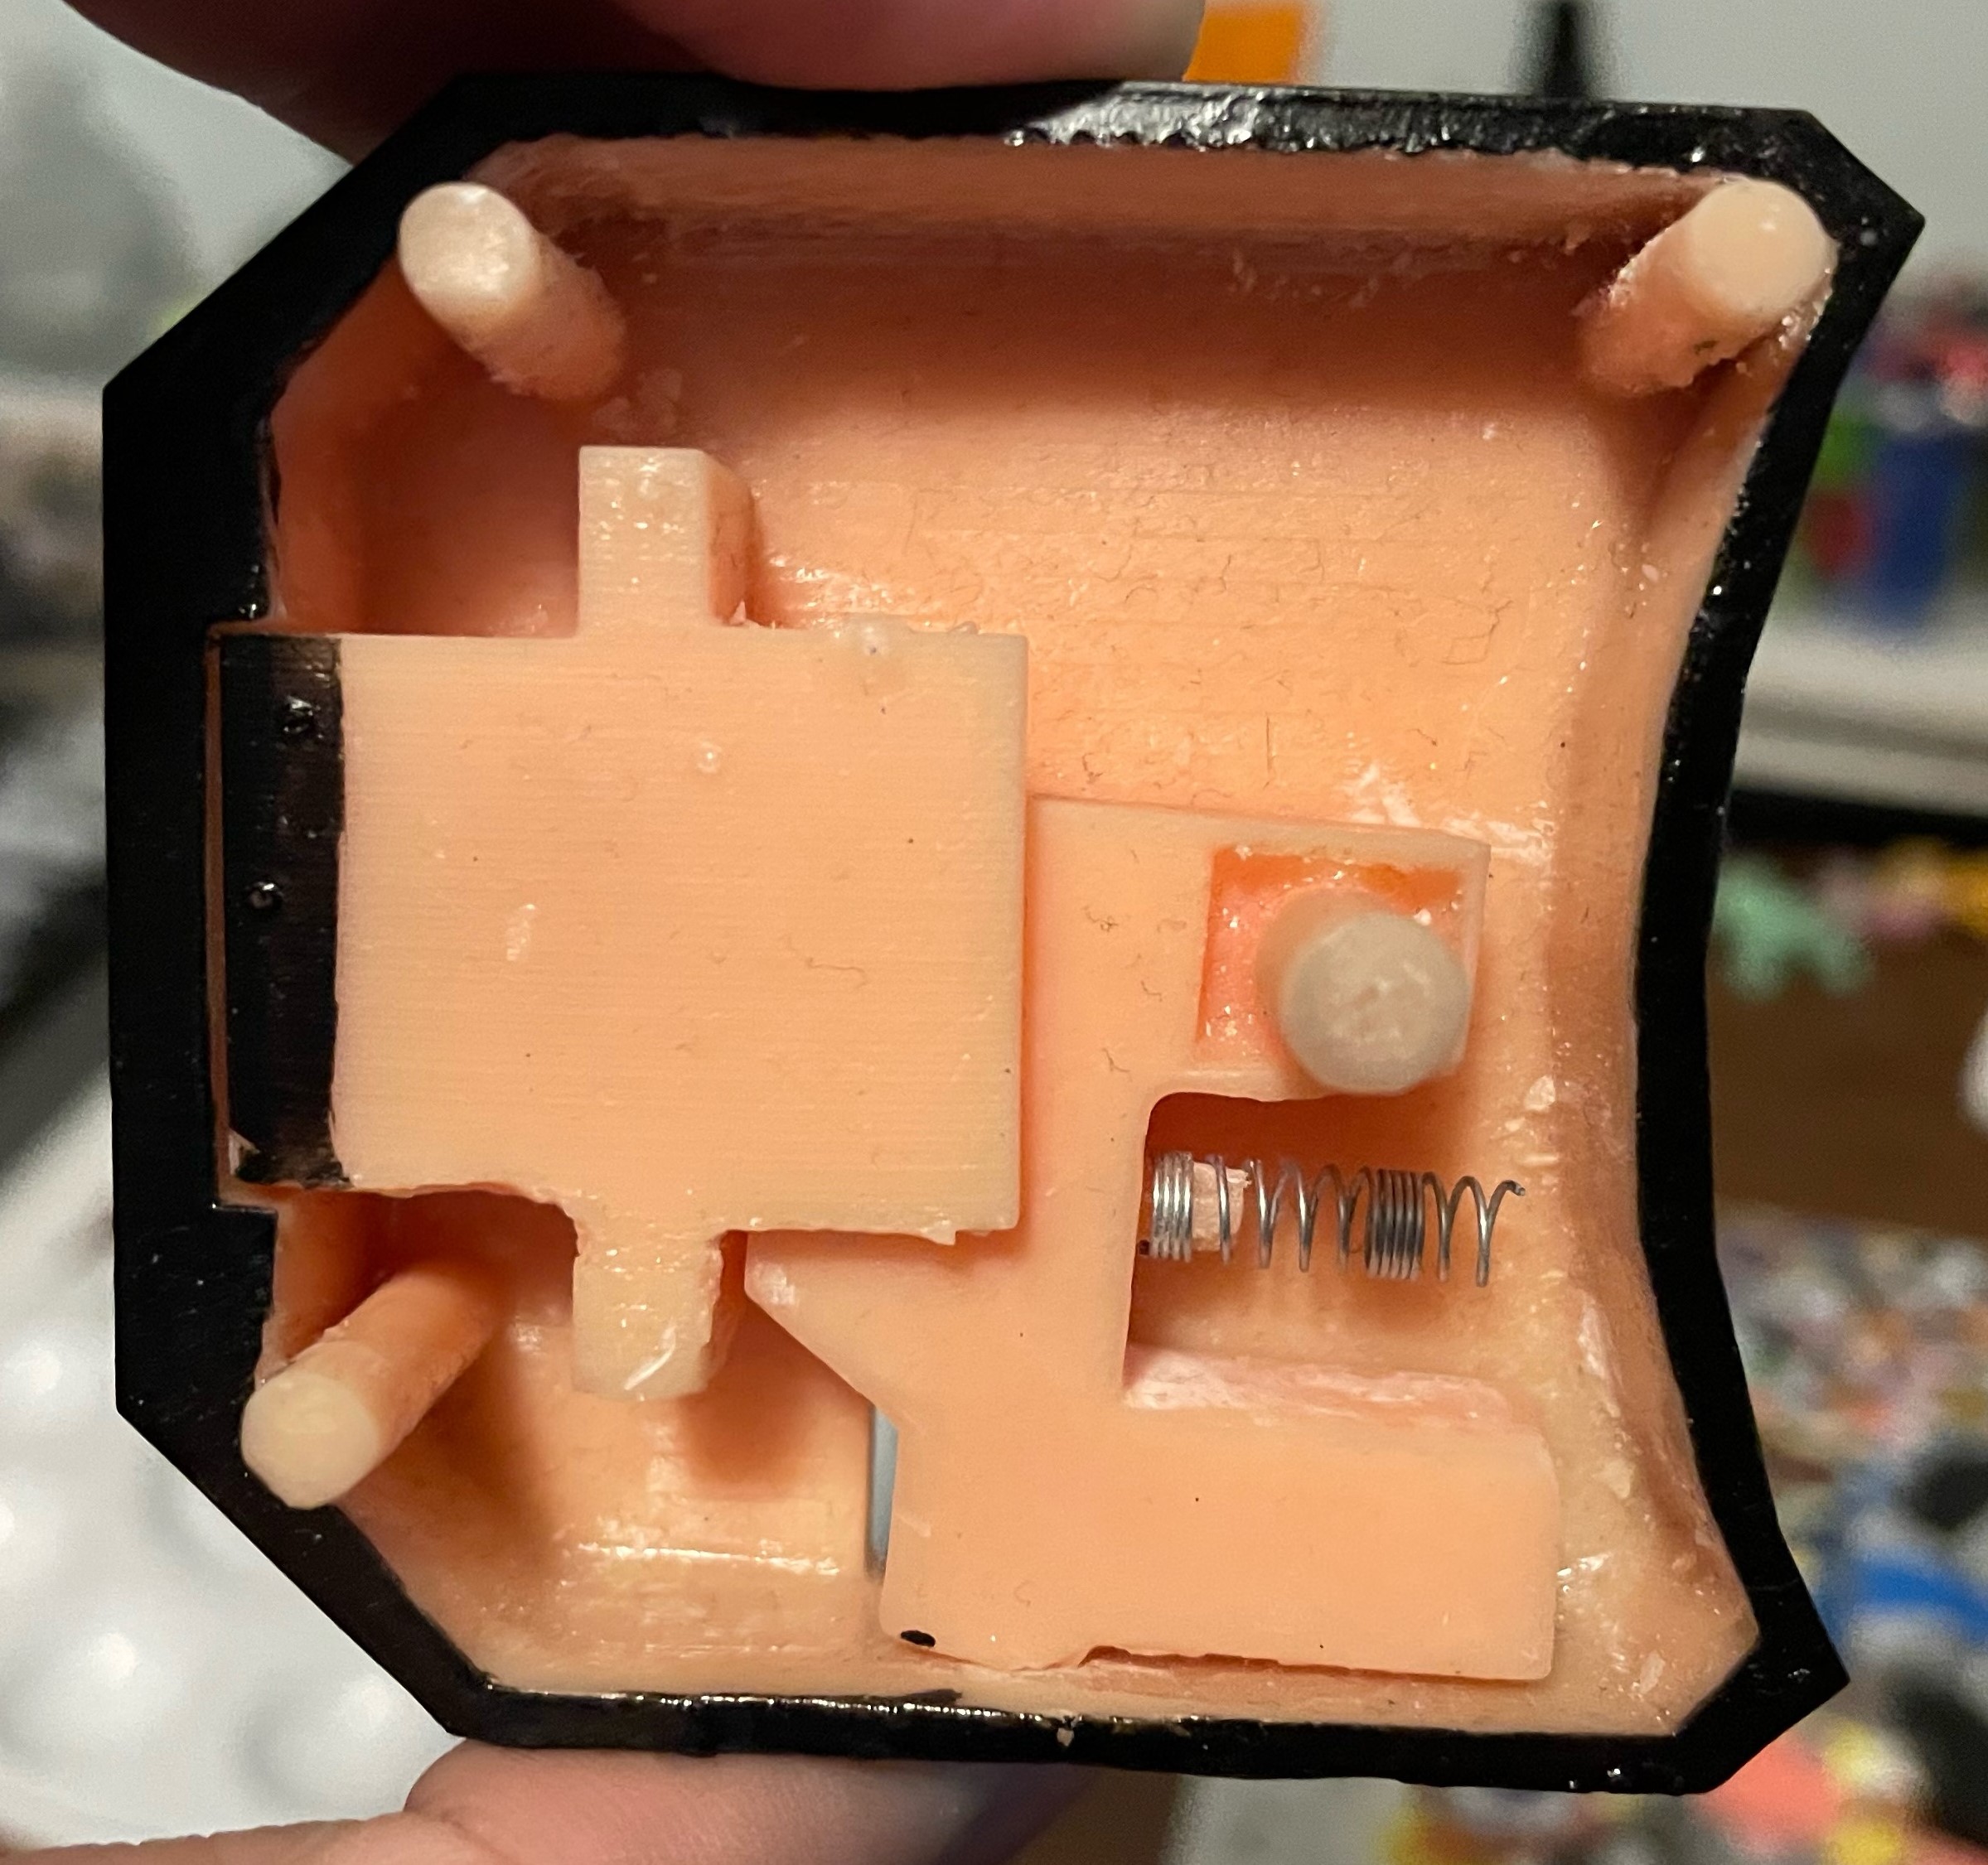
THIS IS CRUCIAL, along with the printed pieces, you will need TWO additional items. First, a 0.4cm spring or anything close to that size that will need to be put onto the plus shaped component of the Inner Part, this will allow the Propellor portion to spring back into its normal position when turned. You can get a spring like this very easily from dismantling a mechanical pencil or pen.
Second piece you'll need is a single 1.55mm diameter metal pin meant to slide into the back of the Propellor piece and through the Front Portion piece, this is what allows the Propellor to rotate while still staying attached to the rest of the buckle. You very easily get one of these by knocking it out of an old action figure that uses pins, or get a small bag of 100 of them off Walmart's website.
ASSEMBLY INSTRUCTIONS: If you are painting this buckle like I did, best idea is to do it before assembling.
1.) Take the thin portion of the piece labeled "Inner Part 0.4cm Spring Ver." and slide it into the hole of the piece labeled "Back Inside". DO NOT GLUE THESE PIECES TOGETHER. Make sure your spring is already attached.
2.) Align and place these pieces together into the piece labeled "Back Piece and Rail". You will know when you have done this correcting when the "Back Inside" piece sits flush in a square slot, (NOTE: This piece will be glued into the slot with the other piece still attached, but hold off on this for a moment) and the block portion of the "Inner Part 0.4cm Spring Ver." slides into the hole in the back near the rail.
3.) Slide the piece called "Front Section" onto the three pegs sticking out of the "Back Piece and Rail" (Again, this will be glued to the back piece, but please hold off for a moment) If there are issues getting it on, check to see if your spring is fitting into the slot on the "Front Section" piece, you may need a smaller spring.
4.) Take the piece labeled "Propellor Piece", with the metal pin attached, and slide into the tiny hole in the middle of the "Front Section" piece. It'll be a tight fit, so you may have to apply a bit of pressure, but be careful not break anything. Also make sure the U-Shaped portion under the "Propellor Piece" is aligned with the square hole and peg poking through the "Front Section".
5.) FROM HERE, BEFORE DOING ANY MORE ASSEMBLING, TEST HOW WELL THE PROPELLOR TURNS AND HOW IT ACTIVATES IN YOUR DRIVER. This is CRUCIAL to do before you start super gluing anything, as if something misprinted or a part is too weak, or broke, then you still have chance to replace things. ONCE YOU ARE HAPPY WITH HOW PARTS ARE TURNING OUT AND THAT THE BUCKLE IS WORKING, YOU ARE FREE TO SUPER GLUE AND MOVE ON TO STEP 6.
6.) Slot in the "Wing Pieces" into the top and bottom square holes of the "Front Section". May or may not need super glue also.
7.) Take the piece labeled "Top Piece" and slot it and glue it into the hole on the big portion of the piece labeled "Black Back Circle"
8.) Take the two components that make up "Black Back Circle" and super glue them TIGHTLY to the two holes on the sides of the "Front Section" piece. If you have a big enough printer, possible print these two pieces together as one big piece.
9.) Finally, take the piece labeled "Clear Circle", align it with the edges of the "Black Back Circle" with some superglue, and your Heli Propellor Buckle is complete and ready to Henshin!
I'll be honest, this is something I was planning to do since around the first few episodes of Geats, and I was hoping to catch the hype train for it, but this took a lot of effort from me while also balancing IRL problems. That being said, despite (at the time of writing) us about to reach the episode 40s and Geats Final Form about to debut, I hope people still enjoy this little creation I made!
This may not be the last buckle I make by the way, I've already had some design ideas for a few other, including some for the unreleased Small Buckles.
Stay tuned everyone and have a great day!
-EvanArtist
:format(webp)/https://fbi.cults3d.com/uploaders/24905231/illustration-file/58f67148-dca7-4fcf-a9d1-c864cab116d5/image2.jpeg)

/https://preview3d-images.cults3d.com/ywy7as46q7a4wsqql0z8vn7v9uln)
/https://preview3d-images.cults3d.com/4znp6zx2c2h6ppwow5jwebpg59rm)
/https://preview3d-images.cults3d.com/dy4izw5h7qtrbr3n0qqlsx306f3i)
/https://preview3d-images.cults3d.com/n1k0osgns0lap8rn9zc4jsw2prx2)
/https://preview3d-images.cults3d.com/vf92xn6291snurzkqh8j1i0bhbka)
/https://preview3d-images.cults3d.com/qq46x83vjsr2gjacx9nlnsctr5lv)
/https://preview3d-images.cults3d.com/yps3v08xyb39w3wymnegetcby8mj)
/https://preview3d-images.cults3d.com/bjj1y3a3xhtwm9wg60fcxbinnk6s)
/https://preview3d-images.cults3d.com/fm2v8120ro7zk3c3natnililbbpk)


