If your Bowden acts like mine, the Teflon tube never seems to stay tight in the small push lock brass fitting. Even with the little printable clip that forces the plastic ring to stay up...over several prints it would eventually wear a groove in the Teflon tube and keep chewing it up. Or sometimes the grippers just don't grip well at all.
That problem is a thing(iverse) of the past. Not being happy with clamp type locks that squeeze the tube, I looked at the solution a little differently. I discovered that a #10-24 Nylon lock nut would lightly thread on the Teflon tube. It would slip, but had good friction without squeezing the ID of the tube. Two nuts was good, and probably enough, but I added a third and found I could not slide the three together down the tube....BINGO!.
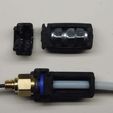
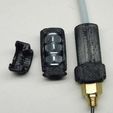
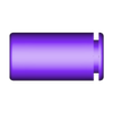
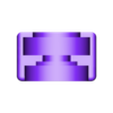
From there it was a simple matter of figuring out how to mount them. Borrowing from the original Bowden fitting clip, I jumped into Fusion 360 and designed a clip that holds onto the Bowden fitting (keeping the release tab fully in the up/out position) and also clips on the "Friction Body". The Friction Body is just a cylinder containing the three nuts that the tube passes through. The clip holds the two together.
If you have to do both ends of the tube, you will need x2 each printable and x6 #10-24 Nylock nuts (or possibly a metric equiv). Print the parts as oriented in the STLs (verify by looking at layer lines on mine). These parts must be layered this way for strength.
Mine are printed in Amazon Basics PETG with an .4 nozzle and .2 layers.
1) When parts are finished printing, pull your filament if you intend to install these parts immediately. It saves you from having to heat it up for a pull later.
Clean the parts up well. You want the clip to fit easily, yet snugly on the Friction Body groove. A little work with some fine sand paper and jewelers/tech files can be expected. Nothing too bad. Just make sure the groove is clear; and you can lightly sand the top surface of the clip to get an exacting fit. Clean the clip well and make sure there's no 'boogers' or anything to mess up or block clip insertion. The open end of the clip should be roughly flush with the 'back' (flat side) of the Friction Body when fully seated.
2) The holes for the Teflon tube at each end of the Friction Body are 4.5mm. Depending on the accuracy of your printer you may need to take a rat tail (round) file to them to make sure the Teflon tube slides through with ease. Use a small spare/left over section of tube for testing.
3) Once the Teflon tube slides through the two holes easily it's time to insert the nuts. They are tight, and they are a b!t@#. Well, only the last one is really tough. Use some sliding "Channel Lock" pliers and a small piece of leather (or similar, for plastic protection) and press/squeeze the last one in. It should be noted that the nuts fit in so that there is a 'peak' pointing out (look at picture, all peaks are lined up). The inside of the Friction Body is hex shaped. Be sure you put them in correct.
Did I mention it is TIGHT? Expect it. I don't want to hear about it. It should be. Like a jock strap, this thing fails it's purpose if your nuts are left flopping around.
4) A little more work with the rat tail (round) file may be necessary here. Look through the tube holes of the Friction Body and through the inserted nuts. They should line up. You might need to oblong the holes slightly in the plastic for this to happen. Fit is right when you can thread the whole Friction Body with nuts onto your test section of tube AND slide a test section of filament through with ease. Note that a small square of sand paper wrapped around the tube makes it grip-able again so you can hold on while threading the body on.
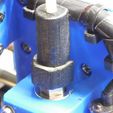
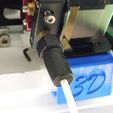
5) If you have a spare brass fitting, you might as well make sure it all fits together like in the pics. Note that in my pictures, the assembly on the bench has slightly different clips than what ended up on the printer. Just a design revision you don't need to bother over.
6) If you have not already removed the filament from your printer, now is the time to heat it up. Make sure both ends of your real, actual Teflon tube (as opposed to your test section) are fully seated in their fittings, installed on the printer (without nifty new parts). You need to mark the location where the tube enters the fittings at both ends. Some extra sticky tape like gorilla tape will make a temporary ring. Once marked carefully remove the Teflon tube so that you don't accidentally slide the tape.
7) Measure from the ends of the tube to your markers. Make note of the measurements. You can remove markers.
8) Take your ready to install Friction Bodies and thread them onto the tube ends. Remember sand paper wrapped around the Teflon tube makes a great grip aid. Be sure to install the Friction Bodies with the grooves out, or towards the brass fitting! Screw them all the way so that all the tube exposed from the end of each Body matches your respective measurement for each end.
9) Insert Teflon tube back into your Hot End fitting and extruder fitting. You want the ends (of the Friction Bodies) with the grooves butted up against the plastic retainer clips of the brass fittings.
10) Turn the Bodies so that the nuts are not visible and install the clips as shown in pic.
11) Re-feed filament and make sure you have a free moving system.
Done. You might need to tune retract settings a little. But you will no longer be chasing a loose Bowden tube and the problems that they present!
Peace Brothers and Sisters.
Four months later UPDATE #1- I've put 2 spools through my machine since installing these. No problems to report. I changed to a Capricorn tube and it holds that tube just as well. I'm still using my first set.
UPDATE #2: Member @NotAnExpert discovered that four 10-24 regular nuts (not nylocks) fit in the friction body and serve the purpose just as well. Be sure to look at the pics NotAnExpert posted in the comments section and read what they had to do to make this work. Thanks NotAnExpert!
UPDATE #3: 10 months later - Just a quick note to say after miles of filament, probably tens of thousands of retract cycles and too many spool changes as well as hot and cool pulls to remember....I am still using the first one I made. No tube slippage. Take that!
Print Settings
Rafts:
No
Supports:
No
Infill:
100%
Notes:

Because these are small I used a 1.2mm brim for sure part adhesion.

/https://fbi.cults3d.com/uploaders/26280286/illustration-file/3878fb1a-3981-4cf1-9ef6-f8775f88dbf6/Parts_2.jpg)
