Skip to content

Return to Dark Tower Quest Markers

Advertising
Advertising
?
Creation quality: 5.0/5 (1 vote)
Evaluation of members on the printability, utility, level of detail, etc.

  • 1.2k views
  • 4 likes
  • 5 downloads
  • 1 comment

License
3D design format
PDF and STL Folder details Close
  • C_Adversary.stl
  • C_Companion.stl
  • C_GuildInn.stl
  • C_MainGoal.stl
  • Caravan.stl
  • Cave.stl
  • Fortress.stl
  • Ruins.stl
  • Shrine.stl
  • Sign9.stl
  • Signs9.pdf
  • Tent.stl
  • Tomb.stl

Learn more about the formats

Publication date 2023-10-14 at 13:16
Design number 1513523

timpow

3D printer file info

3D model description

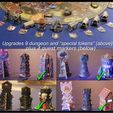
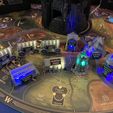
Unique and immersive upgrades for the cardboard goal and quest markers that come with the Return to Dark Tower board game and its Alliances expansion. Each can accept a mini-LED light (you can purchase online) that can be inserted to the models to add more atmosphere.

Lights:
You can purchase your own lights to insert into the models during play. Each 3D model features a space to insert a mini-LED light. Most are inserted vertically, a few are horizontal (Caravans, Cave) – they don’t snap into place, you just put them in, hold them in with your finger while placing the model, and they stay in place with the weight of the model when you put it on the board. You can ask me for a current Amazon link, or just search for "mini LED balloon lights" and get ones that look like the photos included with my painted sets. The dimensions you should look for are around 1.6” tall by .6” diameter, and the shape should be like a bullet.

Credits for some of the remixes:
Allen Kitching https://www.thingiverse.com/kitch72/designs
Evan Carothers https://www.thingiverse.com/ecaroth/designs
Kevin Michielsen https://www.thingiverse.com/mojox57x/designs
Arian Croft https://www.thingiverse.com/dutchmogul/designs
Charles Gattie https://www.thingiverse.com/leominorindustries/designs
Tim Powell

3D printing settings

I suggest printing these at .20 layer height. It might help to print with a brim for adhesion if you have problems. No supports should be needed. The labels (signs) adhere to the models, the PDF for the signs should be printed, laminated, cut to size then adhered to the 3D printed signs with thinned white glue. Once dry, adhere the signs to the models with a dab of glue gun on the back (or find your own method). Print one of each STL, except for the caravans, which will need 3 prints (North, East, West).

I can't guarantee that these will work with all slicers, but they work well in Cura, the slicer I use.

Advertising


Issue with this design? Report a problem.

Would you like to support Cults?

You like Cults and you want to help us continue the adventure independently? Please note that we are a small team of 3 people, therefore it is very simple to support us to maintain the activity and create future developments. Here are 4 solutions accessible to all:

  • ADVERTISING: Disable your banner blocker (AdBlock, …) and click on our banner ads.

  • AFFILIATION: Make your purchases online by clicking on our affiliate links here Amazon.

  • DONATE: If you want, you can make a donation via Ko-Fi 💜.

  • WORD OF MOUTH: Invite your friends to come, discover the platform and the magnificent 3D files shared by the community!


Sharing and downloading on Cults3D guarantees that designs remain in makers community hands! And not in the hands of the 3D printing or software giants who own the competing platforms and exploit the designs for their own commercial interests.

Cults3D is an independent, self-financed site that is not accountable to any investor or brand. Almost all of the site's revenues are paid back to the platform's makers. The content published on the site serves only the interests of its authors and not those of 3D printer brands who also wish to control the 3D modeling market.

100% secure payment by credit card, PayPal, Apple Pay, Google Pay, etc.
View all payment options.