Skip to content

10mm Fantasy City Tiles - Demo Tile

Advertising
Advertising
?
Creation quality: 5.0/5 (1 vote)
Evaluation of members on the printability, utility, level of detail, etc.

  • 1.2k views
  • 1 like
  • 31 downloads

License
3D design format
STL Folder details Close
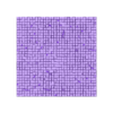
  • 10mm Tile Top - 12x12 Cobblestone.stl
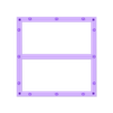
  • 10mm Tile Underframe - 12x12.stl

Learn more about the formats

Publication date 2023-10-17 at 04:31
Design number 1519123

3D printer file info

3D model description

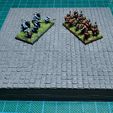
I wanted to build an urban city board for my 10mm scale fantasy wargaming, but couldn't find a set of cobblestone tiles that would print nicely at small scale with my crappy printer. So I designed some tiles instead!

These are designed for 10mm fantasy but would easily work for other small historical or fantasy scales, and could potentially be scaled up for larger scales. The default tile size is 12cm x 12cm, to correspond with a 12" by 12" equivalent size in 28mm scale boards.

One of my favourite things about these tiles is that they are modular - each tile has between 8 to 12 5mm ball magnets embedded inside, which allow the tiles to be connected from any side to any side, with a VERY satisfying snap together which holds them in place. Video: https://www.youtube.com/shorts/bd0zKW7qdFI

This set is a demo tile with basic cobblestones so that you can test it out before buying anything else (or just make a whole board like this?).

Paid files to enhance the set:
https://cults3d.com/en/3d-model/game/10mm-fantasy-city-tiles-pack-1-cobblestones-and-roads
https://cults3d.com/en/3d-model/game/10mm-fantasy-city-tiles-pack-2-canals-and-bridge
https://cults3d.com/en/3d-model/game/10mm-fantasy-city-tiles-pack-3-raised-and-lowered
https://cults3d.com/en/3d-model/game/10mm-fantasy-city-tiles-pack-4-cataclysm

3D printing settings

Tiles are printed in two parts - the underframe and the top. You will need to insert 5mm ball magnets (easily available in bulk, e.g. on AliExpress) into the underframe, then glue the top on using the guide nubs.

I used 0.2mm layer height for most of my tiles, with ironing on the tile tops to get a smooth surface.

On a basic Ender 3 the normal sized underframe took about 3 hours while the tile tops took about 8 hours.

Advertising


Issue with this design? Report a problem.

Would you like to support Cults?

You like Cults and you want to help us continue the adventure independently? Please note that we are a small team of 3 people, therefore it is very simple to support us to maintain the activity and create future developments. Here are 4 solutions accessible to all:

  • ADVERTISING: Disable your banner blocker (AdBlock, …) and click on our banner ads.

  • AFFILIATION: Make your purchases online by clicking on our affiliate links here Amazon.

  • DONATE: If you want, you can make a donation via Ko-Fi πŸ’œ.

  • WORD OF MOUTH: Invite your friends to come, discover the platform and the magnificent 3D files shared by the community!


Sharing and downloading on Cults3D guarantees that designs remain in makers community hands! And not in the hands of the 3D printing or software giants who own the competing platforms and exploit the designs for their own commercial interests.

Cults3D is an independent, self-financed site that is not accountable to any investor or brand. Almost all of the site's revenues are paid back to the platform's makers. The content published on the site serves only the interests of its authors and not those of 3D printer brands who also wish to control the 3D modeling market.

100% secure payment by credit card, PayPal, Apple Pay, Google Pay, etc.
View all payment options.