Skip to content

Melamine Edge Trimmer

Advertising
Advertising
?
Creation quality: 5.0/5 (3 votes)
Evaluation of members on the printability, utility, level of detail, etc.

  • 1.5k views
  • 7 likes
  • 14 downloads
  • 1 collection

License
3D design format
ZIP Folder details Close
  • Perfilador para tapacanto - Melamina 18-15mm.zip
    • Cuerpo Principal - Con tuercas.STL
    • Cuerpo Principal - Sin tuercas.stl
    • Traba para Cuchillas.STL

Learn more about the formats

Publication date 2023-10-20 at 17:13
Design number 1526460

3D printer file info

3D model description

I am building a new under counter, for my kitchen, in 18mm melamine Cedar Nature color, and I needed a tool to cut and profile the 22mm edgebanding,

so I decided to design it.

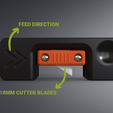
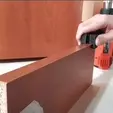
This profiler, designed specifically for 22mm edgebanding, uses 18mm cutter blades, ensuring a clean, precise cut with every use. Its design is comfortable to handle and reduces the possibility of errors when profiling.

Whether you're working on a personal project or are a professional woodworker, this tool will become a must-have in your toolbox. It's easy to print, assemble and, most importantly, gets the job done with the precision you expect.


Features and Specifications:

  • Thickness Compatibility:** Designed to work with 18mm and 15mm thick **melamine with 22mm edgebanding, making it versatile for a variety of projects.

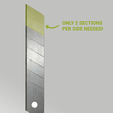
  • Blade Type: uses only two sections of 18mm cutter blades per side, to ensure a clean, precise cut.

  • Adjustable Guide: Allows fine adjustment depending on the exact thickness of the material you are working with.

  • Two versions available: one version for using self-drilling screws and one for using screw and nut.


β›”MODEL AVAILABLE FOR PERSONAL USE ONLY. DISTRIBUTION/COMMERCIALIZATION PROHIBITED.


Ensemble:

Main body with nuts:

βœ… RECOMMENDED FOR MAXIMUM DURABILITY.

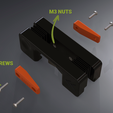
  1. Fit M3 nuts as shown in Image 6.

  2. Section only 2 links from an 18mm wide cutter blade.

  3. Place the blade into the "Main Body " until it stops at the top.

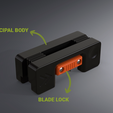
  4. Place the "Blade Lock " to secure the blade with 2 screws M3 x 12mm long.

REPEAT STEPS FOR THE OTHER SIDE.


Main body without nuts:

⚠️RECOMMENDED IF YOU DO NOT HAVE M3 BOLTS/NUTS. PLASTIC BOLT HOLES MAY START TO DISTORT IN THE LONG TERM AFTER BLADE CHANGES WHEN BLADES SHOW WEAR.

  1. Section only 2 links of an 18mm wide cutter blade.

  2. Place the blade into the "Main Body " until it stops at the top.

  3. Place the "Blade Lock " to secure the blade with 2 screws 3.5mm x 12mm long - Locking Head.

REPEAT THE STEPS FOR THE OTHER SIDE.


That's it!

Thank you for taking the time to review my design. If you have any questions, comments or suggestions, feel free to get in touch.

I hope this tool will be of great use to you and make your projects more efficient and professional!

3D printing settings

Main Body (Both versions):** ** Main Body (Both versions):** Main Body (Both versions):** Main Body (Both versions):** Main Body (Both versions)

  • Printer: Creality Ender 3

  • Slicer: Cura

  • Nozzle: 0.6mm

  • Material: PLA Makerparts Black

  • Layer height: 0.32mm

  • Perimeters: 2

  • Filling: 10%

  • Speed: 50mm/s

  • Supports: No

  • Adhesion to printing plate: Skirt (Has good contact surface).

  • Estimated time: 2h 27min

  • Material required: 39g (13.06m)

Quantity required: 1


Blade clamps:** **

  • Printer: Creality Ender 3

  • Slicer: Cura

  • Nozzle: 0.6mm

  • Material: PLA Makerparts Orange

  • Layer height: 0.2mm

  • Perimeters: 2

  • Filling: 30%

  • Speed: 50mm/s

  • Supports: No

  • Adhesion to the printing plate: Border

  • Estimated time: 18min

  • Material needed: 3g (0.89m)

Quantity required: 2


For 0.4mm nozzles: **

  • No brackets are required.

  • Increase the perimeter to at least 3 walls.


*The print orientation is as it appears when the STL file is opened.

Advertising


Page translated by automatic translation. See the original version.
Issue with this design? Report a problem.

Would you like to support Cults?

You like Cults and you want to help us continue the adventure independently? Please note that we are a small team of 3 people, therefore it is very simple to support us to maintain the activity and create future developments. Here are 4 solutions accessible to all:

  • ADVERTISING: Disable your banner blocker (AdBlock, …) and click on our banner ads.

  • AFFILIATION: Make your purchases online by clicking on our affiliate links here Amazon.

  • DONATE: If you want, you can make a donation via Ko-Fi πŸ’œ.

  • WORD OF MOUTH: Invite your friends to come, discover the platform and the magnificent 3D files shared by the community!


Sharing and downloading on Cults3D guarantees that designs remain in makers community hands! And not in the hands of the 3D printing or software giants who own the competing platforms and exploit the designs for their own commercial interests.

Cults3D is an independent, self-financed site that is not accountable to any investor or brand. Almost all of the site's revenues are paid back to the platform's makers. The content published on the site serves only the interests of its authors and not those of 3D printer brands who also wish to control the 3D modeling market.
100% secure payment by credit card, PayPal, Apple Pay, Google Pay, etc.
View all payment options.