Skip to content

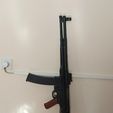
AGM StG 44 MKb 42(H) conversion kit (updated - read description)

Advertising
Advertising
?
Creation quality: 5.0/5 (1 vote)
Evaluation of members on the printability, utility, level of detail, etc.

  • 1.4k views
  • 2 likes
  • 7 downloads
  • 1 collection
  • 1 comment
  • 1 make

License
3D design format
STL Folder details Close
  • AGM STG44 MKb 42(H) conversion kit Mk. 2 Pt. 2.stl
  • AGM STG44 MKb 42(H) conversion kit Mk. 3 Pt. 1.stl
  • MKb Bayonet carrier Mk. 4.stl

Learn more about the formats

Last update 2023-11-19 at 23:26
Publication date 2023-10-22 at 11:30
Design number 1529802

3D printer file info

3D model description

Conversion kit for AGM StG 44. With the files I also provided a step by step tutorial with pictures as to how to install the kit.

Now with bayonet mount - experimental, kar98 bayonet might not fit - WIP

Assembly guide (with pictures):

Pic one - You will need the STG44 replica, two printed parts, a nail or something long and thin, and a hammer or anything that can serve as a hammer. In my case I had an axe hammer.

Pic two - First, you need to remove that muzzle part at the top of your barrel. You push that lever and unscrew it.

Pic three - Then you use a nail and a hammer to knock out the small metal pipe that holds the front sight on the barrel.

Pic four - This is what you get when you take out front sight and that small metal pipe. Don't lose them, we'll need them later.

Pic five - Position the fake ejecting rod like shown on the pic, so the holes are faced sideways.

Pic six -Put the first 3D printed part. You'll notice that part has the same holes as the mock rod, so you want to aling them so you can see the other side. If you can find a similar small metal pipe that's 2 cm long and 4 mm wide, you can put it in to mask the hole as well as further stabilize it (although it's not required).

Pic seven - You will also notice that the first 3D printed part has a cut in front where the front sight will be, and they are different lenght. Shorter lenght cut goes on top, and longer on bottom.

Pic eight - Put the front sight back in, and use the hammer to knock the small metal pipe in to secure the sight in place.

Pic nine - How it looks once the small pipe is in place.

Pic ten - Put back the muzzle part back on the thread of the barrel. With one hand or finger hold the lever while you screw the part with your other hand.

Pic eleven - Once the muzzle part is on, put the second 3D printed part and put it the way shown on pic. Adjust the height of it so the upper barrel is pararell with the bottom one.

Pic twelve - And that's it. The upper barrel will be tight in place. If you want to transform the now MKb back to the STG, you basically follow the same process backwards.

UPDATE: Last pic shows the gun with optics (files can be found on the internet, serves as a decoration only) and bayonet mount. You put the bayonet mount before the rest of the assembly. It's still experimental and might get updated, so keep an eye out for that.

3D printing settings

I don't have the exact measures, but I think it was 0.3 mm layer height, Brim, with tree supports. You can google how to set tree supports if you dont dont have them as a preset.

Advertising


Issue with this design? Report a problem.

Would you like to support Cults?

You like Cults and you want to help us continue the adventure independently? Please note that we are a small team of 3 people, therefore it is very simple to support us to maintain the activity and create future developments. Here are 4 solutions accessible to all:

  • ADVERTISING: Disable your banner blocker (AdBlock, …) and click on our banner ads.

  • AFFILIATION: Make your purchases online by clicking on our affiliate links here Amazon.

  • DONATE: If you want, you can make a donation via Ko-Fi πŸ’œ.

  • WORD OF MOUTH: Invite your friends to come, discover the platform and the magnificent 3D files shared by the community!


Sharing and downloading on Cults3D guarantees that designs remain in makers community hands! And not in the hands of the 3D printing or software giants who own the competing platforms and exploit the designs for their own commercial interests.

Cults3D is an independent, self-financed site that is not accountable to any investor or brand. Almost all of the site's revenues are paid back to the platform's makers. The content published on the site serves only the interests of its authors and not those of 3D printer brands who also wish to control the 3D modeling market.

100% secure payment by credit card, PayPal, Apple Pay, Google Pay, etc.
View all payment options.