3D model description
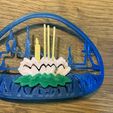
This is a new version of the insert made to snap into the outer part of the FLO mask.
The ring in this version is separate from the decoration that is in front of the filter.
This allows for color combinations and quick change of the decoration.
Update: a slightly improved version of the ring : V4-FLO-template-6a-ring
Update 2: The decoration is now slightly taller, to get a better fit in the snap-in ring.
This design is to commemorate the Loy Kratong festival in Thailand and has several motives like a temple, a Buddha image, a Lotus flower, incense stick and candle floating on the river. I has 4 x 3 layers of 0.3mm and 4 colors.
The details on different layer height allow for a color change when using the "change filament" option during the print when timed correctly. So it needs manual intervention!
Since the thicker versions are also slightly more stiff, they need to be formed around a round object such as a glass jam-jar, when still hot/warm from the print surface.
Please note that these designs are not from and also not endorsed by the FLO-MASK manufacturer.
The designs are my personal initiative and I make no claims about safety and functionality, they are purely for visual enhancement!
I have tested these inserts myself and have not experienced any increased difficulty with breathing.
The preferred material is PETG as that is considered food-safe, odor free, flexible and quite easy to work with.
The ring is printed flat and needs to be curved by hand. In my experience this works best when coming hot off the printer.
It can also be done afterwards with a hair-dryer or hot-air blower to make the plastic slightly flexible.
Place one corner into the mask and bend the the print so that the rim catches the mask all around. After cooling it will stay in that shape. Gently heat and push out the parts that have moved inwards, to make sure that the plastic is free from the filter material.
Attention:
please make sure NOT to overheat the FLO mask part! Although it is made from Poly-Carbonate and quite strong and heat resistant it is best to warm up the clip-in on a wooden surface before mounting it in the mask.
3D printing settings
Use PETG as it is quite strong and flexible in thin prints like this.
(ABS doesn't like bending and PLA can become brittle)
Print at 230-240 degrees and bed temperature at 75 degrees.
Tip: set the slicer to IRONING the top layer, as it is also the layer that the world sees ( unlike some of my earlier designs) and a smoother finish is preferred.
I personally like to work with a 0.6mm nozzle because it allows for easy adjusting of the extruded line, from 0.45 to even 1 mm (slower speed, higher temp) with good bonding results.
Because of the thin lines that need to connect strongly to each other, I prefer to OVER-extrude about 20-30%, so if your normal extrusion factor is around 1,00 then increase to 1,2 -1.35.
Slicer settings: I test the result in preview with variable extrusion thickness, to make sure that all perimeters and infill are bonding.
Edit: I have also tested normal extrusion @ 1.00 and that will work too, provided that the extrusion width is correct: Check in the slicer how the perimeters bond to each other and that there is no gap between inside and outside perimeters or the ring might split when released from the printing surface. I find that adjusting the extrusion to 0.65 or 0.60 instead of the automatic 0.72mm (6mm nozzle) can improve the perimeter adhesion.
At the moment my printing surface is Kapton tape on glass.

/https://fbi.cults3d.com/uploaders/13530103/illustration-file/ef8d5573-e71c-4afa-90a1-db3450665c29/IMG_9833.jpg)


