EASY 13 Printable Jointed Figure
EASY 13 Printable Jointed Figure


Print Profile(4)


Description
Easy 13 is now on a CC BY 4.0 license!
This means that you are free to share these files however you like, including selling prints, provided that you give proper attribution. You can give proper attribution by including this notice on your product page:
| EASY 13 Printable Jointed Figure © 2023 by Lucky 13 Toys is licensed under CC BY 4.0 |
Please help me build my identity as a creator by referring to this design by its original name. Don't pass off my work as your own product.
Want to support future projects with a one-time donation? Make a PayPal donation here!
—
This is my own work, originally uploaded to Printables.
Introducing EASY 13!
Easy 13 is the latest and greatest in my line of printable jointed figures. Did you like the idea of Lucky 13 but find it too frustrating to print and assemble? Wish that Mini 13 wasn't such a squat little fella? Easy 13 is here to help.
What's new?
The name says it all: Easy 13 is my attempt at making Lucky 13 much easier to print and assemble. Here are some of the improvements you'll see:
- Easier printing: Parts have been redesigned to avoid tiny tough-to-print areas. And for extra peace of mind, part sets are provided with optional “runners” that improve adhesion while being easier to remove than standard brims.
- Simpler design: The total part count is greatly reduced by doing away with the internal skeleton - I think you'll find that the new combined parts are even easier to customize!
- Stress-free assembly: Joint connections have been redesigned from the ground up to avoid stresses that often ended up breaking parts in the original model.
- Extra flexibility: Lucky 13 was already a yoga master, but Easy goes even farther! Check out those wiggly toes!
- Backwards compatibility: Easy 13 uses the same size ball joints as Lucky and Mini, as well as the same size hands. No need to adjust your favorite head and accessory remixes!
Printing guide
The part files come in three formats, so pick the one that works for you.
- Individual parts gives you each part as a separate STL for you to arrange and print how you like. If a file says “2x” or “4x,” make sure you print that many.
- Plated parts gives you everything you need in two files - just print both of them and you're good to go.
- Parts runners are the same as the plated parts, but with an added “runner” to help keep small parts from detaching from the bed. Print both files, and then snip the parts out using a hobby knife or flush cutter.
Print settings
These are the settings I like to use - I recommend starting here and then dialing in if necessary. This is for 100% scale and a 0.4mm nozzle.
- Material: ASA or PETG. (PLA is okay but you can expect your figure to go “limp” not long after printing. It can also be tougher to assemble. On the other hand, the small size of the parts means that warping is less of a concern, so this can actually be a pretty easy print with ASA even without an enclosure.)
- Layer height: 0.15mm (first layer 0.2mm)
- 20-30% infill (I like rectilinear for this)
- Slow down the first layer for better adhesion (~25% of default speed)
- 0.2mm elephant foot compensation (for better-fitting ball joints)
- Print external perimeters first (this is especially important if printing the parts on runners - it keeps everything together on the first layer.)
- No supports needed!
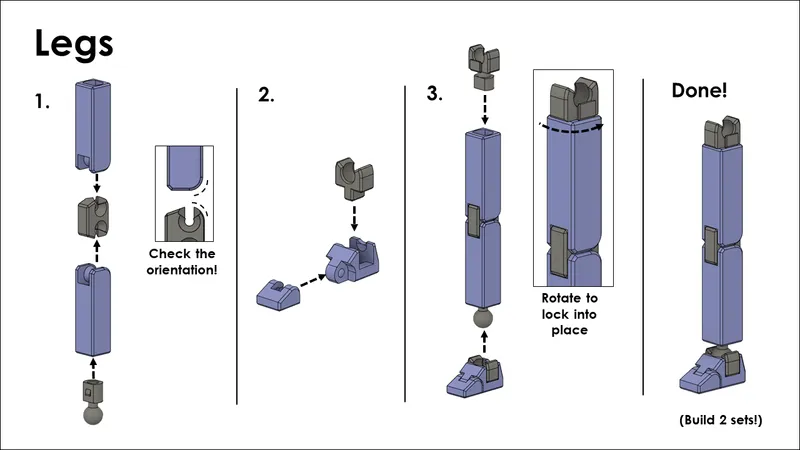
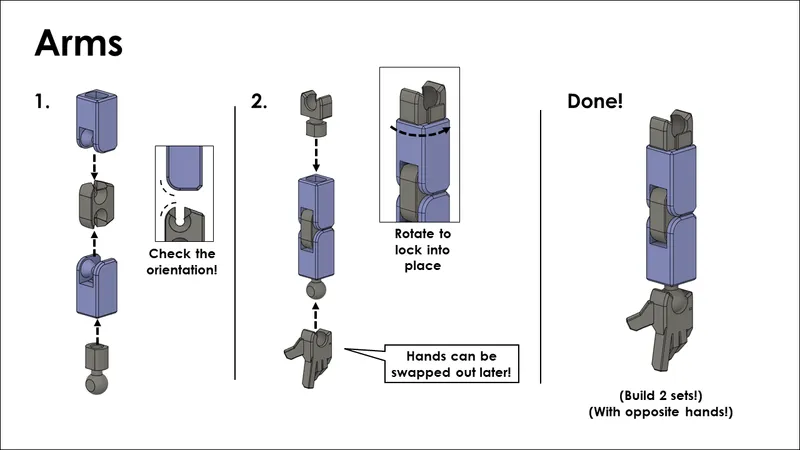
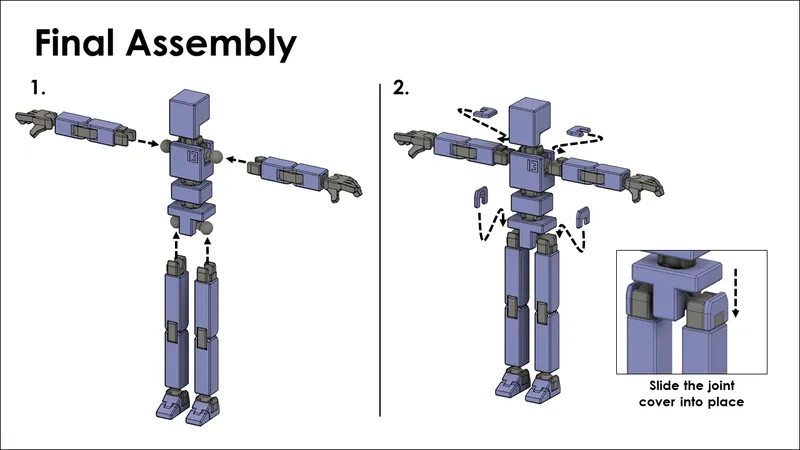
Assembly guide
The video and images below show how to assemble the figure.
All parts should snap or slide snugly into place - no tools needed! If something feels too tight, check that you have the right orientation before forcing it, and consider lightly sanding or filing things down.

Customizing
You'll notice that Easy 13 doesn't come with any accessories. That's because it's fully compatible with any handheld accessories for Lucky 13 and Mini 13. Check out Lucky 13's remix page and grab whatever catches your eye!
(Please note that I haven't vetted every single existing remix for compatibility. Most remixes that consist of an alternate head or a handheld accessory should be compatible. Alternate armors/"skins" will probably not be compatible without replacing entire body parts.)
You can find a compatible display base here.
…And of course you are absolutely encouraged to remix Easy 13 for yourself however you see fit! The simple body shapes are meant to be a jumping-off point for your creativity to shine.
More tips
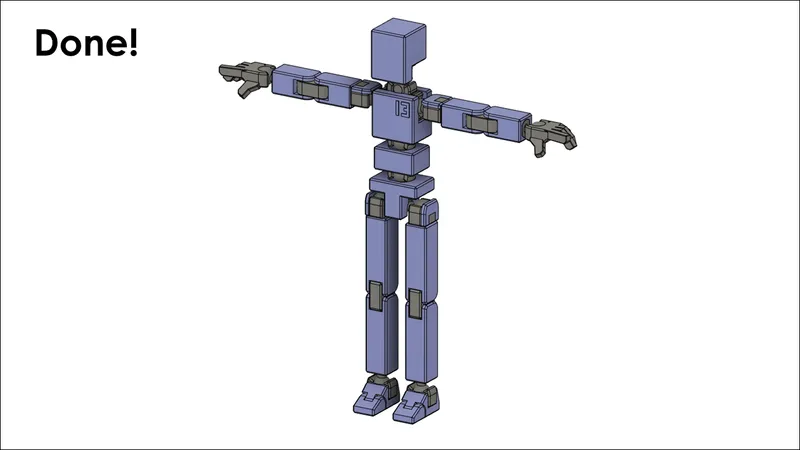
- Easy 13 is about 13cm or 5.2 inches tall when printed at the default scale.
- Printing a lot of small parts can be tricky. In my experience, the best way to keep prints from coming off the bed is to s l o w d o w n the first layer print speed!
- You can also try adding a brim, printing parts one at a time, and increasing the scale of the parts.
- The joints will inevitably get looser over time due to wear and the plastic relaxing. One solution is to disassemble the joint and apply a thin coat of super glue or clear nail polish to one side. Let it dry completely, then reassemble.
Enjoy!
I hope you have a great time with Easy 13. If you enjoyed this print, please consider making a donation here.
Comment & Rating (68)


