Skip to content

PNV57E night vision adapter to the Norotos Rhino NV helmet mount

Advertising
Advertising
?
Creation quality: 0.0/5 (0 votes)
Evaluation of members on the printability, utility, level of detail, etc.

  • 890 views
  • 1 download

License
3D design format
STL Folder details Close
  • OCHA3 PNV57E to Rhino mount part 1 v3.0.STL
  • OCHA3 PNV57E to Rhino mount part 2 v3.0.STL

Learn more about the formats

Publication date 2024-02-13 at 08:49
Design number 1784744

Ocha3

3D printer file info

3D model description

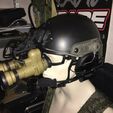
This model is an adapter to mount a Russian made PNV57E night vision device to a Norotos Rhino helmet mount. This unit has been used in Airsoft games, wildlife spotting, and hiking at night.

This build shown in the pictures has been around since 2017 with regular use, and still holding up fine! The print is very coarse since it was printed on one of the first comercially 3D printer kits from China, but that doensn't affect the function.

You will need to print:
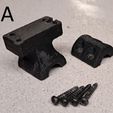
1x OCHA3 PNV57E to Rhino mount part 1 v3.0 (pic. A)
1x OCHA3 PNV57E to Rhino mount part 2 v3.0 (pic. A)

Other parts:
1x Norotos Rino mount (pic. B)
4x 3,0x16 imbus or dome head wood screw (pic. A)
1x PNV57E Night vision device (pic. C)

  1. Dismount the bottom part of the Norotos Rhino mount that is marked yellow. Retain the 4 bolts and the latch spring for the adjustment knob. This will deactivate the QD function to take the NV of the Rhino mount, but you can always take the whole mount of the helmet if needed.

  2. Place the latch spring in the opening in "OCHA3 PNV57E to Rhino mount part 1 v3.0"

  3. Mount "OCHA3 PNV57E to Rhino mount part 1 v3.0" to the Norotos Rhino mount using the original bolts

  4. Place the PNV57E on the mount like in the picture.

  5. Place part "OCHA3 PNV57E to Rhino mount part 2 v3.0", and tighten it down with the 4x 3.0*16 Imbus or dome head wood screws. Only very lightly tighten them, and feel how the PNV57E pivots. If it is too loose, tighten a little more untill you have the right friction for adjustment to your eyes.

3D printing settings

The mounts have been printed in a fibre reinforced filament. It is recommended to take the toughest material available to you. Also take a coarse layer heigth for a minimized number of interfaces between welded material, and take the most benefit of the fibres.

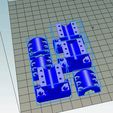
Exact print settings are unknown since the print has been made in 2017, and i've taken my build apart to show you how it was assembled. I found an old picture from our facebook site which shows how the model was oriented on the print bed. But I guess this makes sense.

Advertising


Issue with this design? Report a problem.

Would you like to support Cults?

You like Cults and you want to help us continue the adventure independently? Please note that we are a small team of 3 people, therefore it is very simple to support us to maintain the activity and create future developments. Here are 4 solutions accessible to all:

  • ADVERTISING: Disable your banner blocker (AdBlock, …) and click on our banner ads.

  • AFFILIATION: Make your purchases online by clicking on our affiliate links here Amazon.

  • DONATE: If you want, you can make a donation via Ko-Fi πŸ’œ.

  • WORD OF MOUTH: Invite your friends to come, discover the platform and the magnificent 3D files shared by the community!


Sharing and downloading on Cults3D guarantees that designs remain in makers community hands! And not in the hands of the 3D printing or software giants who own the competing platforms and exploit the designs for their own commercial interests.

Cults3D is an independent, self-financed site that is not accountable to any investor or brand. Almost all of the site's revenues are paid back to the platform's makers. The content published on the site serves only the interests of its authors and not those of 3D printer brands who also wish to control the 3D modeling market.
100% secure payment by credit card, PayPal, Apple Pay, Google Pay, etc.
View all payment options.