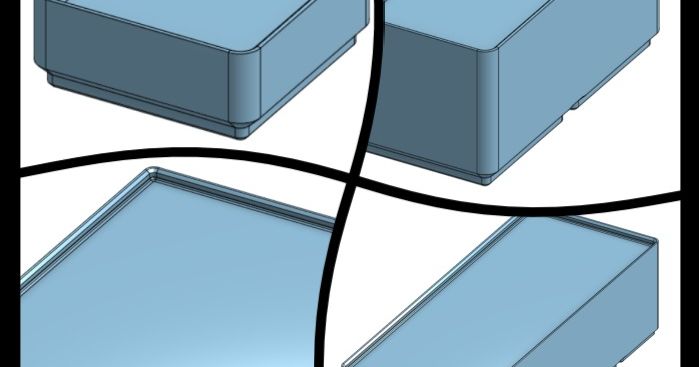
Gridfinity Bin 1x1 single compartment bin lid v1.0
Gridfinity Bin 1x1 single compartment bin lid v1.0


Print Profile(0)
No Print Profile yet. Add one to earn points.
Description
UPDATE 4/6/2024: There is an updated Version 2.1 of this model, which uses filament hinges. I recommend trying the filament hinge model over this version, since it is much easier to assemble. You can find the updated version at the link below:
https://makerworld.com/en/models/416342
This is a remix of Scheff's Gridfinity Collection Solid Bins for Customization (STEP Files), which was used as a blank canvas to design this 1x1 (6U high) bin with a lid. Big thanks to Scheff for posting the STEP file models, which are a huge help for designers! Also big thanks to Ch3vr0n for requesting this design, and the feedback, which helped to improve it!
This bin is designed to work with the Gridfinity Box For Stuff V2.0, and is 6U high with a 1x1U footprint, but it will also work with other cases which have a 6U bin height. The covers are intended to prevent the migration of tiny parts between the bins, when used in a case.
Safety and Assembly info:
Please protect your eyeballs and wear some safety glasses when assembling the door hinges. Clipping the paperclip wires with the side cutters can send the cut ends of the wires flying. If you make or assemble these, it is at your own risk.
If you cannot get the wire installed, STOP and investigate the print, since it should not take a great amount of force to install the wires, and you may have an issue with the print which is blocking the holes for the wire hinge.
Do not push too hard on the wire when installing the wire hinges, and always press against a solid surface (not your hand).
To assemble the doors, I used a couple medium paperclips (mine had a wire diameter of about 0.85mm and 1.05mm). I first straightened them so they can be used as hinge pins for the doors. I was also able to use 1.05mm diameter paperclips, however great care must be taken with the larger paperclip wires, since they require more force to insert (I used a pliers to install the larger wires).
To avoid a nasty poke if the hinge wire were to burst through the other side of the bin if using too much force, do NOT press the hinge wires in place if your hand or other body part is on the other side. The hinge wires do not go all the way through, there is about 1mm of plastic which stops the wire from going through, but if you press too hard it could bust through that 1mm wall and pop out the other side - and you don't want your hand in the way of that wire if it were to pop through during installation.
There are two versions of the model included. One uses a large paperclip wire as the hinge, and the other uses a 1.75mm filament as the hinge. If you use the filament hinge, I suggest using a filament for the hinge pin that does not get brittle easily (like PETG).
To assemble the doors, use a large paperclip or filament (my paperclips have a wire diameter of about 1.05mm), and straighten it so it can be used as hinge pins for the door. To install the door, the paperclip wire or filament is inserted from one end, and then pass it through the door until it stops (the wire will only go about 40mm). Then cut the wire or filament flush with some diagonal flush cutters (which come with most 3D printers). I used pliers to insert the wires, since they are a snug fit with the holes. Note that the wire or filament will not go all the way though the bin it has a stop on one end. I recommend using a drop of superglue to hold the filament hinge in place. Be careful to not use too much force when installing the paperclip wire so that you don't poke yourself with it.

If you intend to print the doors in one color, you can use the following files:
If you are using a paperclip wire hinge:
- 1x1x6u_covered_V4C_LID_w_TAB.STL
Or if you are going to use a filament hinge:
- 1x1x6u_covered_V4G_Filament_Hinge_LID_w_TAB.STL
If you want to print the tabs in a different color, then use the files listed below (load both together into the slicer together so they maintain their orientation). The tabs use an integrated hinge, so they need to print with the door (so load them into the slicer together). This way they are split into two models (tab and door) for multicolor printing (which makes coloring much simpler in the slicer).
Load these models together if you are using a paperclip wire hinge:
- 1x1x6u_covered_V4C_LID.STL
- 1x1x6u_covered_V4C_TAB.STL
Or if you are going to use a filament hinge:
- 1x1x6u_covered_V4G_Filament_Hinge_LID.STL
- 1x1x6u_covered_V4G_Filament_Hinge_TAB.STL
In Orcaslicer (others should be similar), you can load two or more objects together by dropping them together on the build plate and answering “yes” when it askes if you want to load the files as a single object. Doing this will maintain the orientation of the door and tabs which is required for them to print correctly.

The doors on the bins have room for a 9mm to 12mm wide Brother P-Touch Label (or smaller).
The STEP file is included, which has all the models used in this design.
I also included a folder named “1x1x6U Covered Bin - Filament Hinge Pin - Alternative 180 deg Tab” which rotates the tab by 180° so it will open in the same direction as the doors. I consider this change experimental, and am not sure it offers any benefit, so I am looking for feedback on this different tab design. If you have tried printing both versions of the lids, and feel one is better, please post in the comments and let me know.
Other stuff:
If you need some bins for small parts, the following bins with covers are a good option to use with the Box For Stuff 20 bin and 25 bin cases (or other 6U tall cases):
- 1 compartment 2x1 (6U) bin with a magnet pickup tool
- 1x1, 1x2 (3 Compartment) and 1x4 (6Compartment) bins with lids (6U) - version 2.1
- 1x2, 1x3, 1x4 (6U and 12U) Lidded Bin for Stuff with Latch Version 2.0
- 2x2, 2x3, 2x4 (6U and 12U) Lidded Bin for Stuff with Latch Version 2.0
- 3x3, 3x4 (6U and 12U) Lidded Bin for Stuff with Latch Version 2.0
If you want to check out my other Gridfinity cases, you can find them at the links below:
- Gridfinity Box For Stuff 20 bin (6U)
- Gridfinity Box For Stuff 25 bin (6U) (max size for a Bambu X1C/P1S)
- Gridfinity Box For Stuff 16 bin (6U) (Ender 3 size)
- Gridfinity Box For Stuff 16 bin - 12U deep version (Ender 3 size)
- Gridfinity Box For Stuff 2 bin (6U) (small test version)
If you want to store some small hardware and need some good labeled bins, Ch3vr0n posted some segmented bins for the Gridfinity system here:
https://www.printables.com/model/732655-gridfinity-boxes-for-gridfinity-box-for-stuff-20-b
If you find these models useful, please post a like or a comment with some pics of your prints.
You can find the other things I'm working on at my blog here. You can also follow me here or on Printables, to see what new stuff I post. If you would like to support my work, you can Buy Me A Coffee using this link:
https://www.buymeacoffee.com/mystoopidstuff
Thanks for looking!
Comment & Rating (0)
This remix is based on