Check your local laws before printing any airgun custom piece.
INSTRUCTIONAL VIDEO:
https://www.youtube.com/watch?v=dvCd7ujmsno
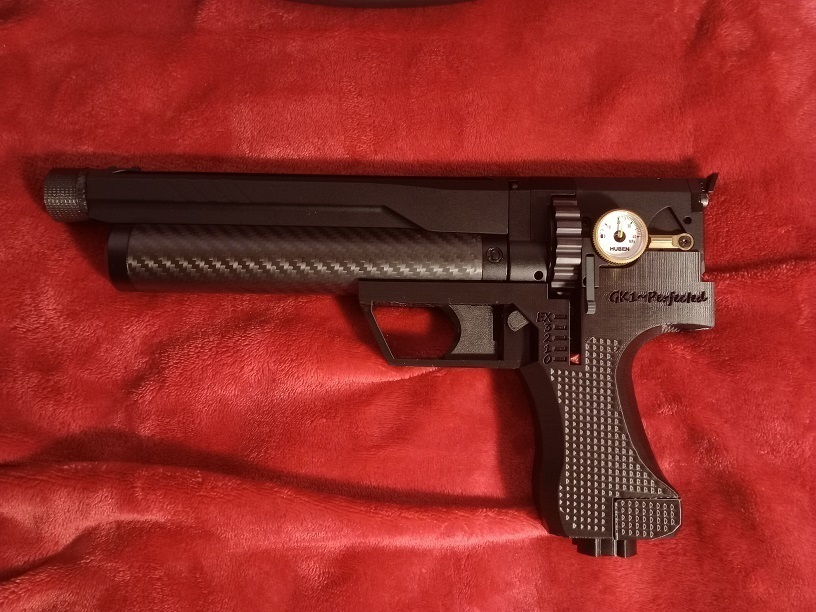
My mod to make this fantastic air pistol PERFECT.
Sadly for the moment this is only compatible with the V1 version (you can check what version you have on the upper part of the serial number. The V3 integrates the adjustment dial on the trigger guard, that you need to remove to use my mod.
If I sell enough designs I will purchase a V3, so I can make a V3 version. (in my dreams)
The handle is less bulky and don't protude far off the slide, this also changes the point of balance to a much nicer and centered point, now is easy to aim targets quickly and the pistol feels less heavy, still a bit front heavy as it should.
Your hand and trigger finger is now lowered, so the annoying charging rod won't get on the way for left-handed people, now its comfortable for them too.
No more wasting extra space! the GK1 Perfected is shorter!!
A tuning dial!! Up to 4,5 revolutions, (you can go beyond if you adjust from upper than 0) with mecanical indicator to select power on the go, like his older brother, the K1 rifle, now the GK1 has a regulator on the go. The manual say you must adjust a quarter turn every shoot if you go from low to high, I don't see any mechanical reason to do that, the rifle as the same gearbox and it incorporates a tuning wheel in the same exact way as my mod, but I won't advice to do any thing against the manual, so... it's your choice how you want to adjust it.
A rear stock quick attachement system!!.*
*** The rear stock is gonna be added soon in a separate download*** yeah... sold separately... but it's gonna be cheap like my loading gate+silencer mod.
WHAT DO YOU NEED?
A shorter bolt (1.2 inch/3cm minimum, better if a bit larger) with the diameter of the original, you can saw off the original, but I don't recomend destroying anything of that absurdly expensive airgun, besides, you might want to return it to its original less awesome form.
3mm allen key cutted off at 1.75inch/4.5cm large, and 0,4inch/1cm wide to fit inside the dial regulator. I included a optional 3d printed allen key, but unless you have acces to polycarbonate or a really strong material, chances are that any 3mm PLA or ABS allen key will simply bent.
And nothing more! Well... a Huben GK1 and a 3d printer.
Instructions:
The print is separated by numbers, only chose 1 number option. (you have multiple options for grip, left handed, extra supports etc... or trigger for shor finger large fingers etc...)
You may need to sand file a little, its a complex print, always play a little with pieces before ensambling everything, make sure all moves smoth .
Once you print it all (I will show you on the instructional video soon).
1-Unscrew the original handle of your GK1.
2-Put off the trigger guard and unscrew the little bolt that connects the firing bolt with the original trigger.
3-Screw that bolt to the ''8TRIGGER CONNECTOR ROD'' without anything else,(you have a side with larger hole to better acomodate the bolt) this will carve the treads, sorry but there is no way that a domestic 3d printer could make so small treads, but is easy to just do this.
4-Unscrew the small bolt from 8TRIGGER CONNECTOR ROD and screw it again attaching the original firing rod, leave that for now.
5-Play a little with the allen key against the 4DIAL hole, make sure it can go a little up and down.
6-Put the allen key inside the dial and the 5DIAL SPRING inside, so the hex rod protudes.
7-Introduce the mounted 4DIAL inside the grip, make sure it rotates nice.
8-Match the upper entry hole with the 10INDICATOR grooves, previously you should also make sure that the indicator moves nice up and down, then rotate the dial to check if the indicator goes up and down without resistance. (Attach one of the optional 12POWER LIMITER on the indicator if you live in a country/state with power limitations on airguns, the number corresponds to the max revolutions the limiter allows and it goes from half to half, if you need a quarter, just cut of the extra lenght.)
9-Put on the 2BASE and screw the 3BASE BOLT, better screw it a few times before to loose resistance.
10-Put the desired 6TRIGGER inside the trigger guard, you will notice a downrail that must match. Put the the 9TRIGGER PLATE catching it inside the handle, the plate should be totally aligned with the pistol tank curve as the rest of the upper trigger guard, sand file it a little if it doesn't ''click'' inside. The spacer should go in front of the trigger, limiting its movement forward.
TRIGGER VERSIONS:
The normal version is what I like, I have normal hands and I reach the normal trigger with the tip of the fingertip, wich is fantastic for presicion shooting, but some people may found it a little forward, so I included a medium-short version. The Large version is for people with really large fingers, and the short one is for women with small hands or kids.
11-Screw the metal bolt (one of the 2 pieces you need for this mod, you can found it on a hardware store, just bring on the original handle bolt to check diameters) in the ''talon'' part of the 1GRIP, make sure it goes up and down, like with the 8TRIGGER CONNECTOR ROD, you will ''carve'' treads, but don't worry, its easy.
12-Time for the truth!! Put the dial on minimum power (indicator should point 0) and also put the GK1 regulator at minimum power, (counter clockwise if you hold the jun normal, clockwise if you hold it upside-down) ensamble your awesome GK1 Perfected mod on the pistol, make sure the 8TRIGGER CONNECTOR ROD ends up inside the internal space just beyond the trigger guard, we are not gonna connect it for now.
Play a little with the dial until the allen key enters the pistol regulator, don't force anything (connection rod may get it the way), when you have everything in place, check if you can rotate the dial and the regulator rotates with it. Screw then the bolt attaching the new handle with the gun. check if the screwing rod of the GK1 is aligned, cause for some reason they put a rotative piece where the bolt attached the handle.
13-Move the gun so the hole of the 8TRIGGER CONNECTOR ROD is aligned with the 1GRIP trigger guard holes, it's not hard... for the love of Christ check that you have the safe on and no pellets loaded.
14-Insert the 7TRIGGER BOLT from the left, the rotate it to catch the thingy inside the trigger guard insert.
15-Enjoy your PERFECTED GK1
If the trigger rattles a little, you can put a bit of tape on the contact part of the trigger with the connector rod.
:format(webp)/https://fbi.cults3d.com/uploaders/28252019/illustration-file/80457651-b070-4425-bc1b-43d9f6a187ee/IMG_20240215_200804.jpg)


/https://preview3d-images.cults3d.com/89dy72h1z1k83isqzptxbqnk8qau)
/https://preview3d-images.cults3d.com/u1jcwjag7xgvhni3o6etf0d9mrx6)
/https://preview3d-images.cults3d.com/e998nhik4yl6oflb2p1p0dlupgqz)
/https://preview3d-images.cults3d.com/07sdspvpp3ay33z7823eefrg9ngq)
/https://preview3d-images.cults3d.com/zppolw4h2kexvn8xhrtr3hf7hl49)
/https://preview3d-images.cults3d.com/ualhantq0p3wz723nyin89ei07r3)
/https://preview3d-images.cults3d.com/2cbz9ddo19a8e5ixdsx7gd96hvku)
/https://preview3d-images.cults3d.com/0x0zvmifqjh31hq88jlupygyqs0t)
/https://preview3d-images.cults3d.com/5b46umtn367kjtqprvuklcf8zwpp)
/https://preview3d-images.cults3d.com/mcfsngg2lb7cujz2fzy5ex15tcrs)
/https://preview3d-images.cults3d.com/r71ipef3e8xv2n3brkb3tfocspgk)
/https://preview3d-images.cults3d.com/ypvwltysgvax9n92co6b31jjxqyu)
/https://preview3d-images.cults3d.com/mrh2o51ztgiyycp7qxyipyjq4fr5)
/https://preview3d-images.cults3d.com/szmwkj7vrde9opdottjdp0vewwfg)
/https://preview3d-images.cults3d.com/1xy59w6nv1hii3s8ep8wzof3m1sw)
/https://preview3d-images.cults3d.com/1087oft5ep5p2r0b9ud7qlcyptnh)
/https://preview3d-images.cults3d.com/l2412hz9pffe2uaizsd86the63nr)

