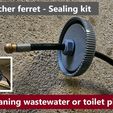
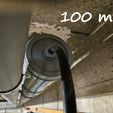
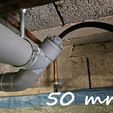
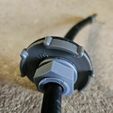
This sealing kit for manholes lets you clean wastewater or toilet pipes with a Karcher ferret without the risk of water backflow to the operator, especially when they're located high up.
You'll need:
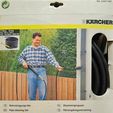
1 - a Karcher ferret longer than the pipe to be cleaned, of course. The ferret that corresponds to the dimensions of this kit has a 16mm diameter head and an 11mm body. I bought it in 15m length (see photo).
2 - one or more new manholes identical to the ones you want to pass through, which will need to be drilled. In my case, these were Nicoll manholes for 100mm and 50mm pipes, which are normally standard. Beware, however, of the screw pitch, which may differ from one manufacturer to another. I also had a 40mm pipe, but I didn't find the right part for it, so I made it differently (see end of text).
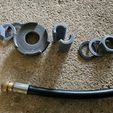
3 - two flat rubber gaskets 20/27 (3/4 inch) to ensure watertightness on both sides of the manhole.
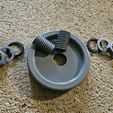
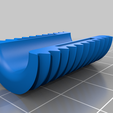
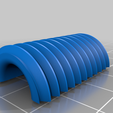
4 - the following parts to be printed: 2 threaded shell halves, two washers, two nuts.
Make sure you have a bucket with a removable handle for easy attachment to the pipe, and a mop.
Start by drilling a 24 mm hole in the center of each of the manhole heads you've just bought and through which you want to pass with the ferret. Use a wood drill or an adjustable bit. It's easiest to do this using a drill mounted on a column, otherwise the ABS of the manholes is very resistant, so it's likely that your hole won't be perfectly round. A tolerance is possible, as a flat gasket will mask imperfections if they are not too great.
Following the enclosed photos, start by passing a nut (domed side) through the ferret head, then a washer and a rubber gasket.
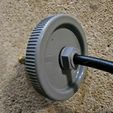
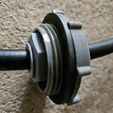
Then pass the ferret head through the head of the manhole you've just drilled, then in reverse order to what you did before, the rubber gasket, the washer and finally the nut on the convex side in reverse order to the washer.
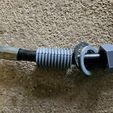
Now ensure that the device is watertight by clamping the body of the ferret between the two threaded half-shells (check that the direction in which they overlap is correct, otherwise the thread will be damaged when tightened; for my part, I look at the ends and can see which ones have been in contact with the printing plate by their shine). Pass this threaded section through the hole in the manhole and tighten on both sides.
The tolerances applied allow the pipe to slide quite freely between the hulls without any water leakage - just put the bucket underneath for good measure.
The parts are preferably printed in ABS, in layers of 0.15 for thread regularity, strength and watertightness.
At the end of the operation, the parts are cleaned, and can therefore be used for another pipe diameter, as long as the washer can be inserted into the manhole cover. This works for 50mm and 40mm pipes. It won't work for 32mm pipes.
Precisely for a small diameter, and because I couldn't find a new part compatible with this thread for drilling, I made a special part that you'll find here :
https://www.thingiverse.com/thing:6497642
A suggestion: remember to bring an advance seal to replace the one on the manhole you're going to open, as well as a strap wrench to make it easier to open large manholes that are often blocked by scale and sediment from sewage or toilets.
-o-o-o-o-o-o-o-
Ce kit d'étanchéité pour regards de visite, permet de nettoyer les conduites d'eaux usées ou de toilettes avec un furet Karcher sans risque de retour d'eau vers l'opérateur, surtout lorsqu'il sont situés en hauteur.
Vous aurez besoin :
1 - d'un furet Karcher d'une longeur supérieure à celle de la canalisation à nettoyer évidemment. Le furet qui correspond aux dimensions de ce kit a une tête de diamètre 16mm et un corps de 11mm. Je l'ai acheté en 15m de longueur (voir photo)
2 - d'un ou plusieurs regards de visite neufs identiques à ceux par lesquels vous souhaitez passer qui devront être percés. Dans mon cas il s'agissait de regards de marque Nicoll pour tuyau de 100mm et de 50mm, normalement standard. Attention toutefois au pas de vis qui peut être différent d'un fabricant à l'autre. J'avais aussi un tuyau en 40mm mais pour lequel je n'ai pas touvé la pièce et j'ai refait la pièce autrement (voir en fin de texte)
3 - de deux joints plats en caoutchouc 20/27 (3/4 pouce) pour assurer l'étanchéité de part et d'autre du regard
4 - des pièces suivantes à imprimer : les 2 demies coques filetées, deux rondelles, deux écrous.
Prévoyez à tout hasard un seau avec une anse démontable pour faciliter son accroche au tuyau et une serpillière.
Commencez par percer un trou de 24 mm au centre chacunes des têtes de regards que vous venez d'acheter et par lesquelles vous souhaitez passer avec le furet. Utilisez un foret à bois ou une mèche réglable. C'est plus facile en utilisant une perceuse fixée sur une colonne, sinon l'ABS des regards étant très résistant il est probable que votre trou ne sera pas parfaitement rond. Une tolérance est possible puisqu'un joint plat viendra masquer les imperfections si elles ne sont pas trop importantes.
En suivant les photos jointes : commencez par passer un écrou (coté bombé) par la tête du furet puis une rondelle puis un joint caoutchouc.
Ensuite passez la tête du furet à travers la tête du regard de visite que vous venez de percer puis en ordre inverse de ce que vous avez fait précédemment le joint en caoutchouc, la rondelle pour finir par l'écrou coté bombé à l'inverse de la rondelle.
Assurez maintenant l'étanchéité du dispositif en enserrant le corps du furet entre les deux demies coques filetées (vérifiez que leur sens de superposition est bon sinon le filetage sera abimé lors du serrage, pour ma part je regarde les extrémités et je vois celles qui ont été en contact avec le plateau d'impression par leur brillance). Passez cette partie filetée ainsi formée par le trou du regard et serrez de part et d'autre.
Les tolérances appliquées permettent au tuyau de coulisser assez librement entre les coques sans fuite d'eau, mettez le seau dessous par acquis de conscience.
Les pièces seront préférablement imprimées en ABS, en couches de 0.15 pour la régularité du filetage, sa résistance et son étanchéité.
A la fin de l'opération les pièces sont nettoyés, et donc utiisables pour un autre diamètre de tuyau tant que la rondelle peut être insérée dans le couvercle du regard. Cela fonctionne pour des tuyaux de 50mm et de 40mm. Cela ne sera pas possible pour des tuyaux de 32mm.
Justement pour un petit diamètre et du fait que je ne trouvais pas à acheter de pièce neuve compatible avec ce pas de vis pour la percer, j'ai fait une pièce spéciale que vous trouverez là :
https://www.thingiverse.com/thing:6497642
Une suggestion : pensez à vous munir d'un joint d'avance pour remplacer celui du regard que vous allez ouvrir, ainsi que d'une clé à sangle pour faciliter l'ouverture des regards de grandes tailles souvent bloquées par le tartre et les sédiments des eaux usées ou de toilettes.

