Skip to content

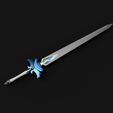
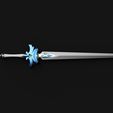
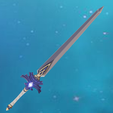
Cool Steel Sword from Genshin Impact

Advertising
Advertising
?
Creation quality: 0.0/5 (0 votes)
Evaluation of members on the printability, utility, level of detail, etc.

  • 256 views

License
3D design format
STL Folder details Close
  • Cool-Steel-1.stl
  • Cool-Steel-10.stl
  • Cool-Steel-11.stl
  • Cool-Steel-12.stl
  • Cool-Steel-13.stl
  • Cool-Steel-14.stl
  • Cool-Steel-15.stl
  • Cool-Steel-2.stl
  • Cool-Steel-3.stl
  • Cool-Steel-4.stl
  • Cool-Steel-5.stl
  • Cool-Steel-6.stl
  • Cool-Steel-7.stl
  • Cool-Steel-8.stl
  • Cool-Steel-9.stl

Learn more about the formats

Publication date 2024-02-27 at 21:03
Design number 1820666

mnprops

3D printer file info

3D model description

Genshin Impact Cool Steel Sword (Base or 2nd Ascension version) for Kaeya.

3D Model modeled for easy print, paint and assembly.

Printable on standard sized printers.

Total length: 1300mm

Can be assembled into 2 pieces (Handle and Blade separate) for Travel purposes or into a whole piece for showcase.

For Cosplay: You gonna need 2x M8 Rods 50cm long for easy assembly, 2x aluminum Rods Ø 6mm 50mm long for the inside of the Blade (you dont have to but i recommand it if you want to swing the Sword) and 1x M8x24mm threaded nut.

For Showcase: 1x 7-8mm Rod 100cm long.

Assembly for Showcase:

Assemble the Sword piece by piece using the Rod as Guide with Epoxy Glue.

Assembly for Cosplay:

First you need to thread one Rod into the Nut just half in. I recommand to glue the first part of the Blade with 2 min. Epoxy Glue to the Nut and Rod and then glueing the rest of the Blade piece by piece. Use the other Rod as a Guide for the Assembly for the Handle but dont glue the Rod into the Handle yet. After the Assembly of the Handle completed, pull the Rod out of the Handle and cut the Rod to the right length to thread it to the Blade. Insert the Epoxy glue in the Rod Hole of the Handle without spilling the glue on the Outside surface and glide the Rod back into the Handle while still threaded to the Blade. Done

3D printing settings

Can be printed with 0,2mm Layer Height. I recommand to print the Pieces with 10-15% Infill to save weight. Wall thickness 1-1,2mm.

Advertising


Page translated by automatic translation. See the original version.
Issue with this design? Report a problem.

Would you like to support Cults?

You like Cults and you want to help us continue the adventure independently? Please note that we are a small team of 3 people, therefore it is very simple to support us to maintain the activity and create future developments. Here are 4 solutions accessible to all:

  • ADVERTISING: Disable your banner blocker (AdBlock, …) and click on our banner ads.

  • AFFILIATION: Make your purchases online by clicking on our affiliate links here Amazon.

  • DONATE: If you want, you can make a donation via Ko-Fi πŸ’œ.

  • WORD OF MOUTH: Invite your friends to come, discover the platform and the magnificent 3D files shared by the community!


Sharing and downloading on Cults3D guarantees that designs remain in makers community hands! And not in the hands of the 3D printing or software giants who own the competing platforms and exploit the designs for their own commercial interests.

Cults3D is an independent, self-financed site that is not accountable to any investor or brand. Almost all of the site's revenues are paid back to the platform's makers. The content published on the site serves only the interests of its authors and not those of 3D printer brands who also wish to control the 3D modeling market.

100% secure payment by credit card, PayPal, Apple Pay, Google Pay, etc.
View all payment options.