Skip to content

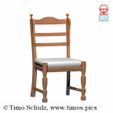
Eared chair" (true to scale)

Advertising
Advertising
?
Creation quality: 0.0/5 (0 votes)
Evaluation of members on the printability, utility, level of detail, etc.

  • 206 views
  • 1 collection

License
3D design format
3MF, OBJ, and TXT Folder details Close
  • Maßtab 1_1 - Struckmannsakte - EG - Wintergarten - Ohrenstuhl (ohne Polster).obj
  • Maßtab 1_1 - Struckmannsakte - EG - Wintergarten - Ohrenstuhl.obj
  • Maßtab 1_10 - Struckmannsakte - EG - Wintergarten - Ohrenstuhl.obj
  • Maßtab 1_5 - Struckmannsakte - EG - Wintergarten - Ohrenstuhl.obj
  • Projektdatei 156g, 1d0h49min, 52,28m, M 1_5 - CCR10SPRO_M 1_5- Wintergarten - Stuhl Ohrenstuhl.3mf
  • Stuhl Ohrenstuhl.txt

Learn more about the formats

Publication date 2024-02-28 at 18:08
Design number 1822158

3D printer file info

3D model description

*Genuine German furniture measured and digitized by hand. *

The ear chair is a magnificent piece of seating furniture with a large upholstered seat. Special features are the turned front legs cut into the sides and the two ears on the backrest. A groove runs parallel to the edge of the ears. The two balls at the top of the backrest add the finishing touches to this piece of jewelry. The original colors of the chair are the wooden parts in rustic oak and the seat cushion has a light orange and pink floral fabric.

A piece of furniture with a story is now ready for your 3D printer. With different scales, they can embellish their model world.

Contents:

  • Chair old time model 1 scale 1:10

  • Chair old time model 1 scale 1:5

  • Chair old time model 1 scale 1:1

  • Project file for scale 1:5

Models are all colorless. The render image is a suggestion for painting according to the original model

Scale

All my furniture models are true to scale. With the 2 preconfigured scales you can make your scale diorama.

If you already have your own scale, you can use the 1:1 scale file to reduce it to your individual scale.

History of the original

This chair was given to us in September 2003 by our family doctor at the time. There were two of them. As I was admiring this chair, my father sat down after a hard day's work and it went CACK! My father was taken aback and looked at the seat from underneath. The cheap chipboard under the upholstery had broken into a nice cross-shaped crack. To this day, there is now an ear chair with and without upholstery.

This model belongs to my collection "Die Struckmannsakte"


The Struckmann file

The Struckmann file is a document consisting of technical drawings, pictures and wire models. It lists all the furniture we have or had in the period 2002 - 2014.

Data from the Struckmann file for this furniture:

Piece of furniture: Chair

Location: Ground floor, conservatory

Seat height:

Year of construction: not known

3D printing settings

Settings

Minimum scale: M: 1:10 (height: 98.065mm), recommended scale min. M: 1:5

Hardware settings

Printer: Creality V2 Pro

Filament: Renkforce PLA

Recommended print bed: Spring steel on magnet

Nozzle: 0.4mm

Software settings

Quality:

Layer thickness: 0.2mm

Line width: 0.4mm

Line width of the first layer: 100%

Walls

Number of wall lines: 4

Hook on: Optimize wall pressure sequence

Fill gaps between walls: Everywhere

Top/bottom

Top/bottom thickness: 0.8mm

Upper layers: 4

Lower layers: 4

First lower layers: 4

Lower/upper pattern: Lines

Lower pattern for first layer: Lines

Filling

Filling density: 20%

Line spacing filling: 6mm

Filling pattern: Cube sub-area

Filling layer thickness: 0.2mm

Material

Printing temperature: 195°C

Pressure plate temperature: 50°C

Flow: 89.89%

Speed

Print speed: 50mm/s

Filling speed: 50mm/s

Wall speed: 25mm/s

Upper/lower layer speed: 25mm/s

Movement speed: 150mm/s

Speed of the first layer: 20mm/s

Skirt/brim speed: 20mmn/s

Number of slow layers: 2

Movements

Tick on: Activate feed

Feed distance: 6mm

Feed speed: 45mm/s

Minimum movement for feed: 1.5mm

Hook on: Z-jump during feed

Z-jump height: 0.2mm

Cooling:

Hook on: Activate cooling for printing

Fan speed: 100%

Limit value for normal...fan speed: 10

Initial fan speed: 0%

Normal speed of the fan at height: 0.6mm

Minimum time for shift 10s

Minimum speed: 10mm/s

Support structure

Hook on: Generate support structure

Support structure: Tree

Placement of the support structure: Touch print bed

Angle for overhanging support structure: 45.1°

Pattern of the support structure: zigzag

Number of wall lines of the support structure: 1

Density of the support structure: 0%

Tick on: Activate support structure interface

Hook on: Activate supporting roof

Hook on: Activate supporting floor

Density of the roof structure: 40%

Line spacing of the roof structure: 2mm

Density of the floor structure: 33.333%

Line spacing of the floor structure: 2.4mm

Pressure plate adhesion

Printing plate adhesion type: Brim

Width of the brim element: 16mm

Instructions for loosening the support structure

if you have a dual extruder, use water-soluble support structure. Because loosening conventional support structure is tricky. Otherwise, here is a procedure that I use:

Removing the fixed support structure on the seating furniture models:

Removing the support structure requires a little patience and dexterity. Depending on the size of the scale, the support must be removed piece by piece.

First remove the object from the print bed with a sharp spatula. Then remove the brim from below. Do not hold the model by the chair legs but by the edge of the seat or the support structure. These could break off at small scales. The brim must be completely removed until the chair legs are no longer connected to the support structure.

Important Hold the chair by the side of the seat

Carefully cut or pull off the supports that have formed on the sides above the chair rungs in the direction of the layer if possible.

Then use a small side cutter to make individual vertical incisions in the tree support structure from below and then carefully remove the support structure layer by layer.

Once you have almost reached the bottom of the seat, lever off the rest with a narrow spatula and make sure that the support structure does not push the chair legs to the side, as something could break off just before the finish.

Reworking

Remove the pimples on the lower edge of the chair back with a half-round key file or a pointed carving knife. Always work with the knife away from the body due to the risk of injury.

Advertising


Page translated by automatic translation. See the original version.
Issue with this design? Report a problem.

Would you like to support Cults?

You like Cults and you want to help us continue the adventure independently? Please note that we are a small team of 3 people, therefore it is very simple to support us to maintain the activity and create future developments. Here are 4 solutions accessible to all:

  • ADVERTISING: Disable your banner blocker (AdBlock, …) and click on our banner ads.

  • AFFILIATION: Make your purchases online by clicking on our affiliate links here Amazon.

  • DONATE: If you want, you can make a donation via Ko-Fi 💜.

  • WORD OF MOUTH: Invite your friends to come, discover the platform and the magnificent 3D files shared by the community!


Sharing and downloading on Cults3D guarantees that designs remain in makers community hands! And not in the hands of the 3D printing or software giants who own the competing platforms and exploit the designs for their own commercial interests.

Cults3D is an independent, self-financed site that is not accountable to any investor or brand. Almost all of the site's revenues are paid back to the platform's makers. The content published on the site serves only the interests of its authors and not those of 3D printer brands who also wish to control the 3D modeling market.

100% secure payment by credit card, PayPal, Apple Pay, Google Pay, etc.
View all payment options.