miniVICE Y-Series - Modular miniature holder, painting and hobby system
miniVICE Y-Series - Modular miniature holder, painting and hobby system


Print Profile(0)
No Print Profile yet. Add one to earn points.
Description
Summary
Update 4/7/2020: added cork holder, use size 9 corks (most used in commercial wine bottles), screw-down into place and secure with a pin underneath.
News
miniVICE X-Series version that improves some issues and supports both round and square bases can be found here:
https://makerworld.com/en/models/215147
I will still continue to improve this version as well
Background
I had a look around at the different holders that are out there. And even though some had some good ideas I felt none of them solve the problem for me. So I created this remix based on 2 holders and added my own ideas. There are many ideas I also want to play with but the base system is ready
How it works
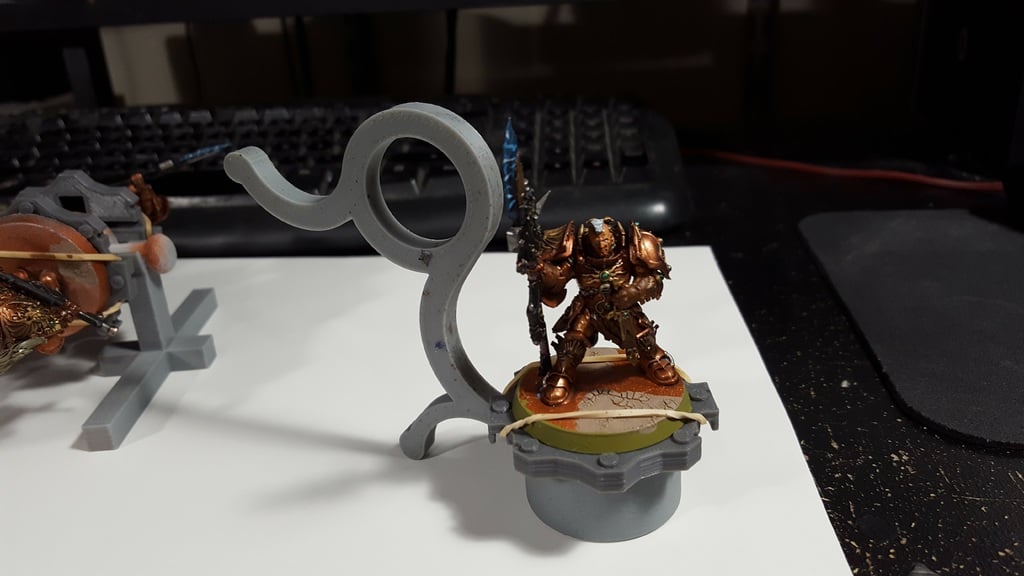
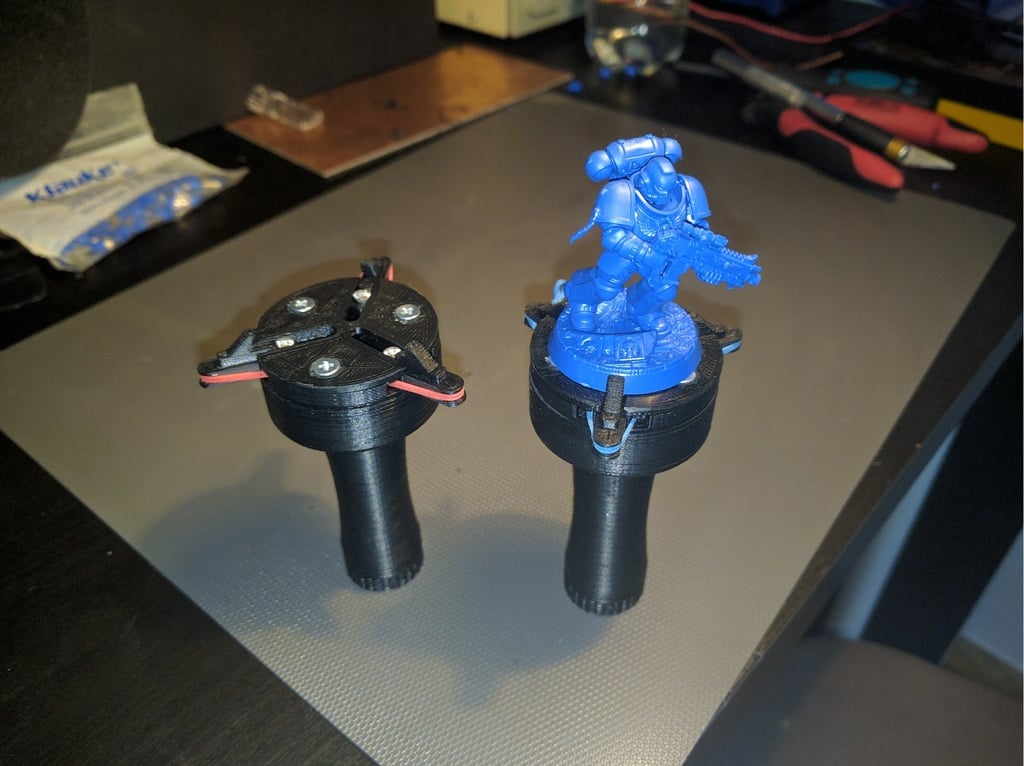
This holder uses a modular chuck instead of a rubber band to hold the base down. This allows you to have access to the base for painting.
The chuck that holds onto the miniature is designed to be portable (modular), so you can quickly attach to, or disconnect from, the other parts in this system using the rare earth N35 magnets. You're not limited to only 1 way to paint your miniatures and you can even set your wip down on multiple stand types and pick right back up when you're ready. with mulitple chucks, you can switch between miniatures easily and only need 1 chuck driver and handle
There are 2 sizes of holder chucks
- 25mm - 40mm bases with the small collet
- 45mm - 60mm with the large collet.
This system provides multiple handles so you have multiple ways to hold the miniatures to suit your style. there are even rounded versions so for people who might find them more comfortable.
The stand/grip can even come apart to become 2 stands in case you need to set your wip down. The main part of the stand/grip has the same footprint as most dropper paint bottles which means it can also be used with any project box or paint station that has holes for Vallejo, Army Painter, Reaper. There is an optional adapter for use with Citadel holes in stands and project boxes.
There are plenty of more things to come
What you will need
To make each of the chucks that grips the base of the miniature you will need (you can find all of these cheap online)
- 3x Cable Ferrules 2.5mm^2 (aka: Bootlace, Pin Crimps, Wire Sleeves). They have a pin length of about 8mm
- many x N35 5mm x 2mm rare earth magnets. Make sure they are earth magnets otherwise they might not be strong enough. You are welcome to get stronger magnets as long as they are 5mm by 2mm they will be fine
- 1x Rubberband:
For 25mm-40mm base size N14 which is about 50mm
For 45mm-60mm base size N18 which is about 76mm or N19 which is about 87mm
Updates
1.1 (29th jun 17)
- added new stand/grip bases (untested) that are compatible with citadel paint pot stands and project boxes. The new bases can also be flipped to be used as a stand. there is both a mini version and tall version to suit your needs
- added a new size of collet, there is now a small collet that supports 25mm - 40mm bases and a large collet that supports 40mm - 60mm (untesting)
- added new square base adapters (untested): there are adapters for 20mm, 25mm and 40mm bases. 50 may also be supported without an adapter. Each adapter is only 1 side, print 2 for use.
1.2 (1st july 17)
- Fixed handles for 60mm base update
- updated main case to suit new handles (however old case works fine)
- added new larger maincase top for large base
1.2.1 (3rd july 17)
- fixed large collet
- updated larger maincase top for better support
- rounded versions of handles added for a more comfortable grip.
1.2.2 (4th july 17)
- updated square base adapters
1.2.3 (4th june 20)
- added cork holder, use size 9 corks (most used in commercial wine bottles), screw-down into place and secure with a pin underneath.
To do list
This is still a work in progress with a few items pending
- DONE citadel paint hole adaptor (added: tall and short versions) needs testing
- DONE square base holder (added adaptors for 20mm, 25mm, 40mm bases) needs testing
- subassembly holder
- large base holder
- jenga wood holder
Print Settings
Printer Brand:
Creality
Printer:
CR-10
Rafts:
No
Supports:
No
Infill:
0-2%
Notes:
All Stls are in their native orientation, I rotated a few to print on its side or even upside down, I didn't need supports at all.
I was able to print all of these parts with 0 infill and 2-3 shell. the only part that needed infill and only for internal supports was the stand and stand base.
The square base adapters stls are only of 1 side. simply print 2 to get the whole thing.
Post-Printing
How To Assemble
Be careful with magnet polarity Once the first magnet is in place, make sure that the polarity of the rest of the magnets are correct when gluing them in place. Double check, triple check that the magnets are correct
There are 2 sizes for the holders.
Common to both are the following parts:
- handle of your choice
- chuck body
- maincase
- chuck driver
- maincase bottom
- chuck knob
- 3x pins
- at least 2, optional 3rd N35 5mm x 2mm magnets
for the regular holder (25mm - 40mm) you will need:
- 3x chuck collet small
- maincase top small
for the large base holder (45mm - 60mm) you will need:
- 3x chuck collet large
- maincase top large

The quantities really depend on how many you want to make. You can buy a bunch of each for really cheap

Added the rubber band in the channels of the Chuck body. Then seal it with the Main case top, it should simply snap fit. Turn it over and make sure the Top pokes through the other side by about 1mm. Take this opportunity to super glue the magnet. Be careful not to use too much glue so as to not spill over the area indicated by green

Pull the Rubber bands out of the way and slide in the Collets. Then make sure the Rubber band sit in the groove on the back of the Collets

Cut and peel the cover off the pins. Make sure not to cut into the pins themselves. Then push the pins into place using a tool like tweezers. Glue is optional but I didn't need it

Glue the N35 magnet to the chuck driver. Then push the Chuck driver into the Main case. Then seal it all into place with the main case bottom, which should snap fit into place. Turn it over and add glue in the square indicated, line up Driver knob and press it into the glue. The magnet on the bottom side of the Driver knob is optional depending on how you intend to use the system

Once the glue holding the magnets is dry, your two assemblies are ready to come together. Then simply select the handle you wish to use and friction fit in to the Main case (glue is optional)
Now all that is left to do is add the magnets to the stand/grip and the bases you want to use.
Again just make sure you install and glue the magnets the right way around to match the polarity of your already installed magnets
Comment & Rating (0)
This remix is based on