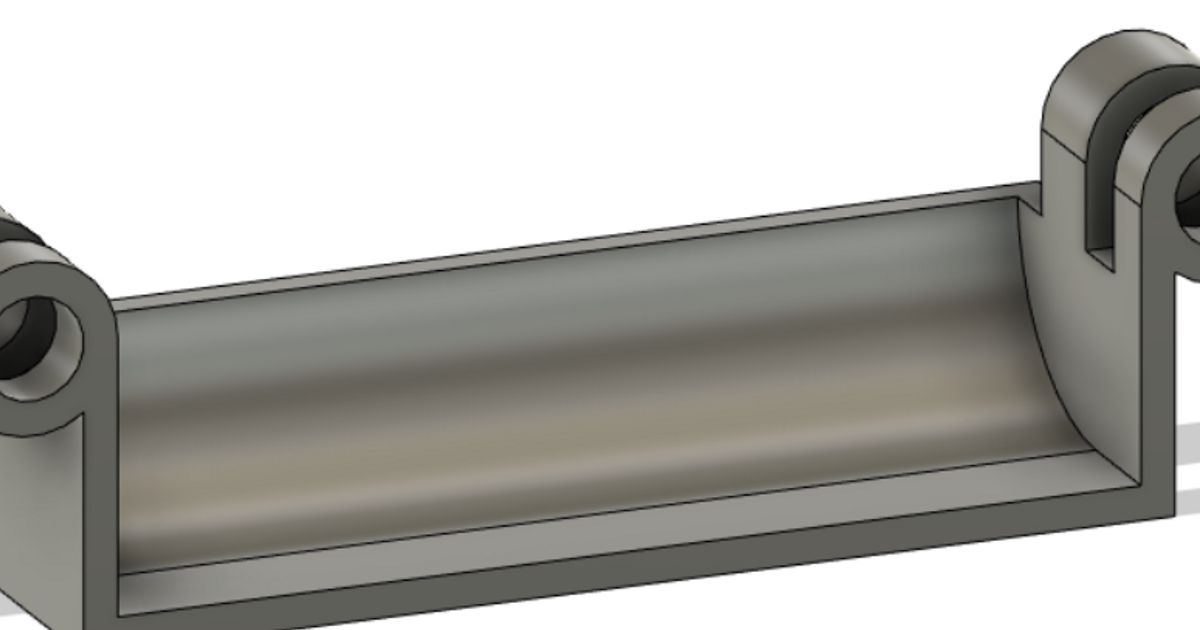
Ender 3 V3 SE Dual 4010 Shroud
Ender 3 V3 SE Dual 4010 Shroud


Print Profile(0)
No Print Profile yet. Add one to earn points.
Description
I am not responsible if you break your printer for any reason using this shroud. If you require a shroud that works with the stock configuration please check out my single fan shroud here; https://www.printables.com/model/595397-ender-3-v3-se-fan-shroud
Please read all of the provided instructions before attempting to put this shroud together, there could be some things that are unexpected and you might not feel comfortable doing.
CURRENT VERSION - V1
Change log:
28/01/2024:
Wow its been a while since I looked at this project! This is the first non-beta release.
- V1 Shroud: Finally fixed the placement of the holes for the extruder screws. Added chamfers for the fan openings and a few small changes I've been working on the last 2 months :)
24/11/2023:
Recommended for all users of the Dual Fan shroud (MK1/MK2), Works with the MK2 Duct
- MK3 Shroud: Added more support for the CR touch due to PLA Creep moving the probe, this might work it might not, I need more time to tell. This also makes it look better in my opinion. Also added a hole for extruder tightening.
09/11/2023:
Not recommended for pre-existing users of MK1, this is only a change to allow new users to print the fan duct easier.
- MK2 Duct : Added extra support for the screw holes while printing, doesn't need support anymore. This should hopefully fix some of the printing issues some users have had
- MK2 Shroud : Changed dimensions slightly to fit the new duct
I don't know if this mod will work with the stock firmware as the CR Touch has been moved, please let me know if it does and provide installation instructions for marlin so I can add it to these instructions. This works with Klipper only right now.
I highly recommend buying two fans with a connector so that if this setup doesn't work for you, you can revert the printer back to the stock configuration. If you decide on doing this with the stock fan you won't need the Molex PicoBlade cable and one 4010 fan.
This mod also moves the placement of the CR Touch so it is inline with the nozzle, its location is X=0. I will go into this more later on in the instructions.
I won't be including any GCODE files as I do not think this is a good idea, everyone's setups are different along with settings. If someone does create a GCODE file for you to use, please make sure that it will work with your setup and not cause issues.
-Wishlist on things to improve
- Fan ducts yet again are my nemesis, I feel like they are still lacking in performance
- Zip tie mounts on the shroud to help with cable management
- Move the CR Touch closer to the hot end for more accurate probing, it can be done I just need to see the performance loss as it will be obstructing the heat sink fan quite a bit
-BOM:
- 10x M3*8 Screws
- 8x M3*16 Screws
- 10x M3 nut's
- 8x Flat washers
- 8x Lock washers (honestly optional, I don't know how much they affect the build but i've been using them)
- 1x CR Touch cable 10cm
- 1x Molex Picoblade cable
- 2x 4010 Blower Fan
You will also need some way of soldering the fan cables together so a solder station or some solder seal wire connectors will be needed. Please make sure to buy Molex PicoBlade cables as the Micro JST cables do not work they look basically the same but have a different pitch, I found this out the hard way :).
-BOM with links if you are in the UK:
- Two 4010 blower fans (These are from Sovol but came Creality branded); https://www.amazon.co.uk/dp/B08B3HCKCP?psc=1&ref=ppx_yo2ov_dt_b_product_details
- M3 Screw Kit (had all the screws I needed and more for future projects); https://www.amazon.co.uk/dp/B08789D7M5?psc=1&ref=ppx_yo2ov_dt_b_product_details
- CR Touch 10cm cable (10cm 5pin) This is the one I used; https://www.aliexpress.com/item/4001291279517.html?spm=a2g0o.order_list.order_list_main.5.21ef1802bJC7rY
- CR Touch 10cm cable (This one is probably better but I havent tried it); https://www.aliexpress.com/item/1005005090614513.html
- Molex PicoBlade Cable; https://thepihut.com/products/adafruit-1-25mm-pitch-2-pin-cable-matching-pair-40cm-long?variant=32463312322622¤cy=GBP&utm_medium=product_sync&utm_source=google&utm_content=sag_organic&utm_campaign=sag_organic
-What to print
You will need the main fan shroud, I recommend whatever is the latest version, the latest version is V1.
-STL Printing instructions:
This will need to be printed with tree supports, below are some screenshots of where to select for support. You can print the shroud in PLA as its not close enough to the print head to start melting, the fan ducts I recommend to print in PETG or ABS though I have mine in PLA and I just replace them every week or so (not ideal but I don't have a set up to print PETG or ABS reliably)
Shroud assembly:


BETA 2 UPDATE: you will need to also support under the lower screw holes

It should look like this in the slicer, every overhang needs to have supports apart from the screw holes.

Fan Duct:
Only needs supports under the loops for the screws, again ive provided a 3mf file but this is here incase that doesn't work for you

Should look like this after slicing, make sure there are no supports on the shroud itself, it doesn't need it and its a pain to get off

-Removing the original fan and cable:
In Creality's infinite wisdom, the fan cable from the factory is behind the hot end of the printer, meaning you have to remove the sprite extruder and hotend to remove this cable. Don't worry, you wont have to route the cable behind the hotend again.
- Remove any filament that is in the printer, this makes it incredibly difficult to remove the extruder as you will have to take it off with the hot end
- Wait for the printer to cool down (burned myself a few times not doing this :P)
- Remove whatever fan shroud you have, my single fan design or the stock one, there is two screws on the right hand side of the printer and in the case of the stock shroud one on the left.
- Remove the four screws shown below to remove the extruder

- Then you will need to remove the cable for the CR Touch and Extruder pictured below, the CR Touch is not present on my printer as I have been using the dual mount shroud. Please remove the hot glue that has been added to the connectors before trying to pull them out, I used the snips that came with the printer very carefully to grab and pull the hot glue off.

- You can then remove the CR Touch from the bracket that is connecting it to the extruder, also remove the bracket from the extruder too, I would picture it but I may or may not have lost that a while ago :/
- It then should look like this (pictured below), if you wanted to upgrade the standard PTFE tube to Capricorn Tubing then now would be an ideal time to do so, i've already done this so thats why my tube is blue, the stock one is white.

- Remove the two screws pictured below to free the fan cable, make sure to not let the extruder drop too far as leaving the cables connected is the best option, you don't want these to break as then it becomes a massive pain in the arse. I'd remove the build surface as well just in case there is any damage made if it does drop

- Now just repeat the steps in reverse, but without re attaching any fan cables or the CR Touch, we will be installing these to the new shroud later.
-Removing the cable from the CR Touch:
Again id just use the snips that came with the printer, very carefully to remove the hot glue off the connector and slowly remove the cable, making note of what side the cable goes into, I don't think it goes in reverse but I wouldn't want to find out what happens if you do manage to do that.
Then you can just put the new 10cm cable onto the CR touch so its ready for later.
-Test Fit time:
I'd suggest now testing to see if the fan shroud fits, it should but it doesn't hurt to check.
Please make sure that the extruder cable goes into the channel and isnt coming out as if it does its at risk of splitting the plastic on the outside of the cable, tell me how I know that happens, if you look close to the picture you can see exactly where I got stressed that I broke it lol. Make sure all of the holes to screw in the mount to the extruder motor fit, I am aware of an issue right now where the rear holes don't line up with the ones on the extruder, just make sure the ones closer to you fit .

Great so now everything should fit properly.
If it doesn't fit, feel free to message me on printables and ill look into the issue and try and resolve it, it could have been an oversight from me :). Make sure to include a photo or detailed description of the issue, this will save time and help me understand what has happened.
-Widening the holes on the fan's
This has been something I have been trying to avoid with this shroud, the M3 screw's need to be able to fit through the holes on the fans as you cant get enough of the standard screws to fit. It also allows me to make the BOM more simple as you only need M3 screws.
All I did to widen the screw holes was repeatedly screw in and out the M3 screws into the screw holes on the fans, basically force them in and out a few times then they should be wide enough to install later. Yes I know its a pain but its the only way I could get all 4 screws to go into one fan. If you have any ideas on how to improve this then please let me know
-Splicing the two fans to the one connector:
So this is the part i'm not very good at, soldering.
You will need to connect the two fans to the one Molex MicroBlade connector in parallel, the two black cables on the fans to the black cable on the MicroBlade. Same with the red. Solder them together and add heat shrink over to protect them.
Make sure there is enough length on the fan on the right side (left side on the photo) to be able to fit around the front of the shroud, pictured below

Quick note, if your fan has yellow and blue cables instead of red and black, the yellow cable is red and the blue is black, took me ages to find this information so leaving it here as a note.
-Time to build the shroud:
Right so now it's the fun time, or the finicky time depending on who you ask.
-Attaching the fans
You will need the 8xM3*16 screws along with the 8xM3 nuts and the printed fan shroud
- First you are going to want to put the fan shroud and fan onto the shroud and screw the M3*16 screws in from the back and put a nut on the end, make sure its finger tight as i've had issues removing them if you make them tight, finger tight is enough so they don't fall off while printing, picture below for reference. Quick note, the fan which is on the left side might not be able to have 4 screws in as the mount for the stock fan is in the way, also pictured below, i'd start without this screw and see if you have enough room, its not really needed anyways


- once all of the screws are in it should look like this.

-Installing the CR Touch
Insert the cable through the hole on the front till it is tight, pictured below

Then we will add the two M3*8 Screws through the bottom and add a nut on the top, for now you will have to hold the nut with your finger as you screw the screw in, im trying to work on a fix for this but its not at the top of the priority list.
Then it should look like this

-Now its time to put it on the printer!
When putting the shroud onto the printer, make sure to have all the cables going below the extruder, this is important so none of the cables get trapped between the shroud and the extruder, picture below for reference.

Then i've found it easier to slide it almost all the way on and connect the cables to the printer, once all of the cables are plugged back in, its time to turn the printer back on and now.
You will now need the 8 M3*8 screws, 8 washers and 8 lock washers, Again I am aware that the rear 4 screws wont line up with the shroud, just put 4 of the screws in, this will be fixed in the future but doesn't affect performance
The best way i've found to screw in the screws to the extruder is like this, its late when i'm writing this and don't wanna open photoshop, hopefully this makes sense :D
2| |1
3| |4

Turning the printer on, make sure not to home it as we have changed the placement of the CR touch so it wont home properly, but you can test the fans to make sure they are working.
-Klipper printer.cfg
Under the bltouch entry on the printer.cfg change the x_offset to 0 and the y_offset to -45.
You will also need to change the bed_mesh settings to mesh_min 20,20 and mesh_max to 201,182
Make sure to do a probe_calibrate as well as the Z offset will be different
You can change these settings how you please but this is what I am using so far.
Now hopefully you have a fully working dual fan mod for the Ender 3 V3 SE, this is the longest instructions I have done on printables so far so hopefully this all makes sense!