FT8900_09Fit
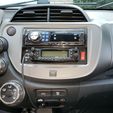
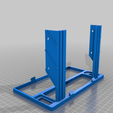
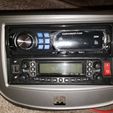
This is a mount for installing both a Yaesu FT-8900 or FT-8800 amateur radio and a standard single DIN stereo in a 2009-2013 Honda Fit. This bracket snaps inside of an adapter which normally allows a double DIN stereo to be installed in place of the stock unit. It also has holes for mounting an RJ12 6P6C jack for the microphone and a rocker switch which I use to run the radios without the key in the ignition.
To use this you will need:
1-Yaesu FT-8900 or FT-8800 (I would love to hear from people with the various Chinese clones of these radios, TYT TH-9800, etc... to find out if they fit too)
1-Single DINN car stereo - I picked a very cheap one because I would like to eventually build a RaspberryPi radio anyway but any single DINN should do
1-Metra 95-7877 double DINN stereo installation kit for the Honda Fit
1-RJ12 6p6c jack - I used this one https://www.amazon.com/dp/B07KYRH49T?psc=1&ref=ppx_yo2_dt_b_product_details
1-Power Relay
1-Rocker Switch - I need to come back and add the exact model.
1-Stereo Wiring Harness for the Honda Fit - I used this one https://www.amazon.com/dp/B0915SCHVF?psc=1&ref=ppx_yo2_dt_b_product_details
1-Antenna Adapter for the Honda Fit - I used this oen https://www.amazon.com/dp/B0875SJMSP?psc=1&ref=ppx_yo2_dt_b_product_details
Power and ham radio antenna wires ran into your dash, where the radio goes
It may be tempting to wire the ham radio to the existing power wires for the stereo. These may not be able to handle the current. Also, it is usually advisable to run a heavy duty power wire directly to the battery for amateur radio use anyway. This minimizes electrical noise. A wire ran directly to the battery however bypasses the ignition switch. I like to add a relay behind my radio and run the power wire through the contacts of the relay. Then I wire the coil of the relay to the switched power input that originally went to the car stereo. I connect both my car stereo and my ham radio to this relay-switched power line. I also bypass the relay with a switch. (the rocker switch mentioned above) This way I can run the radios without the keys in the ignition, such as when using the crossband repeat feature of the amateur radio.
I have this installed in my car now however I would like to come back and revisit this file to add some more features.
For one, I forgot to write down the model number of the switch before assembling everything. The hole is perfectly sized for the switch I used which came from my junkbox. I do remember that I found the same switch on Amazon however there were several others of slightly different sizes for much better prices. I may just adjust the model for one of those. Ultimately I would like to make the model parametric and give the user a choice of switches or the ability to just enter the switch dimensions allowing any switch to be used. Some people might like an option to omit the switch as well.
The screws that hold the microphone connector on kind of stick out. I may create a version with countersunk holes and get a pair of black countersunk screws to match.
I am thinking of adding a couple of screw holes below where the ham radio sticks out with mounts for heatset threaded inserts behind them. Then I would like to design a cellphone holder that would hang down below the radios. Currently I use a clip-on holder that clips to the air vents above the radios. Having something that is permanently mounted and does not block the vents would be much nicer. Not blowing hot air on my phone in the winter would probably be better for the phone too.
I also wanted to have mount a USB jack on the front with a charger on the inside. There was no room for this. I could make that an option that takes the place of the switch for people who do not want the switch. If I go with the cellphone mount idea I will probably include a wireless charger and a hole through this model to run the power wire for that.
I printed this in black Inland PET-G (Inland is Micro Center's rebranding of eSUN). I have read mixed reviews regarding PET-G holding up to hot car temperatures. It has been in my car for less than a week but already it has made it through a few above 90F (~32C) days closed up in a parking lot with no shade. So far it seems to be just fine. If I do have any problems I will re-print it in ABS and post an update here. Definitely do not try this with PLA unless your car will never see hot summer weather.
Update - Ok, it's been a couple of years now. I still have that cheap radio in there as I still have not gotten around to building the Raspbery Pi based replacement that I intend to build. Anyway, the radio stopped working and I had to mess with the power connector on the back to get it going again. When I had it apart I checked how the printed bracket was holding up to holding all that weight through two summer's worth of hot days. It held up perfect. I'd have taken a picture but there was nothing to see. Everything looked exactly like the day I first printed it.
Note - Although the spacing seems to be the same as the ones on the bottom the two snaps at the top did not quite fit for me. I am not sure if they are placed just slightly wrong in the model or if it was an artifact of my printer. I ended up just cutting them off as they were not necessary anyway. On the top where those snaps go you can just use the tabs from the stereo mount to hold everything in place.
One more thing about the clips. I have included supports to help print the overhangs at the tops of the clips. This will have to be trimmed off before use. I hope to make this optional in a future, parametric release of this model.

/https://fbi.cults3d.com/uploaders/21113037/illustration-file/d7c5d89a-1184-4b59-814d-3746985733ba/mounted_inside.jpg)


