Gyroman 4: Walking Gyroscope
Gyroman 4: Walking Gyroscope


Print Profile(0)
Description
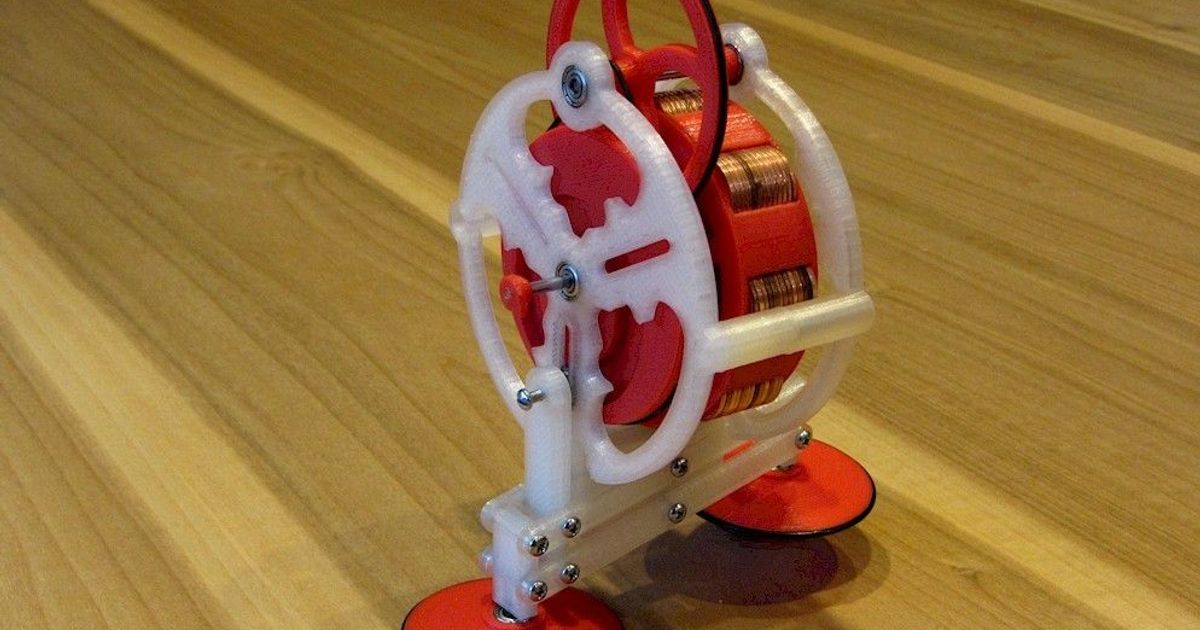
This is my fourth iteration of the fiendishly clever walking toy invented by my friend John Jameson back in 1981. It mechanically gears a spinning gyroscope (made of 104 pennies!) to a cam which pushes a pair of feet up and down. When one foot goes down, the body actually lifts up and then starts to precess clockwise. Then when the other foot comes down, the body lifts again, but this time precesses counterclockwise - and voila, it walks!
Unlike my previous versions that used o-ring belt drive reductions, this version uses printed gears that are more efficient, run for longer, and are easier to assemble. The parts list and assembly instructions are below the video:
Parts List
3D printed parts:
2 sides, 1 flywheel, 1 retaining ring, 1 cluster gear, 1 collar, 1 eccentric, 1 link, 4 bars, 2 legs, 2 feet, 1 hook, 1 pull ring. Print all parts in the orientations shown without supports. I used 0.2mm layers and 3 perimeters.
UPDATE: I've added a version of the flywheel with a set screw to clamp onto the shaft. You can use an additional one of the 4-40 x 3/8" pan head screws as a set screw. Also note that you'll need to get this set screw started before you insert the pennies because the screw head will interfere with the penny stack.
Purchased parts:
10 - 623ZZ bearings (Amazon)
1 - 3mm dia. rod, 63mm long (Amazon)
1 - 3mm dia. rod, 48mm long (Amazon)
20 - 4-40 x 3/8" pan head screws (or M3 x 8mm)
1 - 4-40 x 3/4" pan head screw (or M3 x 20mm)
2 - 4-40 washers, 0.03" thick (or M3 washer)
1 meter of Spectra fishing line (30lb test)
400mm 1.75m TPU filament (or 2 rubber bands)
104 - US pennies
cyanoacrylate glue (superglue)
Assembly
 1. Stack 13 pennies in each of the slots of the flywheel. Press the retaining ring on top and secure with a few drops of superglue. |  2. Press one bearing into the center hole and one into the upper hole on both side pieces. It should be a fairly tight fit. |
 3. Press two bearings into the center hole of the eccentric piece. They should be flush front and back. |  4. Press one bearing into each of the feet. Then, lace the TPU filament through the notches as shown, securing the ends with a drop of superglue. (You can also use rubber bands instead.) |
 5. Press the longer 3mm rod into the flywheel so that it protrudes 5mm from the flat side. Secure with a couple drops of superglue. (You may want to scuff the shaft with emery paper to improve glue adhesion.) Note: I've also added a version of the flywheel with a setscrew hole (use a 4-40 pan head screw) that doesn't need glue. |  6. Press the shorter 3mm rod into the collar so that it protrudes 4mm from one end. |
 7. Place a washer over the short end of the flywheel shaft and then insert that end into the center bearing of one side. Insert the short end of the collar shaft into the upper bearing. |  8. Drop the cluster gear onto the upper shaft as shown.
|
 9. Drop the eccentric piece over the center shaft as shown. |  10. Slide the second side over the two shafts. Secure the two sides together with one screw on either side and two screws in the bottom counter-bored holes. |
 11. Assemble the two legs and 4 bars into the parallelogram configuration shown. The 8 screw holding the legs need to be a little loose so that everything can pivot. Insert screws through the underside of the feet bearings to secure the feet to the legs. |  12. Secure the parallelogram assembly to the body using 4 screws (2 front, 2 back) in the pair of holes underneath the flywheel. Also assemble the link piece sticking up from the legs as shown. (Do not insert the upper side screw yet.) Again, all these screws should be a little loose so that the entire leg assembly can pivot. |
 13. Now the tricky part. Slide one bearing into the eccentric slot, and then tilt the body sideways so that it drops into the hidden slot in the side piece. Then slide the last bearing into the eccentric slot and position is so that it lines up with the first bearing. |  14. Insert the longer screw into the upper hole so that goes through both both bearings. Screw the screw in until it just hits the bottom of the eccentric slot, and then back off by a couple of turns. The end of the screw should not scrape the bottom of the slot during operation. |
| 15. Press the little hook over the long end of the flywheel shaft as shown in the photos above and secure in place with a drop of superglue. (Again, scuffing the shaft with emery paper may improve glue adhesion.) |  16. Create an overhand loop in each end of the Spectra fishing line. Loop one end through the small hole in the pull ring. Do not skip using the pull ring – the Spectra line is extremely thin and will cut your hand if you pull on it directly! |
Usage
Loop the free end of the pull-cord over the little hook on the end of the flywheel shaft. Rotate the flywheel to wind up the cord on the extended length of shaft. Do not wind the cord up the shaft so far that it touches the bearing. Grasp the body across the side bulges, holding the body vertically, and pull very firmly on the pull-ring. You'll want to get the flywheel spinning very fast - up to 2000 or 2500 RPM. Place the Gyroman on the floor (it loves to walk off of tables) vertically without tipping it in the process. Watch it go!
Modifications
I've included STEP files for the flywheel and retaining ring for anyone wanting to modify it for coins other than US pennies. Although apparently, 2 cent Euro coins will work as well – just use stacks of 12 instead of 13 US pennies as the Euro coins are a little thicker.