Skip to content

Sealing plug for radiator control tee

Advertising
Advertising
?
Creation quality: 0.0/5 (0 votes)
Evaluation of members on the printability, utility, level of detail, etc.

  • 183 views
  • 2 downloads

License
3D design format
STL Folder details Close
  • bouchon_test_filetage.stl
  • bouchon_v2.stl

Learn more about the formats

Last update 2024-01-26 at 17:00
Publication date 2024-01-20 at 16:40
Design number 1726474

3D printer file info

3D model description

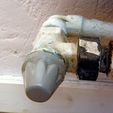
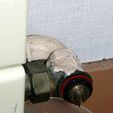
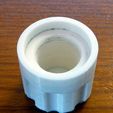
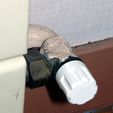
If, like me, you've got this kind of heating radiator adjustment tee (see first and second photos), you'll probably have a leak the first time you try to adjust the return flow. And if you've lost the protection and sealing plug, you'll be in a lot of trouble.

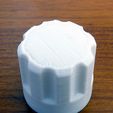
I couldn't find any such stoppers for sale, so I had to make one by 3D printing.

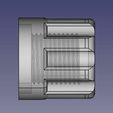
Cap specifications (cap.stl file) :

  • Even if the return temperature isn't normally very high, it's better to use a heat-resistant plug. For my part, I used ASA.

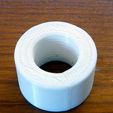
  • The plug's outside diameter is 26mm. Its length is 24mm (2mm longer than the original).

The tapping has the following characteristics (Freecad labels):

  • Unified fine thread (UTS)

  • 0.40mm clearance

  • Size 5/8

  • Thread on 15mm (but in theory, 4mm is sufficient).

Can be fitted with an O-ring for sealing. But it's better to use filasse with jointing paste, as in practice, the O-ring only applies imperfectly to this type of tee.

I've also made a test version (file bouchon_test_filetage.stl) that's quick and easy to print out, so you can check that the threads match.

Version 2: compared to the version initially published, I've made a modification to the plug to improve its watertightness. I noticed a leak at the end where the thickness was 2mm. It's now 5mm thick, and so far I haven't noticed any leaks.

I also made a print with a wall thickness of 10mm, which in practice means 100% filling. But still, for reasons of watertightness, it's better to play with thickness rather than filling.

3D printing settings

For printing, I use Cura's standard settings for ASA except :

  • Activation of stretching on all layers to ensure good flatness of the part that receives the joint if you put one. This activation is unnecessary on the test version.

  • Number of wall lines = 5 (important. I've had leaks with the standard value of 2). For the test version, you can settle for 2.

  • And for ASA, no ventilation

Advertising


Page translated by automatic translation. See the original version.
Issue with this design? Report a problem.

Would you like to support Cults?

You like Cults and you want to help us continue the adventure independently? Please note that we are a small team of 3 people, therefore it is very simple to support us to maintain the activity and create future developments. Here are 4 solutions accessible to all:

  • ADVERTISING: Disable your banner blocker (AdBlock, …) and click on our banner ads.

  • AFFILIATION: Make your purchases online by clicking on our affiliate links here Amazon.

  • DONATE: If you want, you can make a donation via Ko-Fi πŸ’œ.

  • WORD OF MOUTH: Invite your friends to come, discover the platform and the magnificent 3D files shared by the community!


Sharing and downloading on Cults3D guarantees that designs remain in makers community hands! And not in the hands of the 3D printing or software giants who own the competing platforms and exploit the designs for their own commercial interests.

Cults3D is an independent, self-financed site that is not accountable to any investor or brand. Almost all of the site's revenues are paid back to the platform's makers. The content published on the site serves only the interests of its authors and not those of 3D printer brands who also wish to control the 3D modeling market.

100% secure payment by credit card, PayPal, Apple Pay, Google Pay, etc.
View all payment options.