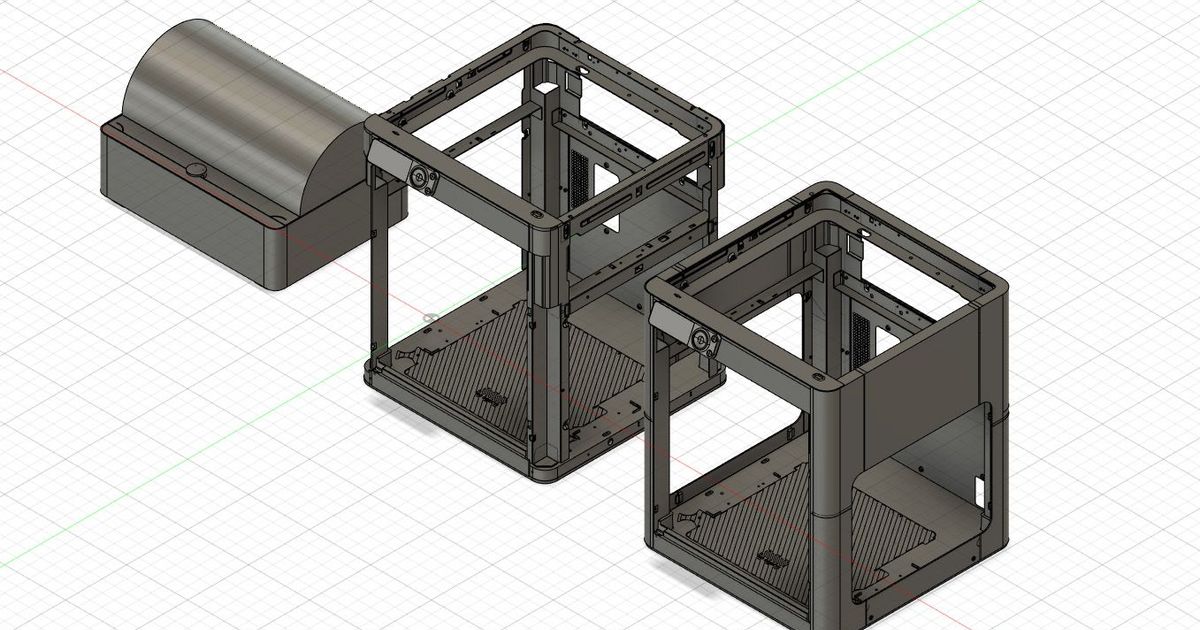
Part 1 - Borg Cube P1P Mod
Part 1 - Borg Cube P1P Mod


Print Profile(1)

Description
Please note this was a collab with Bambu Labs.
The printer was provided free of charge for this project.
Turn your Bambu Labs P1P 3d printer into a Borg Cube with this MOD.
16/04/2023 - Please note assembly instructions have been amended. Please read thoroughly.
This design has been uploaded in two parts due to licenses.
The parts under Part 1 are remixed from Bambu Lab's side panel designs. As such these STL's are uploaded with respect to the Creative Commons license that was originally designated.
All remaining parts under the part 2 download are unique and are not remixed. And have been uploaded with respect to the Star Trek IP and thus have been uploaded under a non commercial license. These parts are uploaded under ‘The Borg Cube P1P Mod - ( Part 2 ).’
You can find Part 2 under my profile page or via the link below.
https://www.printables.com/model/452143-part-2-borg-cube-p1p-mod/files
MAKE IT YOUR OWN
This MOD has a few options you can choose from. The front doors are optional, and there is even a version compatible with the official Bambu Lab P1P lid. So if you want a door, a lid, the options are available to you.
WARNING
Take note, if you decide to print the lid compatible version, I'd recommend printing the outer shell parts in PETG. If you are later planning to print on your P1P materials such as PETG or other such materials that require high temperatures, then I would recommend printing the outer shell parts in PETG. This is important. Think carefully about which material to print the outer shell in. If you are not sure, print the outer shell in PETG. Also note, if you are planning to later print ABS, ASA, due to the high temperatures required I cannot recommend this enclosure.
All parts are printable on a Bambu Lab P1P.
But take note the corner parts were printed on the slowest setting on the P1P.
Please download the assembly instructions and follows these for the assembly.
This MOD will use allot of filament.
Before you all start ordering Black Matte PLA, as an alternative, you can always order pla in various colours and spray paint a few light layers of primer and then spray paint a number of light layers of matte black onto the parts. This would probably work out cheaper and would be a good way to use up any other filaments you have lying around.
The filament overview for Part 1 and Part 2 STL's are below. Along with a more detailed breakdown of Part 1 STL's.
For Part 2 filament part breakdown, please refer to the PDF download ‘Filament Requirements per Part’ PDF. it was too long to add here. :-/
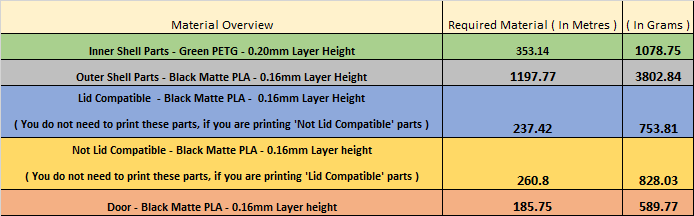
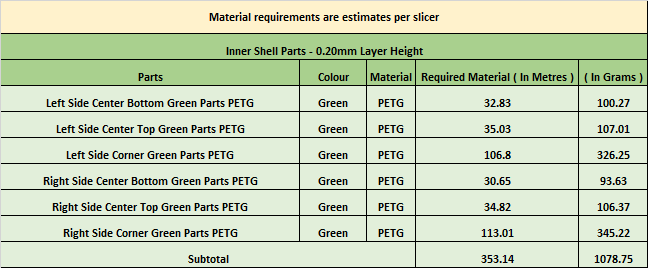
Filament overview per part for Part 1 STL's only..
The video that inspired the unique door mechanism is below. :-)
Video by: I SIMPLY BUILT IT.
If anyone has any questions or queries, even if you might think it is a stupid question, seriously, just ask me. Send me a DM through Prusa Printers and I will get back to you ASAP. I want people to be able to print this. So if anyone is having any problems, just reach out. I'll be happy to help where I can.
If you want to stay up to date with anything I am working on and are perhaps interested in other projects I have in development, please check out my instagram or Twitter.
https://www.instagram.com/neil3dprints/?hl=en
Happy printing. ;-)
Neil
Documentation (4)
Comment & Rating (18)


Related Models


