Reinforced Drawer Stop Glide Kit - Compatible with Rite Trak II, No Support Remix
Reinforced Drawer Stop Glide Kit - Compatible with Rite Trak II, No Support Remix


Print Profile(1)

Description
Reinforced Drawer Stop Glide Kit - Compatible with Rite Trak II, No Support Remix
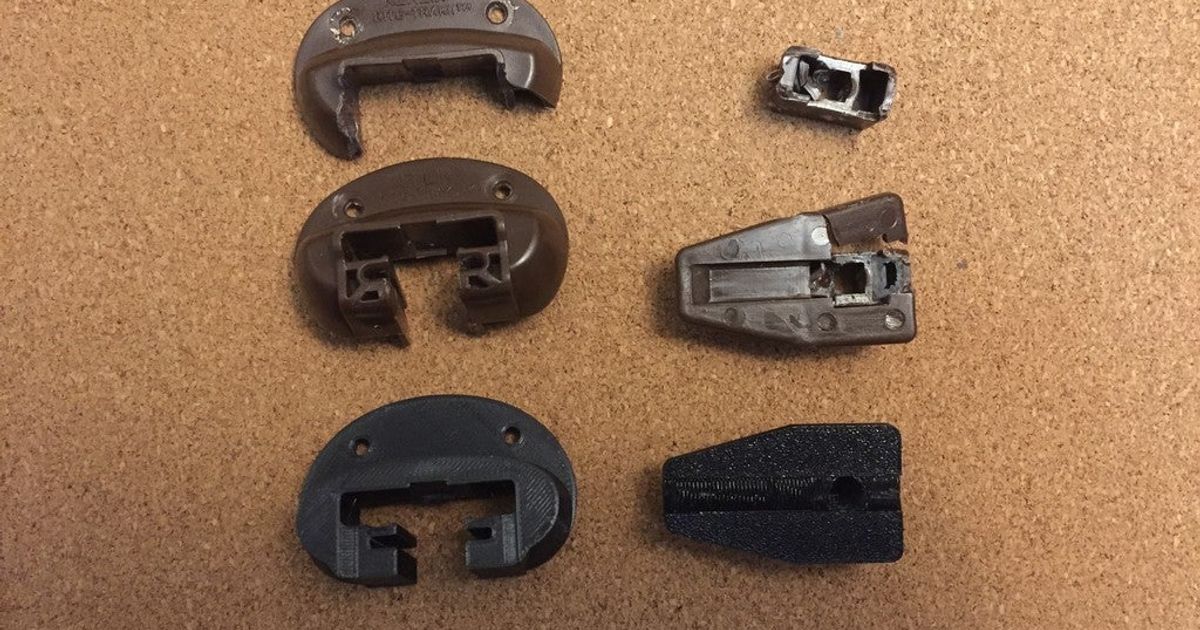
This 2 part model is a remix of a reinforced drawer glider bracket model available on printables. This model is remixed for purposes of print speed, strength, with no need for supports, and no watermarks.
The drawer backplate on plate 1 has been modified to allow for no usage of supports. When I tried using the referenced printables model print times were slow, and supports were challenging to clean up (even when using PLA interface). Even worse the part always broke when installing, the most efficient solution was simply to slice the model at the base, and it works equally well to the referenced model with a better install process.
Print Profile Notes:
Nozzle: Suggest 0.4mm nozzle for precision fit
Wall Loops: 6 wall loops on 0.4mm nozzle, 0.6mm nozzle not recommended due to worse layer adhesion.
Layer Height: Suggest 0.16 to maximize strength
Infill: 80% gyroid
Brim: None on textured build plate. Consider brim for smooth PEI plate.
Batch Size: For optimum layer adhesion advise printing one part at a time to keep layers hot (2 parts tops). For large Batches reduce fan cooling. PETG performs worse if layers cool too much, and you risk a layer shift on bed-slingers like A1.
Material: PETG or ABS
Color: Any, you won't see these once installed, great use for leftover filament.
Print Orientation: On drawer glide back, the flange with holes should be facing down. On drawer glide insert the point of the wedge shape should face the front (on A1).
3d Printers: Should be printable on any printer
Filament amount required: 24.5g per set.
Installation Tools, and Guide:
Tools Suggested:
- Insert Screws: Suggest using larger 1 5/8" Deck Screws for install of drawer glide insert. If you re-use existing insert screw then I would suggest to use wood glue to improve the bond.
- Back Screws: Reuse existing short/stubby screws for drawer glideback.
- Tools: Philips Screw Driver and/or Rachet that can fit Torx Bit (if using wood screws). And vice Grips (best) or pliers (okay)
- Vice Grips: Sometimes the rails get bent over time and won't fit correctly, gently use some vice grips to bend the rails back into shape, by
- Screw Driver Notes: Hand or rachet tighten to ensure you don't over-torque the part and damage the structure.
Install Guide:
- Drawer Removal: Remove Drawer from furniture.
- Backplate and Insert Removal: Remove old backplate and drawer slide insert with screwdriver.
- Backplate Installation: Use vice grips to reshape the corners on the end of rail underneath the drawer (to fit backplate), over time these often become deformed, then install backplate with 2 screws (reusing original is okay).
- Insert Installation: Then install drawer insert to the furniture, suggest using larger screw (referenced above), press down on insert when installing the screw or else the insert can move upward and become canted, which makes it difficult to reinstall the drawer.
- Drawer Re-Installation: When reinserting the drawer to the furniture you may need to push upward on the slider under the drawer in order to get it to insert correctly.
- Savings: Enjoy the money saved versus ordering 10 these online for ~$40.00 USD.