Deathstar Signage
Copyright Claim
Deathstar Signage
Boost
43
57
7


GIF


Print Profile(1)

0.2mm layer, 2 walls, 10% infill
Designer
8.5 h
5 plates
Boost
43
57
7
0
56
21
Released
Description
List of hardware needed:


-800x800.jpg?image_process=format,webp)
- Towerpro SG90 servo motor
- RC servo motor tester
- LED strip 5v
- Tactile button - 15mm height
- Terminal block
- Brass threaded insert m3
- m3 screws - 6mm & 10mm
- Lithium Battery 18650 3.7v - make sure to use 2500mAh or higher battery.. or its not going to be enough to power all servo tester and LED
- Lithium Battery 18650 holder
- TP4056 - USB to lithium battery protection & charger module
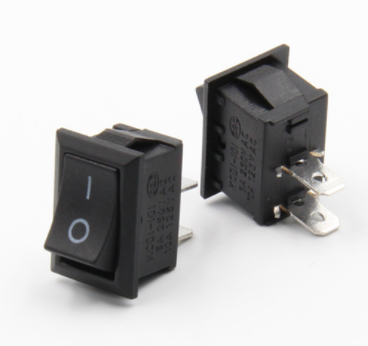
- Rocker switch - 2pins 15x10mm
- wires.. glue gun.. soldering gun..
Wiring diagram:

- the turrent will be turning using SG90 servo motor..
- we will be using the servo tester to control the SG90 servo.. there are 3 modes..
- manual control.. servo centered.. and looping turns…
- since the servo tester board will be use to control manual movement of the turrent.. we will need to solder a new tactile button to control the modes of the servo tester..
- everything is powered by a lithium battery connected to a USB charger

I made the servo motor loose because it seems there is a variation of the SG90 and the size is different.. so i made bracket to be screwed on to hold the servo..

once all wiring is done.. you'll need to make the LED screen.. i made a simple 3 line LED strips and wire the +ve and -ve respectively.. the wire is long enough to reach terminal block

Insert the LED screen and screw it in place..

insert the frame.. text signage and the yellow screen in sequence and screw them together into the base..
And you're done.. I hope you'll have fun making this deathstar signage..
Comment & Rating (7)
All

I think I have everything to make this but the servo tester. there has to be another way to control the servo without the tester?
The designer has replied
0
Reply

you can controller it with a microcontroller.. but that will have to be programmed and its slightly more expensive than the servo tester..
0
Reply
Replying to @fay3dlab
I have an extra micro controller so that's doable.
0
Reply
Replying to @momofatts
i have no idea how to make the servo do a loop move but i think mr chatgpt might be able to help you..
0
Reply

I think for most of them (like me) the effort for a movable turret is too much. How about a housing with a holder for the lamp kit on the back wall?
The designer has replied
0
Reply
i think i can do that.. just need to change a bit the internal signage.. and i'll use the lamp kit 001 to light up the signage.. give me a few days.. currently working on several toher projects..
0
Reply
Replying to @fay3dlab
Take your time ;).Was just a suggestion.I got the same Problem.So many things to print and such a little time ;)
0
Reply
No more
License
This work is licensed under a
Creative Commons Attribution-Noncommercial-NoDerivativesRelated Models


© 2024 MakerWorld