Bambu X1 and P1S LED Riser
Bambu X1 and P1S LED Riser


Print Profile(1)
Description
I was getting a little lost trying to navigate around all the ever expanding number of riser models, so I thought I’d compound the problem and create one to add to the list. I was hoping to create something simple to print and assemble, with an area for LED lighting and a way to vent air through it, while keeping the same outside dimensions as the printer. After more trial and error than I would have liked, I think I ended up with one worth sharing.
It should work on the X1 as well, but I only have my P1S to try it on. It will NOT work on the P1P.
Hardware requirements:
- 4 M4x16 screws
- 2 M3x20 screws
- 6 foot neon strip LED light (https://www.amazon.com/dp/B0B73VGSCL?ref=ppx_yo2ov_dt_b_product_details&th=1)
- Thin ½” double sided tape or glue
The riser prints out in 4 sections that easily connect. You will also need to print out 2 shutters and 2 knobs. This can all be done in 6 prints. You might be able to print 2 sections on the same plate and do it in 4 prints, but it will be tight. I haven’t tried it.
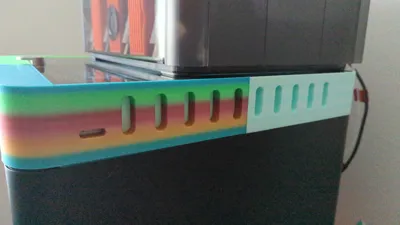
I originally had a 45 degree chamfer on the inside for LED strip lights, but found that they couldn’t make the turn on the corners and it would require cutting them and soldering the sections together. I had a roll of this LED neon strip around and it can bend around the inside corners quite well. It worked even better than I expected. I have the cable routed out through a notch in the riser and plugged in a USB power adapter. I'm sure it could be adapted to plug into the printer lighting as well.
I ended up with some free real estate in front of the glass, so I added a couple of slots for hex drivers needed to change parts in the extruder assembly. I’m including blank sections that can be modified for whatever you would like to keep there, or nothing at all if you want.
I initially wanted to add the logo as part of the main print, but the print time went up drastically if I wanted to do it in color. I ended up making an inset and printing some logo plates separately. They snap right in and can be removed easily by sticking a thin blade in the corner and prying it up a bit. I've included blank plates to download so you can add whatever graphics you want.
Tips
- Normal supports work better than trees on this model; with PLA especially, they pop off nicely.
- Use support blockers for the vent holes, they print better without them. Make sure the blocker is high enough not to interfere with the LED notch on the bottom.
- On the rear sections, extend the support blocker almost all the way to the end. Failure to do this will result in a support plug at the end of the slot that you can’t remove. See picture.
- The shutters slide in the side slots with the notch towards the rear. Line the hole up in the front slot and use the M3x20 screw to attach the knob to the shutter.
- There's a 3mm lip on the inset area of the front piece. I tried a print with PLA and no supports and got a good bit of overhang stringing. It's useable, but I'd suggest letting it support the area. The PLA snaps off clean.
- Assemble by snapping the front and rear sections together separately first, then connect the front and back halves and secure with the 4 M4x16 screws. Don’t forget to put the USB cable through the hole in the back before snapping the back halves together.
- On the front sections, make sure the blockers don’t extend to the tabs on the end, they need the supports. Block the end of the small knob slot towards the front; it’s easier to remove the plug if you can stick something in there and pop it out. See picture.
- Even with the weight of the glass cover, I found that the motion of the printer could sometimes shake the riser out of place. I suggest using something to hold it in place. Double sided tape should do the trick, it shouldn't take more than a few 1" square pieces in the corners. I used a few dabs on silicone sealant. It shouldn't need much, just enough to keep it from bouncing up.
01/12/24 - Fixed problem with lid rocking. Provided cutouts for screws attaching the glass handle.
01/16/24 - Added X1-Carbon nameplate
Comment & Rating (25)