Instant Y-Splitter for Bambu AMS X1C P1S P1P
Instant Y-Splitter for Bambu AMS X1C P1S P1P


Print Profile(2)


Description
I call this the "Instant" version of a Y-Splitter, because it requires no separate purchase of Bowden connectors, just print all necessary parts!
Basic Features:
- No extra parts needed, click and print.
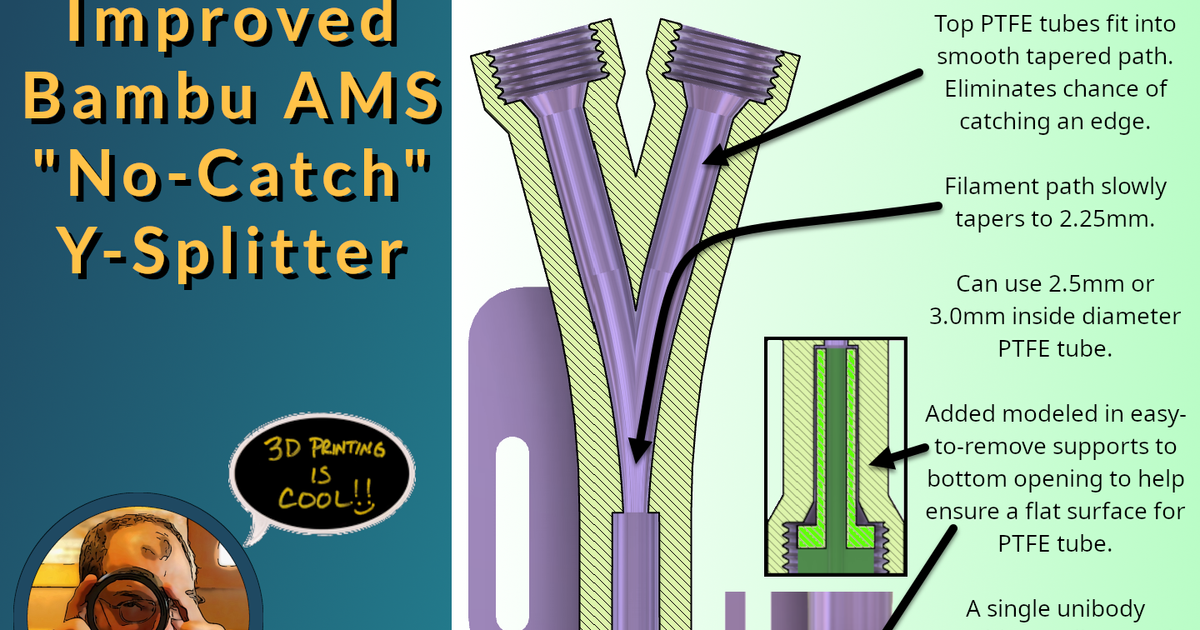
- PTFE tubes held in place securely by friction nuts
- Smoother filament path than default gray connector, less AMS errors.
- Mount directly to back of the printer using existing screw.
- Use rear or side mounted spool holder for external spool, your choice.
- External filament can be fed directly into the splitter or a PTFE tube can be inserted for guiding, your choice.
The goal of this project was to solve the following issues:
- Having a Y-Splitter to use AMS and external spools without ever needing to disconnect anything, like all other Y-Splitters.
- Making a Y-Splitter that did not require the purchase of extra bowden connectors, just click and print!
- Solving AMS pull/push error messages by having a cleaner and smoother filament path than the default gray connector on the back of the printer, which is notorious for causing filament hangups.
- Having the splitter directly mounted to the back of the printer using existing screw holes.
How I solved them:
I am only a novice 3D designer, so I started with an existing Y-Splitter design to remix from. So this is
A remix/adaptation of the
Bambu AMS No-Catch Y-Splitter PC4-M10
by Ed Johnson. Full credit to him!
I chose this design because of the "no-catch" nature of it, and added the printed connectors on the two ends where the PTFE tubes go from the AMS to the splitter and the splitter to the tool head. I then made other changes to the design to accommodate this for printing, such as making it thicker to account for the extra diameter of the friction nuts. The biggest other change I made was converting the split for the external filament into a tapered hold you can directly feed the filament into, or push in a PTFE tube if you want to guide the filament from an external spool.
Printing Instructions:
- I actually recommend printing this in PLA, it has less friction than PETG/ABS and will provide a smoother filament path.
- Click-to-print directly from MakerWorld if you want, the profile is already set up to work well with two AMS colors for the splitter and the nuts.
- Print at 0.16mm layer height, this provides enough smoothness for the filament to glide easily inside, and the majority of the inside is PTFE tubing anyway.
- Because of how this prints, I recommend a hefty brim.
- THIS IS MADE FOR BAMBU TUBES. If you are trying to use other tubes such as Capricorn, the tolerances MIGHT NOT fit.
Post-Processing, and Installation Instructions:
- This prints with a "support" piece to help keep the splitter stable while printing and not wobble. After printing, you can slide this support piece off the bottom.
- You may have to cut the support piece off with a razor knife where it's attached to the brim.
- Use a razor knife to also clean off the brim and clean it up around the threaded connector.
- TEST the tube connection tolerances and filament paths before installing the splitter, using a short piece of spare tubing and spare piece of filament. DO NOT screw the nuts down at this point because once tightened, they are quite hard to remove without pliers.
- If necessary, use a heat gun / lighter to remove any stringing.
- Insert the PTFE tube from the Toolhead to the single port on the Splitter (bottom of the "Y") until it pushes in all the way, you need to put the nut over the tube first, the side of the nut with the bigger hole goes towards the splitter.
- You may also have to pull some extra tubing out of the back of the printer from inside the printer if there is not enough sticking out, you need to loosen the interior "stopper" in the printer on the tube. Remember to put that back later. There is enough inside the printer, don't worry about making it slightly shorter! But if you are worried, you can also cut your own PTFE tube to be a bit longer.
- Tighten the nut down as tight as you can get it by hand, this will lock the PTFE tube in place.
- Unscrew the screw from the back of the printer. You MIGHT need a slightly longer screw. You can use one of the longer ones that came with the printer if you still have them, or you may have to make a quick trip to the hardware store to get one.
- The threads for this screw inside the printer are plastic, so if the threads are different or your replacement screw is slightly wider (i.e. M3 vs M2.5), you CAN force it in to re-thread. Do it at your own risk, it shouldn't damage anything but still your risk.
- Place the screw inside the groove on the splitter and screw it into the printer. This groove allows you to position the splitter how far you like, just like the original design.
- Optionally, you can decide not to mount the splitter to the printer at all, it's fine to dangle or until you get the proper screw.
- Insert the PTFE tube from the AMS hub into the other port on the splitter, remembering to put the other nut over the tube first. Tighten it down by hand again.
- Optionally, you can now cut a piece of PTFE tube and stick it into the final hole on the splitter, cutting it to length and bending it to wherever your external spool is. This does not need to lock into place, but just inserted in snugly. You may have to push it in quite hard.
If you don't want to use the PTFE tube for the external spool guide, you can also just insert the filament directly into the hole when you guide the external filament in manually.
VERSIONS & UPDATES:
2023.10.17
Initial version released. Please print and test, and give me your feedback. Thank you!
Comment & Rating (262)