Bowden Coupler - Fully Printed
Bowden Coupler - Fully Printed


Print Profile(0)
No Print Profile yet. Add one to earn points.
Description
This is a fully 3D-printed couple for combining two bowden tubes together to 1 output.
The Bambu Lab X1/X1 Carbon with AMS allows using filament outside the AMS, but it normally requires uncoupling the bowden tube from the printer and manually inserting filament. The stock Bowden coupler has tiny metal teeth that dig into the bowden tube, and will eventually wear out the PTFE bowden tube. Some others have come up splitters designs that use threaded metal fittings, but I don't have any of these and wanted to use a fully 3D printed version.
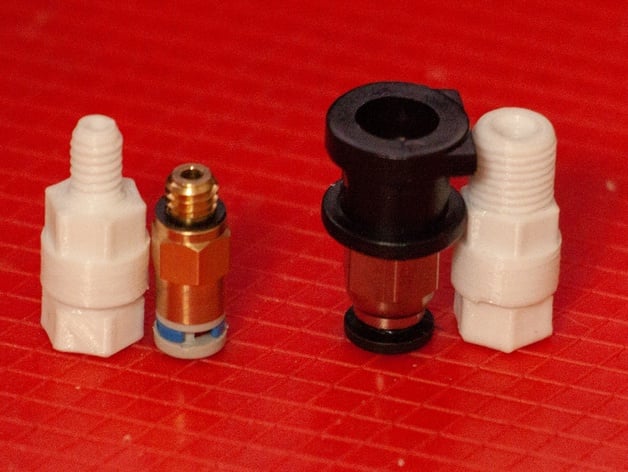
Incorporates a modified version of the PC4-01 fitting by Dimasbka from Thingiverse (https://www.thingiverse.com/thing:3976142) that uses a slot and retention clip instead of M10 threads. This change allows the tubes and coupling to rotate in place.
There was a recent firmware update what added a check box to disable AMS so you don't need to unplug it to use a separate spool of filament.
Printing tips:
I had success printing all parts in PLA, using 0.4mm nozzle and 0.12mm or 0.08mm layer heights for best results on the threads. Make sure you have first layer under control as it will cause problems with fit (on my printer I use 0.07mm elephant foot adjustment).
- Y-coupler:
- Printed laying flat on the side. If printed vertically you may need to re-scale slightly to allow a tight fit to the tube fitting (printing vertically has not been tested).
- If inside corners filled in a bit during printing you may want to clean up the inside corners of the clip slots.
- Tube Fitting:
- Body and nut printed with threads facing up. The side of the slot farthest away from the threads critical to holding in place by the clip. I had moderate success adding supports to the slot and cleaning up with a pen knife.
- Compression ferrule gave me some trouble slicing due to the sharp edges registering as empty layers. Manually adding supports to the bottom few layers seemed to solve the empty layers problem, but also required cleanup with a sharp knife.
- Nut printed with threads facing up. May need to clean up seams inside the hole for tubing and on the threads. As long as it's smooth you should not have issues. Tube hole should be about 4.15mm and slide onto tubing easily.
- Retention clip:
- Print laying flat. Make some extras in case you break some while inserting into the coupler.
Sizing and tolerance:
- Model dimensions were adjusted to print at desired size. Your printer may give slightly different results and one part or another may need slight rescaling to fit just right.
- Nut, ferrule and body - holes for tube should measure 4.15mm
- Tube connector body - slot should measure about 5.85mm, round surface should measure 7.00mm.
- Coupler hole measures between 7.03-7.15mm for me (these are layer artifacts because I printed on the long side, so the opening isn't truly round). This dimension isn't critical as long as the fit is good.
- Connector should fit snugly into the coupler and hold it's position, but it should rotate smoothly with some pressure.
Assembly:
- Slide the nut onto bowden tube followed by the ferrule. Slide the connector body almost to the end of the tube. Try to leave a small gap since the tube will be pushed a little bit when tightening. Tighten the nut until the tube is held firm. You should be able to do this by hand, but may need tools if the printed threads bind.
- Insert tube and fitting fully into the coupler and gently insert retention clip to hold it in place. The clip should fit tight to the tube fitting, and is okay to have a little play in the slot in the coupler.
- Rotate and tug on the tube fitting to make sure clip has a good grip. If it was bent open too much or cracked it can have trouble holding the parts together.
- Remove factory tube coupling and repeat on printer side. You might need to liberate a little bit of extra tubing from inside the printer, there is a little stop on the tube inside the printer.
- For the side connection, I don't use a tube but still like to insert the 3rd fitting so I don't lose it.
Abrasive filaments may wear the inside of the coupling. This has not been tested.
Don't worry too much about the coupler coming undone when starting a print. The AMS will detect a problem and automatically retract the filament once it notices it hasn't reached the extruder. If left unattended it might try a few times but will eventually pause and wait for help.
The coupler inside diameter narrows slightly at the printer end and flares open slightly at the double end to better guide filament into place and avoid it catching. I haven't has any issues with filament catching when loading or unloading from the AMS (just starting a new print using AMS and forgetting to pull the side filament out).
Edit Dec 30, 2022
Added individual STEP files, oriented for printing.
The side mounted spool holder can be found here:
https://www.printables.com/model/320139-bambu-x1-side-mounted-spool-holder
Edit Feb 19, 2023
Added a slightly slimmed version of the connector body that will fit through the gap in the printer back panel. This way you only need to unclip the coupler and don't need to uncrew the PTFE connector to take the back panel off the printer.