Printable "Precision" Measuring Tools
Printable "Precision" Measuring Tools


Print Profile(12)


Description
I remixed this project found on thingiverse and adjusted some shapes that were not printable.
The profile used in Bambu studio is the default 0.08mm Extra fine profile with the following modifications:
walls: 4
infill: gyroid 15%
Copy of the description from the original designer jhoward679:
Summary
this is a wip. i will be tweaking and adding files and information as i go. any comments questions or suggestions are welcome. these are a set of "precision" tools that are printable.
WARNING: do not scale this project it will mess up the measurements. if something does not fit on your build platform you can either copy my original from tinker cad and adjust it to fit, or ask and i can see if i can break up the sets into smaller sets to accommodate.
i am new to 3d printing having just built my kit last month and just started to design a few weeks after that, so any hints tips or advice is more than welcome. constructive criticism helps me construct better.
after i built my 3d printer it took all of 3 seconds before the kids in my family wanted in. i am more than happy to share and teach, however i start to get teary eyed at the thought my expensive precision tools being destroyed by hyperactive 6 year old. being a tinkerer i have a large set of precision tools and know the importance of "the right tool for the job". i have also had more than one tool broken by someone abusing it because they didn't know how to use it properly or didn't care to. so now i can print a set for each kid, then they can all learn how to use them and start in on their own projects! and my tools can live for at least one more day!
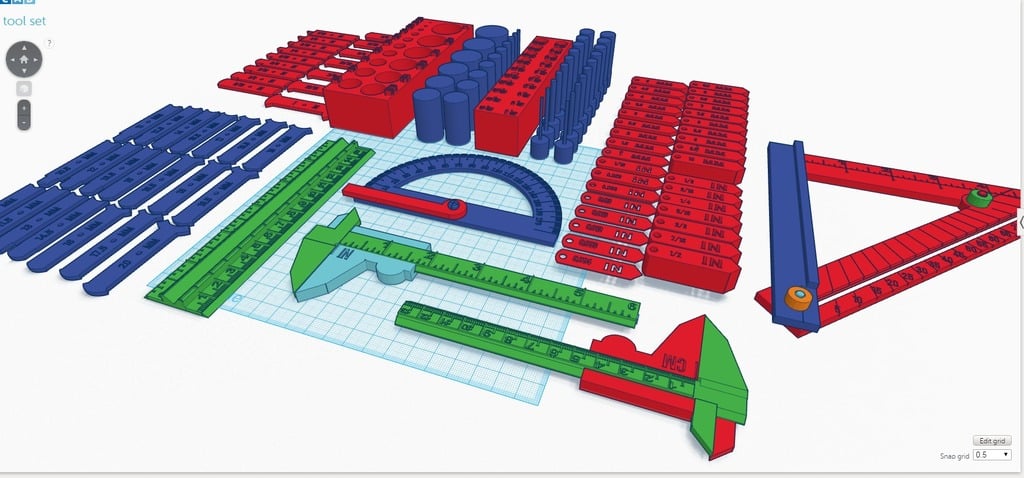
so far i have a set of feeler gauges designed for mm and inch. and a hole gauge set in the same. a 6 in simple ruler inch/centimeter with a v-block to help hold round objects in the center for marking. a set of simple calipers in cm and inch. a fillet gauge in mm and inch with convex and concave ends. a speed bevel to mark or measure angles quickly. more tools will be included in the final set. i hope that they enable people who are starting off in 3d printing and design to be able to have a precision tool set that is adequate for design and testing of their projects and machines. nothing replaces a quality set of durable precision instruments hence the quotation marks around precision in the title however this printable set should serve as a working set until better tools can be acquired, or may serve as a permanent set/loner set. plus its always nice to be able to simply reprint a broken or lost tool.
Thanks to jbeegs30 for the correction on the inch gauge and the file upload.
this set can easly save you at least $100.
steel calipers ~ $10
fillet gauge mm ~ $15
fillet gauge in ~ $15
feeler gauge mm ~ $15 and usually not in the sizes we would use for 3d printing
feeler gauge in ~ $15 and usually not in the sizes we would use for 3d printing
hole gauge set mm ~ $ 20 $10 each
hole gauge set in ~ $ 20 $10 each
total ~$110
Print Settings
- Printer:
Hictop Prusa i3
- Rafts:
No
- Supports:
No
- Resolution:
.1 mm
- Infill:
30
- Notes:
print using the highest resolution settings that your machine can do. the print will take a lot longer, however it will result in a more precise tool with more durability. print with a brim for all of the files except the feeler gauges.
Post-Printing
post print finishing is needed
to get the most out of the tools a good amount of finishing is required. any places on the prints that have any stringing or rough/uneven surfaces should be lightly sanded with a high grit sand paper 200+. for the feeler and fillet gauges i simply threaded a piece of string through the holes in the prints and tied a loop in the string so i can hang them over the workbench. leave enough slack in the line so that you can easily separate one of the tools from the others in the set.
remember that if you dont have any tools to check an item with known measurements t
How I Designed This
how to
i designed the tools in this set on tinkercad. links to the individual files will be added over time. you can click the links to tinker cad and undo/disassemble any of the sets to see how it was done.


Printable "Precision" Measuring Tools
project name
Printable "Precision" Measuring Tools.
a collection of tools that can be used for calibration and testing of your printer and to use as a set of tools for measuring when designing a project.
Overview & Background
hopefully by completing this project you will learn about printer calibration, testing and bed leveling, then by printing your own set of precision printing tools you can learn how to use them properly and be able to recreate a simple object in as a 3d model.
Objectives
by participating in this build students will learn what the different types of precision tools are and how to use them to recreate an object of their choice as a model and print it. they should be encouraged to choose simple models but can tackle harder challenges if they wish.(start shameless plug) even a Sphero or Ozobot docking station obstacle or holder! (end shameless plug).
Audiences
this project is really applicable to any age i showed my 3 year old goddaughter how to use the fillet gauge and she was running around the house measuring the edges of everything and announcing the results, the kitchen counter, her moms phone, the rim of the toilet bowl, the handle of the sink after washing the gauges because she touched the toilet with them...ect.
this project can be scaled from a simple show and tell as an introduction to the tools all the way up to a printer calibration test with a reproduction of a real world object using the tools and then a comparison of the printed model and the real world object to check for the accuracy of how the student used the tools.
Subjects
it really depends on how liberally you want to apply the tools to the lesson. these tools can be used as examples in a lesson or be the lesson itself. math, science, art, shop/handcrafts, design, really any subject that uses measuring.
Skills Learned (Standards)
after the project is completed depending on how the teacher presented the project and the level of difficulty they chose the students will all have an understanding of what precision tools are, how to use them to take measurements, depending on the scale of the lesson it can be used to calibrate and test the printer, take a real world object measure it and reproduce it as a model in tinkercad (or other cad software) and print it.
Lesson/Activity
this lesson/activity can be scaled to however large or small you want it to be.
this can be a simple show and tell for friends family or the kids, or show and tell for the class room. this can be as simple as printing the tool that you want to show and bringing it into class or to your audience and explaining how the tool works, how it is properly used, and then passing it around and letting the student use the tool to measure an object of your/their choice then the students can write down the dimensions of the object and be graded by accuracy within a tolerance. you can print all of the tools in the set and do it all at once or spread it out over a period of time for example doing one tool a day.
this tool set can also be used to test printer tolerances and calibrations in the classroom. the lesson could be about fine tuning and calibration of the machines. as we all know even the best machines need calibration and fine tuning which leads to better prints and a deeper understanding of how these machines work, which makes troubleshooting less of a mind altering, hair pulling, i cant believe the print failed at 90% completion, that's it im throwing this printer off the roof experience. the more you know about the printer the easier it is to trouble shoot. the printed tools can be checked for accuracy with other tools and then a better understanding of the accuracy of the particular printer will be gained.
you can also scale this lesson all the way up to the level of for example having the student choose a real world object to replicate it using the printed and tested tools to measure the dimensions and create the model in cad software (i use tinkercad but there's a ton of great software out there). the student can then use the printed and tested tools to measure the real world object and the printed object to compare how close the dimensions are. the students could work alone or be put into groups depending on the resources of the facility. the final reproductions could then be graded based on accuracy.
Duration
once again the project can be scaled. if the tools are printed before hand and passed around the lesson can be as short as it takes to pass an example around the class. or if the teacher wants the whole class to print their own tools and reproduce an item it can be the entire class from start to finish.
Preparation
if the lesson is a simple show and tell to introduce the students to the tools, then there is no prep and the teacher doesn't even need a printer they can order a print off thingiverse. if not the facility will need a printer/s, an internet connection, and filament.
References
n/a
Rubric & Assessment
I am not a teacher so i don't have any experience in this. i guess for the show and tell you could pass an object around and have the students measure it with the various tools then they could fill out an answer sheet and be graded on accuracy. for the full scale of the project you could give a grade based of how close to a given tolerance the students given tolerance is to for example the reproduced real world object within +/-.1 is an A. +/-.5 is an B. etc... the teacher could adjust the letter grade of the tolerance based on the precision of their printer/s.
Handouts & Assets
n/a
Comment & Rating (40)