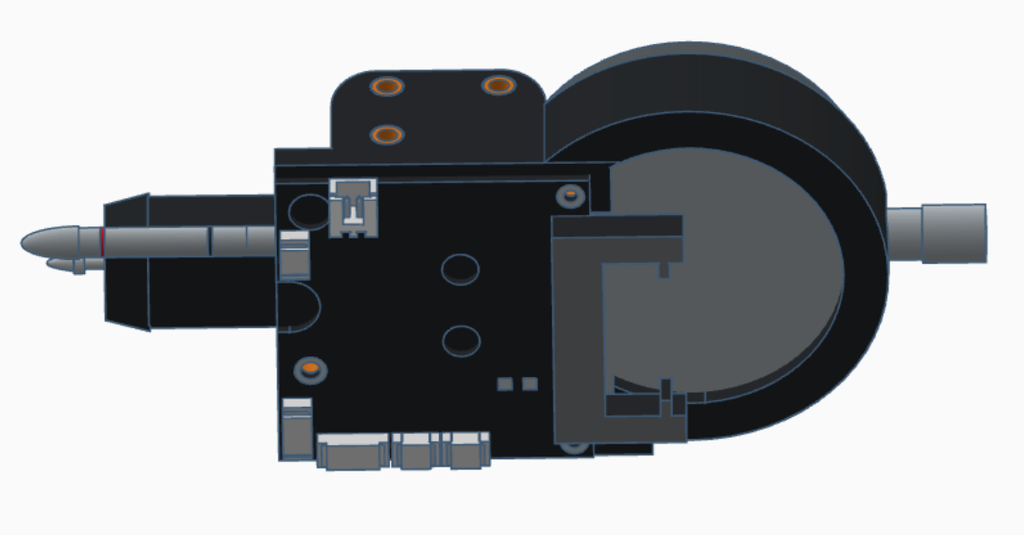
This is a mounting jig for a digital dial gauge.
It attaches to the Creality CR-M4's X-carriage, in lieu of the Sprite extruder. This jig replaces the extruder temporarily, attaching to the X-carriage via the same 3 screws that held the extruder, and allowing precision measurement of X-axis tramming and bed deformity.
Design goals:
1) Position tip of dial gauge in same X/Y location on bed as extruder's nozzle would be.
2) Position optional CR-Touch probe at same relative offset from nozzle as on extruder.
3) Afford adequate rigidity to prevent flexure of either element during use.
This jig might be usable on other 3D-printer models which also utilize the Sprite extruder - but I've not tested it on anything other than the CR-M4. Please comment if you successfully use it on some other model of printer.
There are 2 versions of the stl file:
One version has "HSI" in its filename and is designed to accommodate threaded Heat Set Inserts.
The other version has NHSI in its filename and does not accommodate them - its mounting holes are sized for either M2 or M3 screws to self-tap directly into the part.
After printing, either version of the jig can be assembled in one of two configurations:
1) "Dumb" configuration, with no PCB or CR-Touch installed.
This version would simply be positioned manually over various bed positions by hand, reading the output from the dial gauge. The printer can be powered off while doing this.
The dumb version is best used in concert with my simple Z-belt lock:
https://www.thingiverse.com/thing:6555992
The belt lock holds the Z-axis fixed in place while using the "dumb" mounted dial gauge to read various bed position heights.
2) "Smart" configuration, with a Sprite extruder PCB mounted on its back, and a CR-Touch sensor mounted on its arm.
The "smart" version can be "Z-homed" using the printer menu. It can also perform auto-leveling just as the extruder would.
When positioned to Z=0 and using the same Z-offset you would for printing, the dial gauge plunger will be depressed approximately 6mm. The gauge can then be zeroed and the printer can be commanded to various positions within the print volume just as though it were the hotend nozzle, with the dial gauge reading the actual Z-height at the commanded position. This allows examination of bed geometry, verification of mesh data effectiveness, etc.
Of course, the "smart" version functions perfectly well in "dumb" mode in concert with the belt lock and with the motors disabled or the printer powered off.
Additional parts required:
For either version of the jig, you'll need a compatible dial gauge, similar to this one, with 0.01mm resolution:
https://a.co/d/id590Iw
Or for even higher resolution, this one affords 0.001mm:
https://a.co/d/6Axe7xk
The digital dial gauges above simply slide into the circular opening of the jig with a friction fit. There are no retaining screws needed.
Unfortunately, design requirement #1 resulted in the need to move the dial gauge so far to the right that it would interfere with the mounting screw area of the X-carriage. So it was necessary to raise the dial gauge up far enough that the stock rod length is inadequate.
The solution is to remove the tip and insert a rod extension. These are readily available and not terribly expensive. The gauges above use a 4.5mm diameter rod with m2.5 thread. I used the 20mm extension from this set:
https://a.co/d/8l7MEVr
For the "Smart" configuration, you'll also need a Sprite extruder PCB. The CR-M4 revision of this board is more rare than hen's teeth - but isn't required for this application since no fans or hotend heater/thermistor will be connected. The CR-Touch connector on the V10 board will work just fine with the CR-M4 logic:
https://a.co/d/9f5loQs
You'll also need a CR-Touch sensor:
https://a.co/d/eaKcFmU
Note:
The 10mm thick CR-Touch spacer used on the Sprite extruder is not required or used.
The cable required to connect the CR-Touch sensor to the Sprite extruder PCB is not provided with any version of the CR-Touch sensor that I've been able to locate - so you will need to obtain that also:
https://a.co/d/2ZrF0iW
To install the Sprite extruder PCB onto the back of the jig, you will need the following screws:
1 ea. m3 x 4mm (or m3 x 5mm, but not longer)
2 ea. m2 x 4mm
You can use button-head or socket head screws, but flat heads are self-centering.
To install the CR-Touch sensor onto the mount, you will need the following screws:
2 each m3 x 6 button or socket head screws
If you build the HSI version, you will need the following heat set inserts:
6x m3 short
2x m2 short
Enjoy!
:format(webp)/https://fbi.cults3d.com/uploaders/32105938/illustration-file/f649a468-0c12-4dbb-af8c-75f6e7d45b57/658fa88a-9efe-4dfe-83aa-d3b98fe3ae9a.png)


/https://preview3d-images.cults3d.com/9b0no99vfk8bpg99ajmatvw2e3qw)
/https://preview3d-images.cults3d.com/144xmfph34s4g94ve3075xo8zve3)
