Skip to content

Minimalist aero hub cap (rim cover, trim) for Skoda Fabia, Octavia, Kodiaq, Karoq, Superb

Advertising
Advertising
?
Creation quality: 5.0/5 (1 vote)
Evaluation of members on the printability, utility, level of detail, etc.

  • 167 views

License
3D design format
STL Folder details Close
  • Skoda-Aeroblende-Basis.stl
  • Skoda-Aeroblende-Fluegel.stl
  • Skoda-Aeroblende-Schraube.stl
  • Skoda-Aeroblende-Stift.stl

Learn more about the formats

Publication date 2024-04-15 at 10:00
Design number 1924009

Escapppe

3D printer file info

3D model description

The Skoda Aero rims are fitted with very large and aesthetically questionable hub caps as standard, which - depending on taste - can detract from the appearance of the rims. Unfortunately, Skoda does not offer smaller caps that protect the wheel hub without detracting from the design.

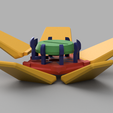
This model was developed for this purpose. The minimalist aero hubcap fits perfectly with a variety of Skoda aero rims and has been specially designed for 3D printing, making it super easy to print, with no overhangs and no support structure.

Product details

  • Universal fit: Suitable for Skoda aero rims with 53 cm rim opening.

  • Modular design: The hubcap consists of several individual parts that are simply plugged together. This design ensures maximum stability and enables printing on small printing areas of less than 100x100 mm.

  • Tool-free assembly: The individual parts of the hubcap can be assembled without tools. The only screw connection required is also printed and fits into the space provided to hold everything securely in place.

Optimal for your Skoda

Whether Octavia, Fabia, Karoq, Kodiaq or Superb - this hubcap gives your vehicle a stylish aesthetic. Ideal for car enthusiasts who value design.

Disclaimer

These trim panels have been developed for aesthetic purposes only and have not been tested. Their ability to withstand the centrifugal forces on a wheel is significantly influenced by the material used and the printing properties. Any warranty is excluded as these covers are designed for stationary vehicles only. When used on a moving vehicle, it is the owner's responsibility to check the suitability and safety of the decorative covers themselves or to have them checked by an authorized body at their place of residence.

3D printing settings

This decorative trim consists of four separate elements, each of which should be produced with different printing parameters to achieve optimum results.

General settings for all parts

  • Choice of material: At least PETG is recommended. PLA should be avoided as it does not offer the required strength and heat resistance. Carbon reinforced PETG is ideal for added rigidity and improved appearance. Materials such as ABS or nylon offer even better properties.

  • Printing temperature: High printing temperatures are required to ensure maximum strength of the material.

  • Flow calibration: Perfect flow calibration is crucial to achieve the best possible material strength and accuracy of fit.

  • Fitting accuracy: All parts are designed for an accuracy of -0.10 mm. If the fit is too loose or too tight, the values should be corrected via Hole Compensation, XY Compensation or by adjusting the dimensions of the element.

Additional measures

  • Reinforcement with adhesive: Each mated part can be additionally reinforced with adhesive. The choice of adhesive is crucial and should be suitable for the printed material.

  • Welding with a soldering iron: In addition, all plastic parts can be welded with a soldering iron on the non-visible inside mating areas to ensure an even stronger and permanent connection.

Specific settings

Base (red):

  • Top layers: At least 6

  • Bottom layers: 4

  • Walls: 5

  • Infill: 15%

  • Special feature: Concentric layer on bottom for improved aesthetics

Wings * 5 (yellow):

  • Top layers: At least 4

  • Bottom layers: 3

  • Walls: 3

  • Infill: 10%

  • Special feature: Concentric layer on bottom for improved aesthetics

Screw (green):

  • Top layers: At least 6

  • Bottom layers: 4

  • Walls: 5

  • Infill: 20%

Pen * 8 (blue):

  • Top layers: 0

  • Bottom layers: 0

  • Walls: 99 (solid)

These specific settings ensure that each part of the trim panel is printed optimally and provides the required mechanical properties as well as the desired appearance. Following these instructions will ensure the longevity and functionality of your customized decorative panels.

Advertising


Page translated by automatic translation. See the original version.
Issue with this design? Report a problem.

Would you like to support Cults?

You like Cults and you want to help us continue the adventure independently? Please note that we are a small team of 3 people, therefore it is very simple to support us to maintain the activity and create future developments. Here are 4 solutions accessible to all:

  • ADVERTISING: Disable your banner blocker (AdBlock, …) and click on our banner ads.

  • AFFILIATION: Make your purchases online by clicking on our affiliate links here Amazon.

  • DONATE: If you want, you can make a donation via Ko-Fi πŸ’œ.

  • WORD OF MOUTH: Invite your friends to come, discover the platform and the magnificent 3D files shared by the community!


Sharing and downloading on Cults3D guarantees that designs remain in makers community hands! And not in the hands of the 3D printing or software giants who own the competing platforms and exploit the designs for their own commercial interests.

Cults3D is an independent, self-financed site that is not accountable to any investor or brand. Almost all of the site's revenues are paid back to the platform's makers. The content published on the site serves only the interests of its authors and not those of 3D printer brands who also wish to control the 3D modeling market.

100% secure payment by credit card, PayPal, Apple Pay, Google Pay, etc.
View all payment options.