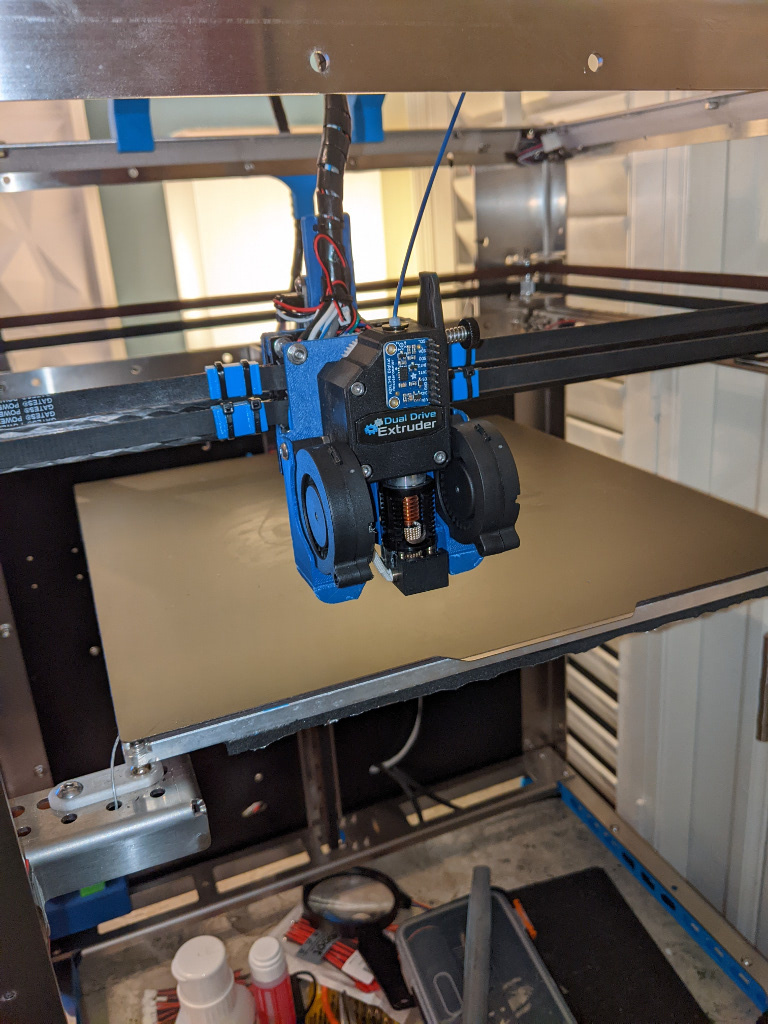
This is a replacement SecKit SK-Tank mount for a BMG and CF gantry, with dual 5015 radial/blower fans for part cooling, and a ducted axial 30mm (3010, 3015, or 3020) fan for hotend cooling. The same mount supports the Dragon HF, E3D V6, and E3D Volcano using different friction-fit air ducts for part cooling.
EDIT 2022-02-25: Added support for BLTouch. There are two mounts - one for Volcano, and one for V6 and Dragon HF. I recommend printing these in the default orientation for strength. The Volcano one can be printed without supports, but the V6/Dragon one will probably need supports (build plate only).
EDIT 2022-04-07: Added a mount for the Euclid Z probe toolboard. I recommend putting the dock in the back right corner of the Tank, with this mount going on the +X side of the back of the extruder plate. That way homing X and Y will go away from the dock, minimizing any chance of collision. My dock design is posted separately (https://www.thingiverse.com/thing:5345188) as it is not dependent on this toolboard mount or even this extruder setup.
In future, I plan to add support for the stock aluminum gantry... the hole pattern is a bit different so this one only works on the CF gantry.
Assembly instructions:
* Print the parts. The default orientation should be OK, but adjust as needed.
* Tap the hotend fan holes in the back of the extruder plate for M3, or your preference. The holes as designed are intentionally a bit small for M3, so they tap easily. If you don't plan to tap them you may want to drill them with a 3mm bit to accept an M3 screw.
* Install the hotend fan.
* If using an inductive probe, install the inductive probe (height is not important yet, just put it about halfway) into the L-shaped inductive probe mount, with the L pointing up.
* If using a BLTouch, install the BLTouch into the appropriate mount, with the wires facing away from the mount. The mounting point for the BLTouch is at the top of the mount, with the BLTouch hanging down facing the mount. The slot should allow a bit of vertical adjustment.
* Install the probe mount to the extruder plate using two short M3 screws.
* Remove the 4020 duct, BMG and hotend, if installed.
* Sandwich the extruder plate between the extruder stepper and the BMG, and start the three long M3 screws. Do not tighten fully just yet.
* (Dragon HF only) Rotate the hotend so that the heat block points towards the front. This is to prevent radiant heat from deforming the hotend fan duct.
* If necessary, reverse the heater and thermistor so that the wires will exit to the left.
* Tighten the three long M3 screws to firmly attach the BMG to the stepper motor and lock the hotend in place.
* Pass the heater and thermistor wires through the rounded pass-through hole in the extruder plate.
* Trim and/or file the inside of the fan duct attachment sockets, so that they are smooth and free of obstructions.
* Trim and/or file the fan ducts the same way. You may want to test fit them during the process to ensure they will go all the way in and fit snugly.
* Install the extruder assembly to the four existing M3 standoffs.
* On each of the 5015 fans:
* File down the top screw channel so there is room to accommodate a nut between the screw channel and the body of the BMG. The side that needs to be filed is different per fan; file one side on one fan, and the other side on the other fan.
* File down the little nub at the bottom of the +Y side of the fan, to allow it to seat fully.
* Test fit the 5015 fans. Make any necessary adjustments, then install the fans, placing a nut toward the inside, between the fan and the BMG. Run the wire for the left fan through the same opening as the other wires. Run the right one around the right side of the fan, then up along the stepper motor inside the standoffs.
* Insert the fan ducts until snug, then tighten them down at the top.
* Connect the wiring.
* Adjust the firmware configuration to reflect the new probe X and Y offsets. With the inductive probe the offsets are -22.2 mm for X, and +32.3 mm for Y. Accordingly you should also adjust your bed mesh and z tilt coordinates. I have pasted my current Klipper config below for reference.
* Calibrate the probe Z offset.
* Adjust fan speeds in your slicer.
* You're done!
My Klipper config:
# This file contains common pin mappings for the 6 stepper motor
# "FLYmaker Fly-CDYv2" board from creative3dprinter.com. To
# use this config, the firmware should be compiled for the STM32F407
# with a "32KiB bootloader".
# see hardware details on https://github.com/FLYmaker/Fly-CDYv2

# The "make flash" command does not work on the Fly-CDYv2. Instead,
# after running "make", copy the generated "out/klipper.bin" file to a
# file named "firmware.bin" on an SD card and then restart the Fly-CDYv2
# with that SD card.

# See docs/Config_Reference.md for a description of parameters.


# This file can be used as a basline printer.cfg for the SK-Tank
################################################################################################################################################################
# ATTENTION # You shall not use this file without checking and adopting the settings according to your actual built! (e.g. wiring, dimensions, extruder setup) #
################################################################################################################################################################
# Note: please check https://www.klipper3d.org/Config_Reference.html to get the full list of settings. Default settings and not set explicit in this cfg


########################################
# basic settings
########################################

[mcu]
serial: /dev/serial/by-id/usb-Klipper_stm32f407xx_220040001651383230343230-if00

[printer]
kinematics: corexy
max_velocity: 300
max_accel: 5000 ;set to 7000 for resonance test
max_z_velocity: 7
max_z_accel: 100
# Note: Extruder settings have to be set in on the extruder in the Steppers & Stepper
# Drivers section usig "max_extrude_only_velocity:" and "max_extrude_only_accel:" attributes

########################################
# Steppers & Stepper Drivers
########################################
# using TMC2208 configuration for TMC2225 steper drivers

# lower belt stepper left back
# usind X socket on Fly-CDYv2
[stepper_x]
step_pin: PE5
dir_pin: !PC0 # for standard SK-Tank wiring you have to change the direction by adding "!" so the new pin will be "!PC0"
enable_pin: !PC1
microsteps: 16
rotation_distance: 32 # Marlin/RRF reference: 200 steps / mm (rotation_distance = <full_steps_per_rotation> * <microsteps> / <steps_per_mm>)
full_steps_per_rotation: 400 # for a 0.9 stepper
endstop_pin: PC7
position_endstop: 0
position_min: -1
position_max: 350
homing_speed: 150
[tmc2208 stepper_x]
uart_pin: PC15
interpolate: True
run_current: 0.800
hold_current: 0.500

# upper belt stepper right back
# usind Y socket on Fly-CDYv2
[stepper_y]
step_pin: PE4
dir_pin: !PC13 # for standard SK-Tank wiring you have to change the direction by adding "!" so the new pin will be "!PC13"
enable_pin: !PC14
microsteps: 16
rotation_distance: 32 # Marlin/RRF reference: 200 steps / mm (rotation_distance = <full_steps_per_rotation> * <microsteps> / <steps_per_mm>)
full_steps_per_rotation: 400 # for a 0.9 stepper
endstop_pin: PD11
position_endstop: -3
position_min: -4
position_max: 324
homing_speed: 150
[tmc2208 stepper_y]
uart_pin: PA8
interpolate: True
run_current: 0.800
hold_current: 0.500

# Z stepper front left
# usind ZA socket on Fly-CDYv2 - ZB socket need to be jumpered when not used (connect 2B<>2A and 1A<>1B pin in socket)
[stepper_z]
step_pin: PE3
dir_pin: PB7
enable_pin: !PB8
microsteps: 16
rotation_distance: 32 # Marlin/RRF reference: 2000 steps / mm (rotation_distance = <full_steps_per_rotation> * <microsteps> / <steps_per_mm> * <gear_ratio>)
full_steps_per_rotation: 200 # for a 1.8 stepper
gear_ratio: 20:1 # to match z stepper 20:1 gearbox NEMA8
#endstop_pin: PB10 # use optical endstop for Z endstop
endstop_pin: probe:z_virtual_endstop # use BL-Touch or inductive probe for Z endstop
#position_endstop: 2.5 # disable when using BL-Touch or inductive probe for Z endstop
position_min: -3
position_max: 400
homing_retract_dist: 2 # added to lift the nozzle 2mm after homing vs. endstop
[tmc2208 stepper_z]
uart_pin: PB6
interpolate: True
run_current: 0.500
hold_current: 0.400

# Z1 stepper front right
# usind E1 socket on Fly-CDYv2
[stepper_z1]
step_pin: PE1
dir_pin: !PD3 # direction inverted since SK-Tank setup is using flipped stepper orientation for Z1
enable_pin: !PD4
microsteps: 16
rotation_distance: 32 # Marlin/RRF reference: 2000 steps / mm (rotation_distance = <full_steps_per_rotation> * <microsteps> / <steps_per_mm> * <gear_ratio>)
full_steps_per_rotation: 200 # for a 1.8 stepper
gear_ratio: 20:1 # to match z stepper 20:1 gearbox NEMA8
[tmc2208 stepper_z1]
uart_pin: PD1
interpolate: True
run_current: 0.500
hold_current: 0.400

# Z2 stepper back center
# usind E2 socket on Fly-CDYv2
[stepper_z2]
step_pin: PE0
dir_pin: PA15
enable_pin: !PD0
microsteps: 16
rotation_distance: 32 # Marlin/RRF reference: 2000 steps / mm (rotation_distance = <full_steps_per_rotation> * <microsteps> / <steps_per_mm> * <gear_ratio>)
full_steps_per_rotation: 200 # for a 1.8 stepper
gear_ratio: 20:1 # to match z stepper 20:1 gearbox NEMA8
[tmc2208 stepper_z2]
uart_pin: PE9
interpolate: True
run_current: 0.500
hold_current: 0.400

# extruder stepper
# usind E0 socket on Fly-CDYv2
[extruder]
step_pin: PE2
dir_pin: !PD6
enable_pin: !PD7
microsteps: 16 # values set for Biqu H2
#rotation_distance: 3.45 # Biqu H2. Marlin/RRF reference: 1900 steps / mm (rotation_distance = <full_steps_per_rotation> * <microsteps> / <steps_per_mm> * <gear_ratio>) # values set for Flex3Drive G5 Flex Extruder
rotation_distance: 7.71 # Triangle Lab BMG clone
full_steps_per_rotation: 200 # for a 1.8 stepper
#gear_ratio: 19:16 # values set for Flex3Drive G5 Flex Extruder
nozzle_diameter: 0.400
filament_diameter: 1.750
#max_extrude_only_velocity: 40 # values set for Flex3Drive G5 Flex Extruder
max_extrude_only_distance: 100.0
#max_extrude_only_accel: 60 # values set for Flex3Drive G5 Flex Extruder
#pressure_advance: 0.05
heater_pin: PD12 # T0
sensor_pin: PA3 # T0 Temp

# Thermistor - Biqu H2
#sensor_type: NTC 100K beta 3950
#control: pid
#pid_Kp: 13.385 # to be adjusted by running PID_CALIBRATE HEATER=extruder TARGET=205
#pid_Ki: 0.386 # to be adjusted by running PID_CALIBRATE HEATER=extruder TARGET=205
#pid_Kd: 115.950  # to be adjusted by running PID_CALIBRATE HEATER=extruder TARGET=205

  #Thermistor
 - Triangle Lab Dragon HF
sensor_type: NTC 100K beta 3950 # basic Thermistor, type to be verified by Ernest
control: pid # changed to "watermark" and comment/delet the PID seetings below if you have issues with the SSR (like some SSR dont like PID control)
pid_Kp: 23.242      # to be adjusted by running PID_CALIBRATE HEATER=extruder TARGET=220
pid_Ki: 1.476       # to be adjusted by running PID_CALIBRATE HEATER=extruder TARGET=220
pid_Kd: 91.516     # to be adjusted by running PID_CALIBRATE HEATER=extruder TARGET=220

min_extrude_temp: 170
min_temp: 0
max_temp: 260
[tmc2208 extruder]
uart_pin: PD5
interpolate: True
run_current: 0.800
hold_current: 0.300


########################################
# BED HEATERS & FANS
########################################

[heater_bed]
heater_pin: PB0 # BED
sensor_pin: PB1 # B-TEMP
sensor_type: NTC 100K beta 3950 # basic Thermistor, type to be verified by Ernest
control: pid # changed to "watermark" and comment/delet the PID seetings below if you have issues with the SSR (like some SSR dont like PID control)
pid_Kp: 53.190      # to be adjusted by running PID_CALIBRATE HEATER=heater_bed TARGET=60
pid_Ki: 2.955       # to be adjusted by running PID_CALIBRATE HEATER=heater_bed TARGET=60
pid_Kd: 239.354     # to be adjusted by running PID_CALIBRATE HEATER=heater_bed TARGET=60
min_temp: 0
max_temp: 100

[fan]
pin: PA0 # FAN0 used as print cooling fan

[heater_fan FAN1]
pin: PA2 # FAN1 used as hotend cooling fan
heater: extruder
heater_temp: 50.0

#[controller_fan FAN2]
# this will allow you to connect to driver cooling fan to FAN2 instead of VCC (permanent power) so its only cooling if the stepper drivers are active
#pin: PA2 # FAN2 used as controller cooling fan


########################################
# Inductive sensor
########################################

[probe]
pin: PB10
#x_offset: -22.0    # BMG/Dragon stock
#y_offset: 16.0     # BMG/Dragon stock
x_offset: -22.2    # BMG/Dragon dual 5015s
y_offset: 32.3     # BMG/Dragon dual 5015s
#x_offset: -27.4     # BMG/Dragon Berd-Air
#y_offset: 14.9      # BMG/Dragon Berd-Air
z_offset: 1.05
speed: 7.5  #   Speed (in mm/s) of the Z axis when probing. The default is 5mm/s.
samples: 1


########################################
# BL-Touch
########################################

#[bltouch]
#sensor_pin: ^PC2
#control_pin: PE6
#pin_move_time: 0.4
#stow_on_each_sample: True
#probe_with_touch_mode: True   #Needed
 for BLTouch V3.0 / V3.1
#x_offset: -26.0
#y_offset: 0.0
#z_offset: 2.65
#speed: 5
#samples: 2
#sample_retract_dist: 2
#samples_result: average

[safe_z_home]
home_xy_position: 175,175 # Change coordinates to the center of your print bed
speed: 150
z_hop: 10                 # Move up 10mm
z_hop_speed: 7.5

[bed_mesh]
speed: 150
horizontal_move_z: 3
mesh_min: 35,51       #Probe
 coordinates
mesh_max: 310,341     #Probe
 coordinates
probe_count: 7,7
algorithm: bicubic
bicubic_tension: 0.2
move_check_distance: 5
split_delta_z: .025
fade_start: 1
fade_end: 10
#fade_target: 0

[z_tilt]
  #Positions
 of the bed mounts, in nozzle coordinates. Shouldn't need to change these once set up.
z_positions:
    6, 6
    344, 6
    175, 325
  #Positions
 to measure, in nozzle coordinates - i.e. make sure the probe is above the bed when the nozzle is at these positions
points:
    31, 0
    350, 0
    203, 278
speed: 100
horizontal_move_z: 10
retries: 2
retry_tolerance: 0.1

[force_move]
enable_force_move: True #   Set to true to enable FORCE_MOVE and SET_KINEMATIC_POSITION


########################################
# Input Shaping
########################################
[mcu rpi]
serial: /tmp/klipper_host_mcu

[adxl345]
cs_pin: rpi:None

[resonance_tester]
accel_chip: adxl345
probe_points:
    175,175,20  # an example

[input_shaper]
# Biqu H2
#shaper_freq_x: 74.0
#shaper_type_x: mzv
:format(webp)/https://fbi.cults3d.com/uploaders/25604171/illustration-file/2d76cf44-b3a8-43fd-891c-70c2c4e0d83c/Front_View_reduced.jpg)


/https://preview3d-images.cults3d.com/vbvdik1rq2hoobtaemhrmvyq8clo)
/https://preview3d-images.cults3d.com/ywh8h174oj8uvzunjx57nof69czy)
/https://preview3d-images.cults3d.com/vtpfnryxfhoeyipsusmlr07a5q6d)
/https://preview3d-images.cults3d.com/kos804vjs6p2jqgc2o3px8aa561d)
/https://preview3d-images.cults3d.com/5qcapo0of9duqu86o5knx6tnrqpk)
/https://preview3d-images.cults3d.com/6gm4iwrrxws1nvzeovl3qqfpol09)
/https://preview3d-images.cults3d.com/dk299uq6bv1dihgcpxvn7yp3k8r7)
/https://preview3d-images.cults3d.com/ny3eluozmaghppr5fwu1z53fhz2d)
/https://preview3d-images.cults3d.com/pw79ca1dcil98b4vhiqjao0y8bum)
/https://preview3d-images.cults3d.com/io0vsb0zs7t28a4fhdy1bcthnypp)
/https://preview3d-images.cults3d.com/cqbeuea2bxp9sfkw96vcvr2dgo19)
/https://preview3d-images.cults3d.com/hgykkwvkrolwhv8lpw0izxfx4hzx)
/https://preview3d-images.cults3d.com/rnf7va04dcgw0r03vwriwv41kj39)


