Howdy !
my first real Thing !
i desperately needed a powerful torch/flashlight but am so poor i couldnt afford to buy one !
so after rooting about in my electronics stash, i had everything needed to build one, this is using ULTRA CHEAP PARTS from Aliexpress, the cost of making one of these for yourselves is laughably low, i actually had almost all parts in my stash!
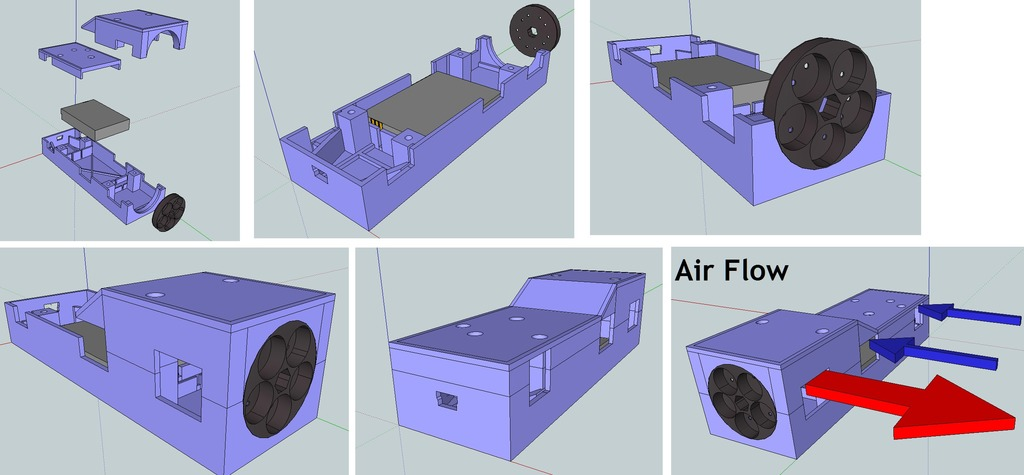
The grey block in the diagram is the lipo battery x1 but the enclosure is large enough to wire up two of these in parallel for double the lifetime per charge
Also by collecting these parts, you'll have a load left over for many more projects :)
Parts needed;
12v LED BULBS
Lipo Charger PCB
Step-Up Voltage Boost Converter
(Latching)Push-Button Flashlight Switch
Lipo Cell Phone Battery (or 2 or 3 !)
5v 40mm Fan
5V 100ma Voltage Regulator AND two 0.1uF Capacitors
As for the screws, i use hex-Pan-head screws, these can be used as a built-in washer to certain designs as ive embedded the screw holes in the top parts to get fastened downwards;
Two M3x10mm Pan Head Screws
Two M3x20mm Pan Head Screws
Four M3x5mm Brass Inserts
Also, ive been buying 12.9 Rated hardened steel screws & grub screws from Aliexpress too, as the standard ones i buy get the heads stripped over time, but the 12.9 hardened steel ones seem to be a lot stronger, there's 10.9 too and accompanying nuts too.
Wires
Solder+Flux
OPTIONAL BUT HIGHLY USEFUL !
200 Mesh Stainless Steel Mesh
- i use this for making fan air-intake grills to put in front of the fans so that dust and crap gets stuck in this, then its easy to vacuum out, instead of dust and crap destroying your electrical appliances - 200 mesh is good, very fine, but dont go higher or air-flow does get restricted, 100 mesh would actually be perfect too, but dont go below 100 i'd advise.
Tools Needed;
3D Printer
Soldering Iron
Multimeter
Helping Hands
Screwdrivers etc lol
-------------------------------------------------/-------------------------------------------------
NOTE 1;
you can comfortably link up 2-3 cell phone batteries in parallel to triple the mAh rating of the batteries, lets face it, cell phone batteries arnt that great but they are slimline and thin enough to include into projects !
NOTE - 2 & WARNING;
GENUINE cell phone batteries ALL have a protection circuit built into them, this prevents the battery from being over-charged/discharged, but the Lipo Battery Charger PCB included in the parts list is an intelligent version and stops charging when the battery is around 4.2v plus it has two LED Lights to show charging & charging-complete.
Messing around with Lipo Batteries is DANGEROUS IF YOU DO NOT KNOW WHAT YOU ARE DOING - GOOGLE IS YOUR FRIEND ! IF IN DOUBT - RESEARCH IT THROUGH GOOGLE !
We got the world's knowledge through googling, just imagine the whole world's encyclopedia at your finger tips - if you dont know how to do something, type it in google and ask questions in forums !
The batteries shown in the link are for two and are very similar to the one i have in my torch, the sketchup file shows a Red-Housing, that was v1.0 and while it printed okay, it wasnt very strong.
The next version v1.1 ive lost lol somewhere on my computers...
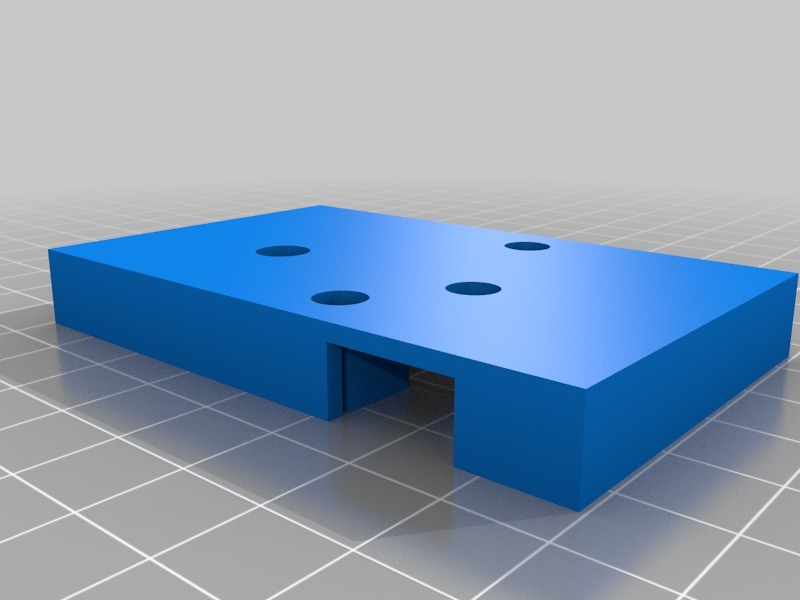
v1.2 is made to be printed in 3 parts for easier printing, the top shells are screwed to the base shell using brass inserts like this - i used M3x5mm, so they fit M3 screws and are 5mm in length
Using a soldering iron, gently melt the brass inserts into the base shell, theres 4 square posts for them with holes in them to ensure that any melted plastic goes into the holes
NOTE 3.
USE A LONG SCREW, M3x30mm and screw in the brass insert until its flush on the end of the screw, use heat-proof gloves, or oven gloves and gently heat up the brass insert with a soldering iron whilst holding the screw and brass insert over the square post's hole then slowly press it in as it heats up, this only takes 10 seconds or so, so its pretty fast.
When the brass insert is in position, make sure its straight as possible then DO NOT TOUCH IT OR UNSCREW IT until its back at room temperature or itll completely mess up the entire print !!
When cool, give the screw a sharp strong un-screw-JERK to get it out of the brass insert.
Repeat for all posts
i used TWO M3x10mm Screws, Pan Head for the top part B, no washer needed but could be used if wanted.
Also two M3x20 screws for the taller Part A top shell
Circuit Wiring Diagram To Come, photo's of v1.0 and in the middle of printing v1.2.
This Torch is super-bright and extremely powerful for just using a cell phone battery !
It is using FIVE of the 12v LED bulbs, meant for cars, i was amazed at how bright this thing is !
Charging only takes an hour, the charging PCB is a 1 amp fast charge module, although you can change this to a lower amperage charge by de-soldering a resistor and re-soldering a higher value resistor, though its SMD components, 1Amp works fine for me for years that ive been using this module !
If only my photos could properly show just how bright this little thing is !!! Stupidly POWERFUL and well-worth the time spent making this thing !
- The cell phone batteries linked are a two-pack, £5.38 so only £2.69 each for a 1200mAh rating slimline battery (Camera Device Batteries work much better in projects as Digital Camera's require heavy-duty power sources)
Total cost including shipping, all bought from Aliexpress;
5 LED Bulbs; £3.21 (1 bulb spare as the link is two-pack of bulbs each)
Lipo Charger PCB £0.19
DC TO DC Step Up PCB £0.34
Push button switch £0.78 (9 switches left over for other projects from 10-pack)
Lipo 2-pack Batteries £5.38 (Can use both in this torch or have 1 left over)
5v Voltage Regulator £0.94 (99 left over for other projects lol)
0.1uF Capacitors £0.58 (98 left over for other projects lol)
Total; £11.42
- And you also got a bunch more electronics parts to go toward next projects, if you only used 1 battery then the cost goes down to £7.25, also added the cost of only ONE 5v voltage regulator and two capacitors lol
There just is NOT any flashlight on the market THIS BRIGHT for this low amount of money and - rechargeable !
- Also - for longevity, it includes an all important 5v Fan to cool the LED BULBS - without the fan the lifetime mean-time-before-failure (MTBF) OF THE BULBS DRAMATICALLY & EXPONENTIALLY FALLS & the flashlight will fail within a week to a month or so of heavy use
its VITAL that the fan be included.
This is what the 5v Voltage Regulator is connected to, plus the two 0.1uF capacitors, one for the input voltage and one for the output voltage, as the fan is just a low power device, the 100mA voltage regulator will be fine to run it, slightly under powered but thats fine, close to negligible on any power losses.
on a test, i left the torch switched on for 10 minutes and the bulbs were too hot to touch, i would had got burned if i touched the metal housings.
Same 10 minutes switched on with the 5v Fan on them and they were just warm and could be handled without problems.
Apologies photo's arnt here yet, they are coming as this project gets finished and the new v1.2 housing enclosure gets printed :)
:format(webp)/https://fbi.cults3d.com/uploaders/13732863/illustration-file/00af1ceb-beba-4154-bf76-12ccd0a51784/58393fd016021ce2b6f26ab187605c5b.png)


/https://preview3d-images.cults3d.com/5ieubst0sxo6vhm37845td8xq87g)
/https://preview3d-images.cults3d.com/9mrvhz8mlevrkpk4j8sy0s2cmuc0)
/https://preview3d-images.cults3d.com/5uuos2xlbh7c2kn1r8shrvd4685e)
/https://preview3d-images.cults3d.com/tgenft63khs3j4wd9i5vva0rvrxb)


