Dungeon Dolls: Oracle


Dungeon Dolls: Oracle
Published 2017-07-28T11:41:30+00:00
Updated 2/19/17
Ever like the variable designs of FlatMinis, but the customization of Dungeon Dolls? Ever wanted more options? Look no further! Inspired by the aesthetic of GrumpyRobot's FlatMinis, and DutchMogul's Dungeon Doll system, come Trixster_98's take on the classic Dungeon Doll.
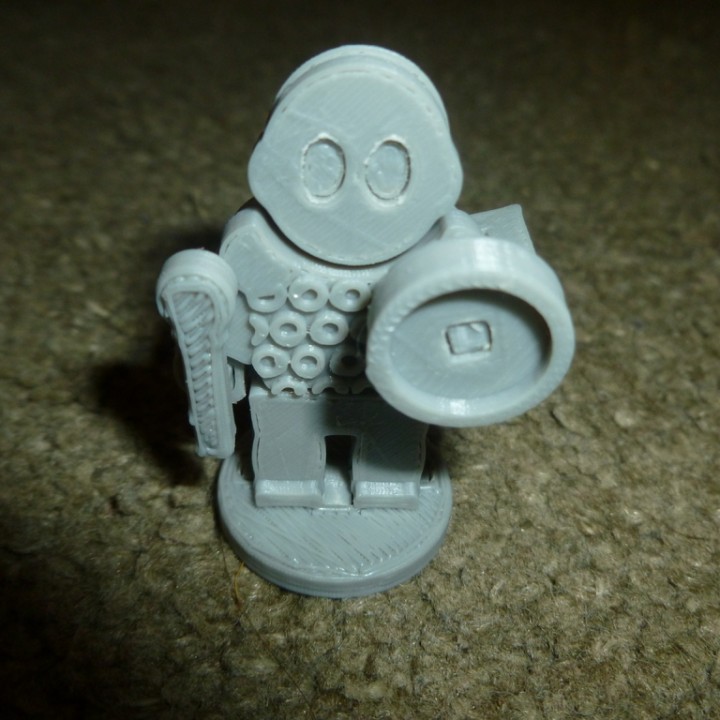
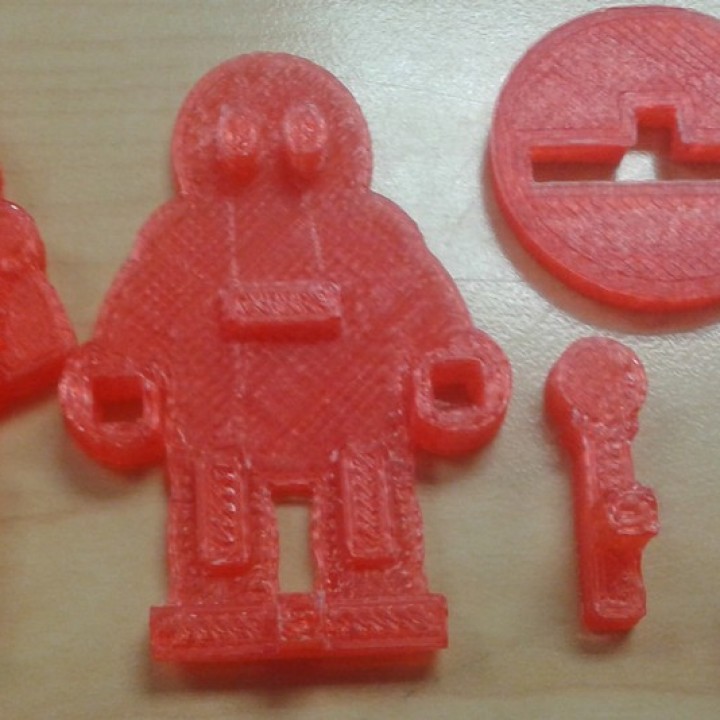
This handy Oracle includes a buckler, mace, plain pants, shirt with chainmail and simple pauldrons, plain head, and a cape base if you wish or a plain base if not. I printed mine at 200% (Red) and the base stands at 56 mm tall. You can also print at 150% (Grey) which stands at 42 mm. Fully customizable and modular, look for more designs to come in the following weeks.
These designs are fully compatible with DutchMogul's original Dungeon Dolls, but not with FlatMinis
Made in Tinkercad, red printed at my library, grey printed on my Monoprice MP Select Mini
The remixed and improved version of my 2014 work that was unprintable and abandoned shortly after inception
note
The buckler was a small round shield traditionally strapped onto the forearm to allow for one hand to be free for other things. The buckler slides into the handle and then slides onto the arm.
Buckler has been updated to fit better
note
Although I don't see how the original design by GrumpyRobot was meant to be an oracle it is still one of my favourite designs. The shirt looks great when printed and it has a certain simplicity about the design that I like. And a buckler is also a piece of equipment any self respecting adventurer should have access to.


Post printing
Printing The pieces should be printed at 150-200% depending on what you feel your printers accuracy to be. My printer can make all the details clearly visible at 100% but needs the print to be at 150% in order to fit together well. The picture shows the 3 sizes of 200%, 150%, and 100% Preparation In order for the pieces to properly fit together, you will need to lightly sand them with a set of needle files. The heads just need very minute sanding in the eye holes. My first layer is always slightly off which always needs work in that one spot. The studs that attach to the shirt and pants need light sanding, but the holes should be fine, depending on your printers accuracy. The shirt stud typically needs a very small amount of sanding compared to the pant studs. The bottom that fits onto the base will most likely need sanding on both the hole and stud depending on accuracy. Always test fit pieces together as you sand. I'm not responsible for ruined pieces due to too much sanding.
| Date published | 28/07/2017 |
| Technology | FDM |
| Complexity | Easy |