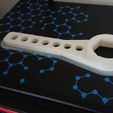
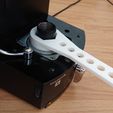
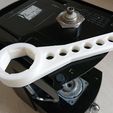
Hexagonal key (40) for mounting and dismantling the capsule cage on Nespresso Magimix. This key replaces the original part supplied with the coffee machine.
You have lost this part, it is unavailable for purchase from the manufacturer? Do not throw away your machine, repair and maintain it.
This wrench (XL) has been tested on a Magimix M150 and I also provide you with a smaller model (M of 175) for printing on machines with a smaller platen (200x200).
For information, I printed my part on an Alfawise U20 (without box), with Greetech white PLA and Ultimaker Cura, but of course you can print it with the PLA, the printer, and the software you want and master.
According to the tests I have performed and following the successful test on my Magimix M150, I advise you to print it in :
layer height 0.1 mm (thin);
wall thickness of the shell 2.4 mm ;
in 50 % (cubic) filling.
Print the part on the flat part.
I didn't use a support.
I used these settings, but it depends on your printer and its configuration:
nozzle temperature of 205°, and plate temperature of 35°;
speed of 60 mm/s;
100% nozzle cooling;
Tray adhesion type: Edge (or, "improvement of the adhesion surface" because I don't have a box).
Approximately: 22m of PLA, or 66g, Time about 9h.
If you can't increase the wall thickness, or don't know how to do it, then I advise you to print your solid part (100% filling), the key needs a high strength to resist loosening.
To use the key, disconnect (the power supply from) your machine, remove all removable parts (water tank, bottom tank, top plate), and use a screwdriver to remove the metal frame from the nozzle. This will allow you to access the nozzle with the key.
Use gloves when handling.
–
Hexagonal key (40) for assembly and disassembly of the capsule cage on Nespresso Magimix. This key replaces the original part supplied with the coffee machine.
Have you lost this piece? Is it unavailable for purchase from the manufacturer? Do not waste your machine, repair and maintain it.
This key (XL) has been tested on a Magimix M150. I also provide you with a smaller model (M of 175mm) for 3d printing on smaller tray machines (200x200).
For information, I printed my piece on an Alfawise U20 (without box), with a white PLA Greetech and Ultimaker Cura, but of course you can print it with the PLA, the printer, and the software you want and master.
According to the tests I have done and following the conclusive test on my Magimix M150, I advise you to print it in:
layer height 0.1 mm (fine);
thickness of the shell wall 2.4 mm;
in filling 50% (cubic).
Print the part on the flat part.
I did not use any support.
I used these settings, my it depends on your printer and its configuration:
nozzle temperature of 205 °, and plateau of 35 °;
speed of 60 mm / s;
cooling the nozzle to 100%;
Tray adhesion type: Border (or, "improvement of the adhesion surface" because I do not have a box).
Approximately: 22m of PLA, 66g, Time about 9h.
If you can not increase the thickness of the wall, or do not know how to do it, I advise you then to print your piece full (filling 100%), the key needing a solidity to resist the loosening.
To use the key, disconnect (the power supply of) your machine, remove all removable parts (water tray, bottom tray, top plate), and disassemble with a screwdriver the metal surround of the nozzle. You will be able to access with the key to the nozzle.
Use gloves for handling.

/https://fbi.cults3d.com/uploaders/14160684/illustration-file/5bbc8305-70d1-4d15-a2cc-656d0c9f35e2/CleH-Nespresso_02.jpg)


