Skip to content

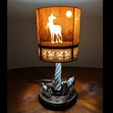
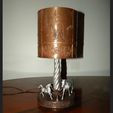
Unicorn Table Lamp

Advertising
Advertising
?
Creation quality: 4.5/5 (2 votes)
Evaluation of members on the printability, utility, level of detail, etc.

  • 11.5k views
  • 50 likes
  • 398 downloads
  • 1 make

License
3D design format
STL Folder details Close
  • 120x120 panel 1.pngW120H120T3V4B3A3C90NS.stl
  • 120x120 panel 2.pngW120H120T3V4B3A0C90NS.stl
  • 120x120 panel 3.pngW120H120T3V4B3A0C90NS.stl
  • 120x120 panel 4.pngW120H120T3V4B3A0C90NS.stl
  • Base complete.stl
  • Base front blank.stl
  • Base left.stl
  • Base right.stl
  • Large unicorn left.stl
  • Large unicorn right.stl
  • Large unicorn's horn.stl
  • base main.stl
  • horn bottom.stl
  • horn top.stl
  • shade support BL.stl
  • shade support BR.stl
  • shade support TL.stl
  • shade support TR.stl
  • small unicorn left.stl
  • small unicorn right.stl
  • small unicorn.stl
  • unicorn border.pngW120H50T3V4B3A0C90NS.stl

Learn more about the formats

Publication date 2020-11-02 at 02:20
Design number 221059

3D printer file info

3D model description

Unicorn lamp with a the last unicorn lithophane shade.
Model is sliced up for a 120mm square bed.

Parts needed and rough assembly instructions:
NOTE: you need some rough knowledge of wiring for this project but it is not that complex make sure to consult the instructions with your components and follow all rules for your area. I am not an electrician and any work with electricity should be done carefully and is done at your own risk.

Approx. 6.5 inch long threaded lamp pipe/rod with appropriately sized lamp nut (1) and a large washer
Keyless Phenolic lamp socket
(https://www.amazon.ca/Lamp-Keyless-Phenolic-Socket-threaded/dp/B01LX1NI1O/ref=sr_1_26?dchild=1&gclid=Cj0KCQjwufn8BRCwARIsAKzP6978j3it9iPc7JbTNVmBWjtqPbn8sU0MrTDWS6YAFOGVkm_n8velBhUaAm-JEALw_wcB&hvadid=325574020008&hvdev=c&hvlocphy=9001346&hvnetw=g&hvqmt=e&hvrand=8460618675323017914&hvtargid=kwd-304594687862&hydadcr=17401_10229191&keywords=phenolic+socket&qid=1604282383&sr=8-26&tag=googcana-20)
Push button singe circuit switch
(https://www.amazon.ca/Creative-Hobbies-Switches-Circuit-Stripped/dp/B00T6I8TTG/ref=sr_1_9?dchild=1&keywords=lamp+push+switch&qid=1603492970&sr=8-9)
Lamp cord
Weights for base, lots of things work, just think heavy not flammable and small enough to fit in the hollows of the base
LED bulb (must be LED to reduce heat output and prevent damage to the plastic)

Print each piece and 4 copies of unicorn border. I have included the base sliced and whole depending on your bed size. The unsliced version will be easier to weight so do that if possible.

Assemble the main lamp. Note there you may need to so some sanding to get the horn into the flower it is a very tight fit.

Screw the lamp rod to the socket and test fit it into the lamp. Check the length of the rod and trim as needed, it should almost touch the table top when the lamp is upright.
Thread a nut and washer on the cord and insert the cord through the lamp rod.
Wire the socket and screw it to the lamp rod.
Use the washer and nut to tighten the lamp rod inside the base. If you have a properly sized lamp weight this would also go on through the wire onto the lamp rod.
Cut the hot side of the wire and wire in the switch
Connect the switch to the lamp base using the included nuts and washers.
Cross your fingers and test it. If it does not work google it.
Add your weights (if not already done)
Cover the bottom with cardboard or thin wood and something nonstick. I like to use craft foam.

Assemble the 4 parts of the shade support. Test fit them to the lamp socket. Assemble the 4 unicorn borders and the 4 panels, do not attach the border to the panels yet. I suggest using a wood burner to create a smooth seam or friction welding for the shade. Attach the shade support to the top of the unicorn border with about half of the support sticking above the top of the border. Attach and seam the borders to the panels using the shade support to hold them in place. The shade support should sit within the seam between the border and the panels.

Good luck, if you don't want to do all this work but still want one of these please reach out to subtlyfantastic@gmail.com. Due to the effort involved in assembling this piece the cost will be between 250 and 300 CAD depending on level of finish.

#FLASHFORGECULTS

3D printing settings

Best possible setting for your printer for the main lamp. Lithophane setting for the unicorn border and lithophane panels. The lamp pictures is printed with PLA then painted and finished.

Advertising


Issue with this design? Report a problem.

Would you like to support Cults?

You like Cults and you want to help us continue the adventure independently? Please note that we are a small team of 3 people, therefore it is very simple to support us to maintain the activity and create future developments. Here are 4 solutions accessible to all:

  • ADVERTISING: Disable your banner blocker (AdBlock, …) and click on our banner ads.

  • AFFILIATION: Make your purchases online by clicking on our affiliate links here Amazon.

  • DONATE: If you want, you can make a donation via Ko-Fi πŸ’œ.

  • WORD OF MOUTH: Invite your friends to come, discover the platform and the magnificent 3D files shared by the community!


Sharing and downloading on Cults3D guarantees that designs remain in makers community hands! And not in the hands of the 3D printing or software giants who own the competing platforms and exploit the designs for their own commercial interests.

Cults3D is an independent, self-financed site that is not accountable to any investor or brand. Almost all of the site's revenues are paid back to the platform's makers. The content published on the site serves only the interests of its authors and not those of 3D printer brands who also wish to control the 3D modeling market.

100% secure payment by credit card, PayPal, Apple Pay, Google Pay, etc.
View all payment options.