SIMPLE "NO-PRINT-HEAD" TIME LAPSE VIDEO PROJECTS ENDER 3/PRO
I always wondered how they vanish the print-head while taking stunning time lapse 3D print videos, until I watched related youtube videos.
The method is quite smart and easy:
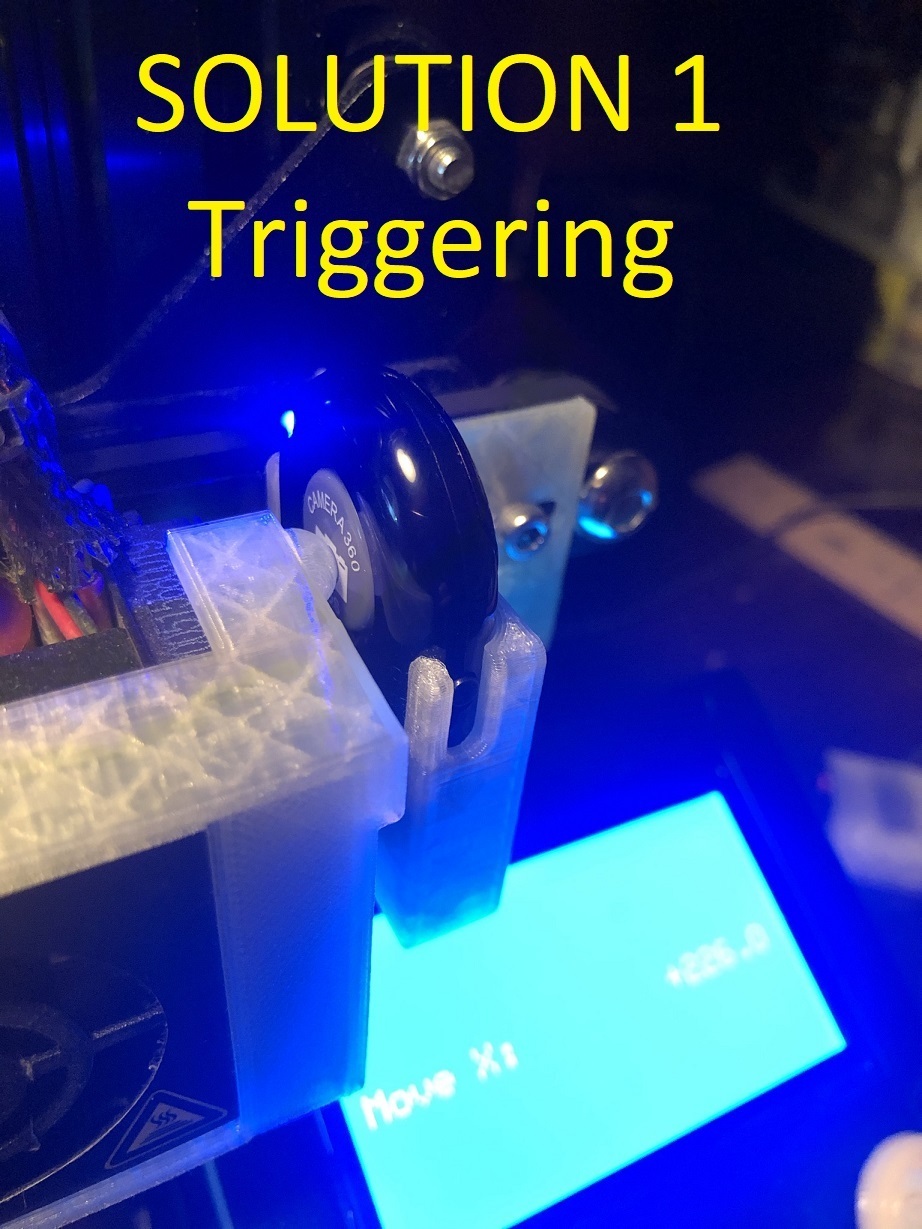
At the end of each layer the hot-end box (or print-head) moves to the very right side of the X-Axis where it triggers a switch to take a photo.
In this respect two targets are achieved:
1) the print-head goes out of the scene,
2) and also it triggers the switch mounted on the right side of the X-Axis which triggers the camera to take a snap shot at the end of each layer.
Very logical and very smart!
I suppose below 2 projects (SOLUTION 1 and 2) are the simplest and cheapest solutions (total cost_except for the cost of phone/camera and tripod_is less than 5$).
COMPONENTS:
As always, I use the componenets on hand, though there are various other solutions to trigger the camera (ie using phone's headphone cable*).
1) As a camera, a spare (old) mobile phone with a bluetooth connection (I used my very old iPhone 4, but any phone with a universal bluetooth connection can be used).
2) A bluetooth universal remote shutter (usually comes with a selfie stick or sold seperately costing around 2-3$ at Aliexpress). See attached picture.
3) A tripod to keep the camera/phone firm (I assume you have one on hand).
4) An end-stop/limit switch (cost 1$ or so) -->NOT NEEDED FOR SOLUTON 1
5) Some wire -->NOT NEEDED FOR SOLUTON 1
(*) Using old phone's headphone cable could be a more effective solution as it will directly trigger the phone's camera instead of more complicated bluetooh connection. But unfortunately, I don't have such a cable on hand so I couldn't try it. -->NOT NEEDED FOR SOLUTON 1
SKILLS: -->NOT NEEDED FOR SOLUTON 1
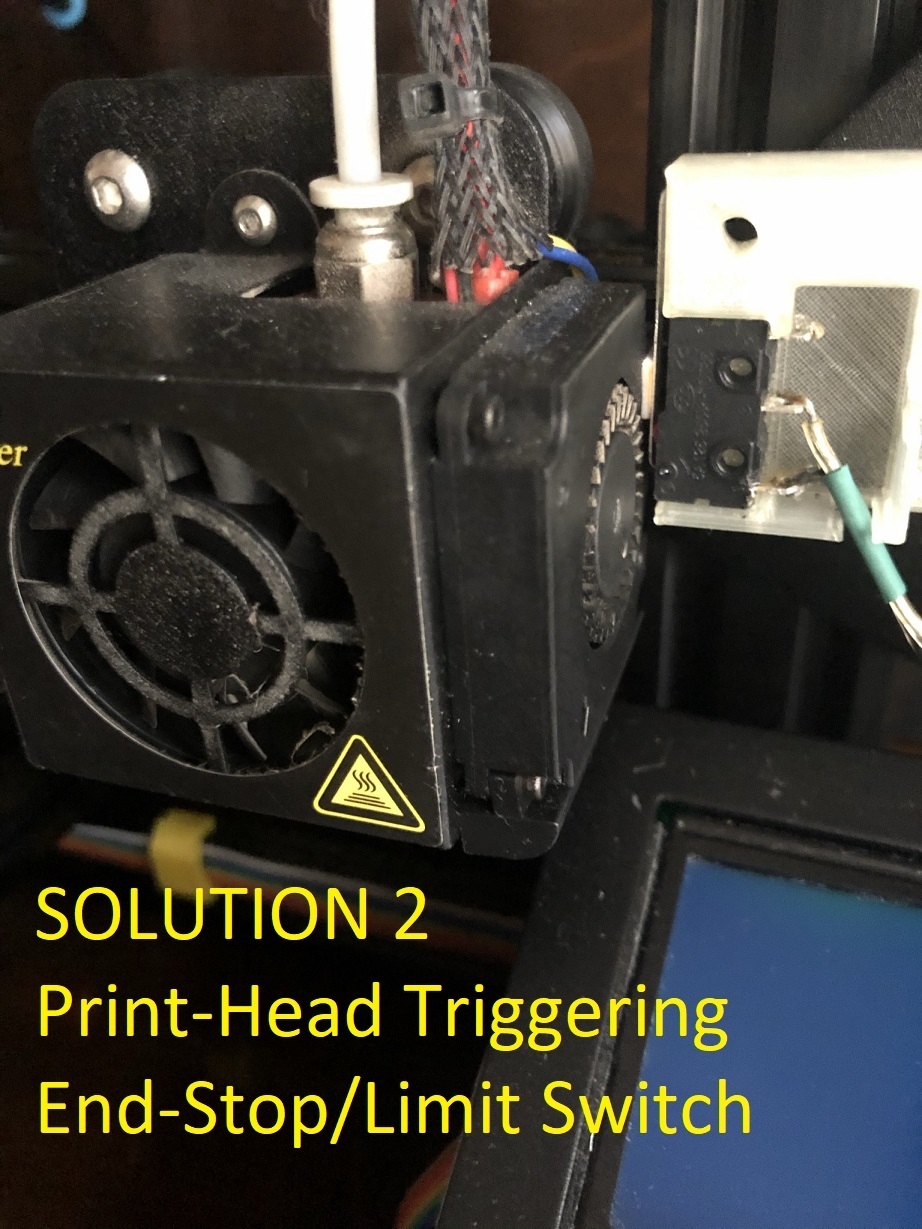
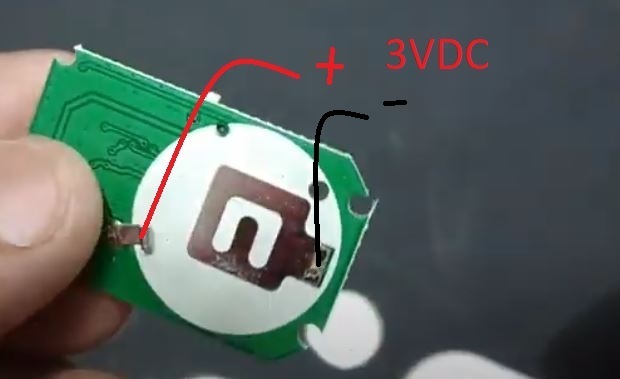
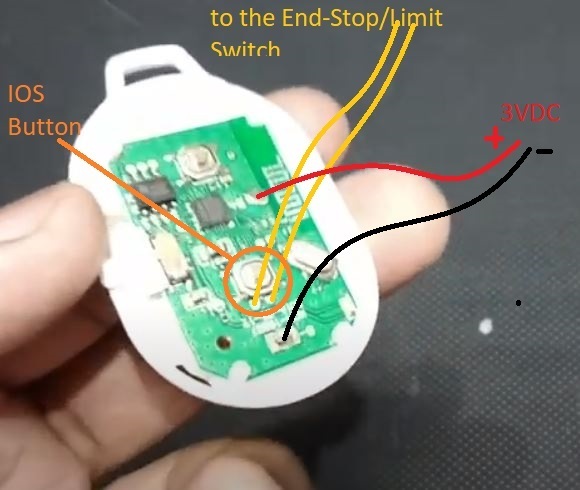
You need some soldering skills for SOLUTION 2 becasue you have to dissamble the bluetooth remote shutter device and solder two wires to the push button pins inside the device.
This is the hardest part because the push button pins are quite small for soldering. The other ends of the wire will be soldered to the end-stop/limit switch. The wires should be long enough to keep the bluetooh remote controller on the desk when the print head goes (on Z -Axis) upto the height of the model printed (ie max 250mm for Ender 3). So approx. 40cm wire length will be sufficient).
Optional: I also soldered two additional wires to the battery housing of the bluetooth remote shutter to use a 3VDC power supply instead of the small battery (CR2032) equipped with the controller, to avoid any battery run outs during print. But I suppose this is not necessary for at least 5-6 prints, if the battery is fresh.
SOLUTIONS 1 & 2:
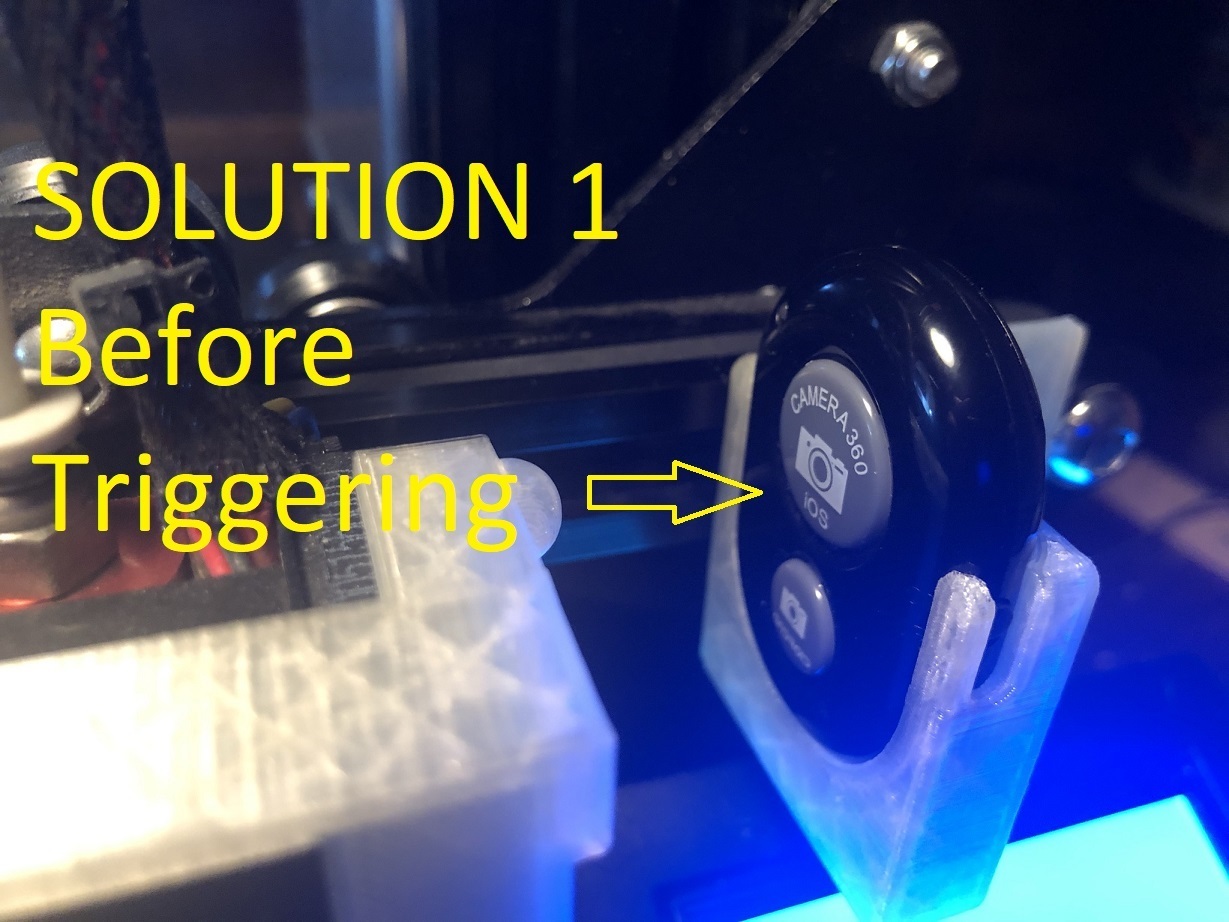
SOLUTION 1 is a direct control of the Bluetooth Remote Shutter mounted on the printer. Extremely simple and easy to mount and no wiring/soldering is required.
However, I have included another solution (SOLUTION 2) to the project due two reasons:
a) The Bluetooth Remote Shutter models may be different in size and yours may not fit to the holder I have designed and attached here,
b) Solution 2 (with end-stop/limit switch) may support using it in other ways (other than bluetooth connection) to control the cameras or phones through direct triggering them.
In addition, you can power supply your controller in SOLUTION 2 more easily by using direct use of a DC power supply, instead of the battery equipped with the device, to avoid any battery run outs during print.
PRINTING THE HOLDERS (SOLUTIONS 1 & 2):
Print the stls attached based on the choosen solution:
- Bluetooth Remote Shutter Holder.stl and Print-Head Trigger Frame.stl for SOLUTION 1 or;
- Limit Switch Holder.stl and Limit Switch Holder Lid.stl for SOLUTION 2.
For both solutions print settings are as follows:
Quality: Standard (0.2)
Infill: >=20%
Speed: <=70
Support: None
Build Plate Adhesion: None
I used PLA as the printing material.
MOUNTING THE HOLDERS (SOLUTIONS 1 & 2):
Mount the choosen holder on the very right end of X-Axis by using the original 2 screws of the X-Axis tensioner (see the pictures attached).
Mount the Print-Head Trigger Frame on the Print-Head Box (bumper on the right top side and just push fix, no screws) for SOLUTION 1.
Then insert the Bluetooth Remote Shutter (SOLUTION 1) or the End-Stop/limit Switch (SOLUTION 2) in their specific "holders".
Important: For SOLUTION 1 take care of the position of the Bluetooth Remote Shutter. If you are using an ios phone, put the keychain side of the Bluetooh Remote Shutter downwards. For Android phones vice versa, as Android phones use the small shutter button. The holder is suitable for both positions.
Finally, in SOLUTION 2, I noticed that the right fan of the print-head sometimes makes annoying sound when the long triggering contact of the End-Stop/limit Switch touches the print-head. To avoid that I sticked a 2mm thick self-addesive tape piece 4x4x2mm size on the right top corner of the fan side (without touching the fan). Now, the contact only touches this tape piece and makes no sound.
FIND OUT THE X-AXIS TRIGGERING POINT:
Turn on your printer, Auto Home and then move your X-Axis through the Move X menu to the right carefully and slowly to check at what point the print head will trigger (by pushing) the bluetooth remote shutter's button (SOLUTION 1) or the end-stop/limit switch (SOLUTION 2) and note it to somewhere (as this value will be used in G-Code modificiaiton explianed below). Depending on your mounting position of the "holders", the point should be around 220-225mm (for my case it was 222mm). If you go further, you may harm your printer. Take Care.
G-CODE EXTENSIONS:
There is a standard TIME LAPSE sequence in CURA (ver 4.8.0)
To activate it, go to Extensions-->Post Processing-->Modify G-Code-->Add a Script-->Time Lapse:
Trigger Command: M240 (not necessary for our case but remain it as it is)
Pause Length: 900 (in miliseconds where the print-head will remain pushing the button on the bluetooth remote shutter or triggering the end-stop/limit switch*)
Park Print Head: Check it (if not checked as default)
Park Print Head X: 222mm (put the X-Axis triggering value you have noted as described above)
Park Print Head Y: 170mm (to forwards "the so far printed model" in front of the camera while taking snap shot)
Park Feed Rate: 3000mm/s (parking speed as default)
(*) This is important, becasue the print-head should wait some time before it returns to the last printing point while the camera takes the snap shot. Because of bluetooth triggering delays sometimes you may need to increase the value (ie to 1000-1200) but take care that if you increase more the bluetooth remote shutter button (SOLUTION 1) or the end-stop/limit switch (SOLUTION 2) will remain triggered so much that the camera may take several unnecessary photos in series and the printing time would aslo increase.
Finally don't forget to check "Enable retraction" and "Retract at Layer Change" in "Travel Menu" in CURA before slicing. Or otherwise you may face fluffing strings during snap shot travels.
CAMERA/PHONE SETTINGS:
- Locate the phone/camera somewhere close enough to see the model to be printed, properly (use a tripod to fix the camera strait and firm).
- Lighting is very important to take good pictures. Light should be smooth and steady though out the whole printing process.
- Use a sample object to understand whether the model to be printed would be in the proper location on the build plate for the camera. To do this, after Auto Home, move the X-Axis to 110mm (halfway of all X-Axis) and Y-Axis to 170mm (almost quarter to the end of Y-Axis). Locate the sample object on the build plate in the middle between 170mm-110mm (ie 140mm) on Y-Axis and just in the middle of X-Axis (ie 110mm) by rule of thumb. Of course this is an estimated place.
Adjust your camera:
- Zoom your camera to the sample model on the build plate as described above. But of course consider the sizes of your model and adjust your camera's zoom accordingly. For this purpose, I have included a "18cm ruler" as a sample model (18cm Ruler.stl) to check especially the height of the zoom (so that you can compare the height with your model which you will print and adjust accordingly).
- NEVER USE Flash: The light should be stable both during the adjustment process and the whole printing process, as the same. Flash may cause over exposure and also delays on snap shot.
- NEVER USE "Auto Exposure (AE)" and/or "Auto Focus (AF)": If auto exposure or auto focus (or both) are "on", the photos may have different exposures and focusing during the whole print process which will cause annoying flickers when watching the time lapse video. To lock AE and AF (on iphones) touch the sample object's image on the LCD display for a few seconds until "AE/AF LOCKED" appears (and remains) on the LCD screen.
- HDR is also not advised as it may casue delays in taking the photos (nevertheless I didn't try it).
- Keep your camera/phone "on" during whole printing process. Adjust your camera/phone settings to "never sleep" (or lock). Accordingly, keep your camera/phone on charger during the whole print process, to avoid any battery run outs.
- There should be enough space on the camera/phone's memory to save as much photos as the number of layers. Check the max number of layers of the model, on CURA preview. Multiply it with an average file size of one photo to calculate the space required. For example, iPhone 4 (5M Pixel rear camera) photos are approximately 1.0-1.2Mb size each. So, if your model is, say, 823 layers then there will be exactly 823 photos which will occupy approx. 1GB place on the phone at the end. Of course you will delete them all after transferring all photos to your computer.
START PRINTING:
- Don't forget to add your bluetooth remote shutter to your camera/phone and turn it on before start.
- Check if the bluetooth remote shutter button or the end-stop/limit switch works properly or not: Trigger bluetooth remote shutter button (SOLUTION 1) or the end-stop/limit switch (SOLUTION 2) with your fingers manually and check if the camera/phone responds and takes a photo. Try it a few times (don't worry you can delete them easily later after the print, as they are at the very beginning of the all taken photos).
- Start the print and check the first few layers whether:
a) the shutter works properly at the end of each layer and camera/phone takes the pictures,
b) the model's base layers (at least) are within the "frame" on the LCD display of the camera/phone and they are properly focused and exposured.
If everything seems ok, let the print ends normally. Or otherwise start form the beginning.
CREATING THE TIME LAPSE VIDEO:
There are so many video creating tools free/not free and with codex or without.
The simplest tool comes with Windows 10 embadded and free of charge (but ufortunately without codex to compress the videos).
It's easy to use but sometimes not so much user firendly.
After transferring all your photos to a seperate directory on your PC, first delete the trial photos at the very beginning. Ensure that the rest are sequentially named/numbered. Right click the vey first photo and click "create new video". Then follow the instructions. In the app, the default period between each frame (frame rate) is 3 seconds which is unacceptable. You have to change it to a number between 0,02 sec to 0,08 sec (max) to have good flow between photos. To do it select all photos and change the frame rate at once. You can also insert Text, music, sounds and 3d effects to your video in due course. All are included in the applicaiton. Save your video in mp4 format (1080p max, 720p etc...) I recommend 720p to reduce file size but keeping good resolution at the same time.
ADDITIONAL NOTES:
Some other notes based on my experience.
- Never change lighting, never reloacte or move the camera even 1-2mm and don't play with the camera's settings (you will lose your fixed focusing and exposure settings) during the whole printing process.
- Don't use experimental Vase mode (or Spiralize Outer Contour mode in CURA) while slicing the model. It doesn't work properly with Time Lapse function (or at least I couldn't succeed).
- Don't use too much shining printing material to have good results.
- Bluetooth remote device goes on standby if not triggered for a long time (ie after 3-4 minutes). If the layers of your model are too large then the bluetooth remote shutter device may go standby and will need a second triggering to run the camera's shutter. To avoid that you may need to perform double triggering (one for awaking the bluetooth device and the next for triggering the camer's shutter) by modifying the G-Code in CURA. It's rather complex to explain here. So, try printing smaller models instead.
- Avoid printing models with support and build plate adhessions for good results.
- To have stunning effects during time lapse replay, print twisting or expanding/narrowing, rameous, detaching/attaching models instead of staright shapes like boxes.
- Where possible, use a small manual watch/clock at the background, on one of the corners in the picture frame (gives a sweet time lapse effect).
- Where possible, use "Gyroid" as the infill pattern while slicing in CURA, which also gives a stunning effect.
- Where possible, use square snap frame (ie on iphone 4) to narrow the scene size (and also the file size) and avoid entry of other unwanted objects in the scene.
- If possible, use photo lighting equipments (ie youtuber led lights etc) for proper lighting of the model to achieve good exposure results.
- Cover unwanted objects at the background with black cloths and try different light colors as you get more experience.
- Time lapse print process (print-head's depart from the last printed point and, after taking the picture, return to the same point at each layer change) may increase the print time significantly if the model consists of so many layers. Depending on the model, one triggering process is approximately 6-7 seconds. So, if your model consists of say 900 layers the printing time will increase 90-100 mins.
SAMPLES:
Here are some samples created by me as above:
https://youtu.be/SmZyiDtOeUE
https://youtu.be/8BgksuuhZGA
See how it works (SOLUTION 2):
https://youtu.be/f7rbp18R92E
Any questions and comments are welcome,
Have a nice printing...
:format(webp)/https://fbi.cults3d.com/uploaders/16688082/illustration-file/942d93a0-580b-46e6-90a9-edc319b1b5ca/Solution1%20Tinkercad.JPG)


/https://preview3d-images.cults3d.com/variants/ud72bchc89vygwxj6o7b3p0e3egs/9ce1a1278a90847fe525f7bdea66ae6081035e320afa813bf6efbbbe4c5d9f85)
/https://preview3d-images.cults3d.com/variants/hkw4shs0lgl92uddic63vsyl6v55/9ce1a1278a90847fe525f7bdea66ae6081035e320afa813bf6efbbbe4c5d9f85)
/https://preview3d-images.cults3d.com/variants/n4084trnqnnieumak2fivm26u96t/9ce1a1278a90847fe525f7bdea66ae6081035e320afa813bf6efbbbe4c5d9f85)
/https://preview3d-images.cults3d.com/variants/k1l6sn02n28o00b74yhpfxfwk7wb/9ce1a1278a90847fe525f7bdea66ae6081035e320afa813bf6efbbbe4c5d9f85)
/https://preview3d-images.cults3d.com/variants/rvd4zccxvnjwmz11ohmawodwy5hw/9ce1a1278a90847fe525f7bdea66ae6081035e320afa813bf6efbbbe4c5d9f85)


