Skip to content

Spektrum DX8 Antenna Upgrade Collar

Advertising
Advertising
?
Creation quality: 5.0/5 (1 vote)
Evaluation of members on the printability, utility, level of detail, etc.

  • 781 views
  • 1 like
  • 6 downloads

License
3D design format
STL Folder details Close
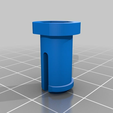
  • DX8_Antenna_Insert_Body.stl
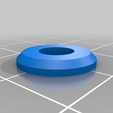
  • DX8_Antenna_Insert_Cap.stl

Learn more about the formats

Publication date 2021-03-16 at 04:38
?
Published to Thingiverse on: 2018-09-05 at 10:00
Design number 332359

3D printer file info

3D model description

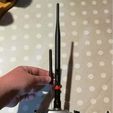
This is a simple collet to aid in upgrading the antenna on the Spektrum DX8 (first generation). The stock antenna is quite small and not quick swap (no screw-on connector) so this collet allows you to fit an U.fl to RP-SMA pigtail.

Instructions:

Open the radio (see instructions elsewhere) and set aside the back. Remove the whole antenna assembly including TX module - it's fairly obvious how this is done so I won't go into details here.

Remove the stock antenna and cable from the cylindrical plastic housing.

Remove all washers and nuts from the RP-SMA connector of your new pigtail. Insert new pigtail through the printed component, ensuring the RP-SMA connector sits down fully into the hex recess. Use some CA/superglue to fix the cap part over the top of the threaded section of the RP-SMA connector. Re-install the lock washer, spring washer and hex nut over the top of the cap that you just glued down. Tighten firmly but not too much.

Insert the assembly into the cylindrical housing fully, and then rotate to lock (this is the same mechanism that holds the stock antenna in place, and I have replicated it exactly on this model for ease of installation). Use a 12mm spanner if needed to lock into place- I have modelled in some flats for this purpose.

Thread the U.fl connector through the original metal plate and screw back on exactly as it was originally. Route the pigtail under where the TX module sits. Plug the TX module back in and screw down. Plug in the U.fl connector to the TX module and re-assemble radio cover.

Done!

3D printing settings

-

Advertising


Issue with this design? Report a problem.

Would you like to support Cults?

You like Cults and you want to help us continue the adventure independently? Please note that we are a small team of 3 people, therefore it is very simple to support us to maintain the activity and create future developments. Here are 4 solutions accessible to all:

  • ADVERTISING: Disable your banner blocker (AdBlock, …) and click on our banner ads.

  • AFFILIATION: Make your purchases online by clicking on our affiliate links here Amazon.

  • DONATE: If you want, you can make a donation via Ko-Fi πŸ’œ.

  • WORD OF MOUTH: Invite your friends to come, discover the platform and the magnificent 3D files shared by the community!


Sharing and downloading on Cults3D guarantees that designs remain in makers community hands! And not in the hands of the 3D printing or software giants who own the competing platforms and exploit the designs for their own commercial interests.

Cults3D is an independent, self-financed site that is not accountable to any investor or brand. Almost all of the site's revenues are paid back to the platform's makers. The content published on the site serves only the interests of its authors and not those of 3D printer brands who also wish to control the 3D modeling market.

100% secure payment by credit card, PayPal, Apple Pay, Google Pay, etc.
View all payment options.