Skip to content

Repconn Fallout Rocket...Rocket

Advertising
Advertising
?
Creation quality: 5.0/5 (2 votes)
Evaluation of members on the printability, utility, level of detail, etc.

  • 2.4k views
  • 4 likes
  • 80 downloads
  • 1 make

License
3D design format
STL Folder details Close
  • FalloutRocketBigWindow.stl
  • FalloutRocketBody.stl
  • FalloutRocketEngineBlock.stl
  • FalloutRocketFin.stl
  • FalloutRocketNosecone.stl
  • FalloutRocketNoseconeBlock.stl
  • FalloutRocket_SmallWindow.stl

Learn more about the formats

Publication date 2021-03-23 at 01:41
?
Published to Thingiverse on: 2020-04-20 at 16:01
Design number 338232

3D printer file info

3D model description

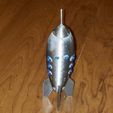
I saw Alpokemon's fallout rocket (https://www.thingiverse.com/thing:4269195) and thought "This thing needs to be a rocket!".

I mean, it IS a rocket, but it needs to be a rocket rocket...err...that is, it needs to actually FLY!

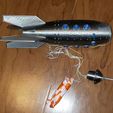
So I converted it to a rocket that will fly on 18mm (Estes A, B or C) sized motors.

Some build tips...

1) Print the body with no infill and 1mm walls, floors and ceilings.
2) Print the nose cone with heavy infill. I used 50%. but you might want to go higher.
3) You'll need some 18mm body tube. This is commonly referred to as "BT-20" tube.
4) You'll need an engine hook. I made mine out of a piece of spring steel taken from an old windshield wiper blade. Alternatively you can skip this and use tape to friction fit the motor. The body is designed to work around an engine hook, though.
5) Use kevlar line through the engine block as a shock cord.
6) Attach the engine hook to the body tube, glue the engine block into the body tube flush with the top of the engine hook (Not inside the hook area, above it) and glue the body tube in the body of the rocket. The bottom of the body tube should be flush. Cut the top of the body tube so it's flush with the top. The body tube protects the rocket from the heat of the motor a little bit so it's kind of required.
7) Glue the noseconeblock to the nosecone after aligning it in the tube to be sure it's centered.
8) Use a dowel or tooth pick in the nosecone for the antenna. This would be too thin to 3d print and expect to stay on. You may have to widen the hole in the nosecone for it to fit.
9) Print the windows (6 of the large and 2 of the small) in the color of your choice and glue them in place.
10) Glue the fins to the rocket, you can see where.
11) Use a small chute. I think the one I have is 9" but smaller might work. Actually, the chute didn't deploy in the first flight I did and it fell without one and survived.

It's really a pretty simple build and DOES fly, at least on an A8-3. I cannot guarantee stability on larger motors but if you print it and fly it on one, let me know!

3D printing settings

-

Tags

Advertising


Issue with this design? Report a problem.

Would you like to support Cults?

You like Cults and you want to help us continue the adventure independently? Please note that we are a small team of 3 people, therefore it is very simple to support us to maintain the activity and create future developments. Here are 4 solutions accessible to all:

  • ADVERTISING: Disable your banner blocker (AdBlock, …) and click on our banner ads.

  • AFFILIATION: Make your purchases online by clicking on our affiliate links here Amazon.

  • DONATE: If you want, you can make a donation via Ko-Fi πŸ’œ.

  • WORD OF MOUTH: Invite your friends to come, discover the platform and the magnificent 3D files shared by the community!


Sharing and downloading on Cults3D guarantees that designs remain in makers community hands! And not in the hands of the 3D printing or software giants who own the competing platforms and exploit the designs for their own commercial interests.

Cults3D is an independent, self-financed site that is not accountable to any investor or brand. Almost all of the site's revenues are paid back to the platform's makers. The content published on the site serves only the interests of its authors and not those of 3D printer brands who also wish to control the 3D modeling market.

100% secure payment by credit card, PayPal, Apple Pay, Google Pay, etc.
View all payment options.