Skip to content

Dial guage clamp for RepRapPro Prusa Mendel Mono and Tricolour

Advertising
Advertising
?
Creation quality: 0.0/5 (0 votes)
Evaluation of members on the printability, utility, level of detail, etc.

  • 641 views
  • 1 like
  • 3 downloads

License
3D design format
STL Folder details Close
  • guage_clamp.stl

Learn more about the formats

3D model size X 45.9 Γ— Y 28 Γ— Z 10 mm
Publication date 2021-09-12 at 23:14
?
Published to Thingiverse on: 2013-07-14 at 05:41
Design number 518280

3D printer file info

3D model description

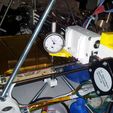
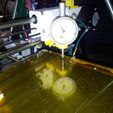
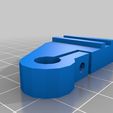
This handy little bracket attaches to the extruder carriage of a Mendel Mono or Tricolour (the latest version as of July 2013, not the previous version with the horizontal carriage). You can then attach a standard 8mm shaft dial guage as shown.

Note that I have the bracket upside down in the photo.

3D printing settings

Settings aren't critical. Sliced using slic3r at 0.3mm. Slic3r still has problems with undersized holes, so you will probably have to open the holes out to size with a drill bit - 3mm for the mounting holes, 8mm for the larger one. NOTE: THE THE CLAMP SCREW HOLE SHOULD BE 2.5mm!!. I left the mounting holes undersized and just didn't use nuts.

To level the bed:

1) Adjust the Z axis zero screw so that there is 1mm or so clearance between the nozzle and the bed (THIS IS IMPORTANT!), then zero the Z axis.

2) Attach the bracket, then slide in the dial guage. Leave the clamp a bit loose.

3) Move the print head to position the guage over the bed near the single bed height adjustment screw and zero the Z axis again

4) Adjust the position of the guage in the bracket for a small (about 0.1mm, less is better) reading on the guage then tighten the clamp.

NOTE: you only want a small reading on the guage, otherwise the spring in the guage will push the bed down and give you a false reading. Also, having clearance between the nozzle and the bed is important. If the nozzle touches the bed, it will screw up your readings.

5) Zero the scale on the dial guage.

6) Move the print head to position the guage over the bed near one of the other bed height adjustment screws and zero the Z axis.

7) Adjust the bed height screw near the guage until the reading is zero. Re-zero the Z axis and check

8) Repeat steps 6 and 7 for the other bed height screw.

9) Recheck the bed height at all the bed height screws and readjust as necessary.

10. Check the bed height at the edges of the bed. If there are any discrepancies, you may need to put some kapton tape under the glass to get the bed flat

11. Remove the guage and readjust the Z zero screw for the proper nozzle clearance. (you could adjust the Z clearance in slic3r, but my preference is to have the mechanical bits adjusted properly)

Advertising


Issue with this design? Report a problem.

Would you like to support Cults?

You like Cults and you want to help us continue the adventure independently? Please note that we are a small team of 3 people, therefore it is very simple to support us to maintain the activity and create future developments. Here are 4 solutions accessible to all:

  • ADVERTISING: Disable your banner blocker (AdBlock, …) and click on our banner ads.

  • AFFILIATION: Make your purchases online by clicking on our affiliate links here Amazon.

  • DONATE: If you want, you can make a donation via Ko-Fi πŸ’œ.

  • WORD OF MOUTH: Invite your friends to come, discover the platform and the magnificent 3D files shared by the community!


Sharing and downloading on Cults3D guarantees that designs remain in makers community hands! And not in the hands of the 3D printing or software giants who own the competing platforms and exploit the designs for their own commercial interests.

Cults3D is an independent, self-financed site that is not accountable to any investor or brand. Almost all of the site's revenues are paid back to the platform's makers. The content published on the site serves only the interests of its authors and not those of 3D printer brands who also wish to control the 3D modeling market.

100% secure payment by credit card, PayPal, Apple Pay, Google Pay, etc.
View all payment options.