Skip to content

Christmas Star

Advertising
Advertising
?
Creation quality: 5.0/5 (1 vote)
Evaluation of members on the printability, utility, level of detail, etc.

  • 2.2k views
  • 6 likes
  • 77 downloads

License
3D design format
STL Folder details Close
  • Polyhedron Base.STL
  • Polyhedron Frame.STL
  • Polyhedron Spike.STL

Learn more about the formats

Publication date 2021-12-22 at 06:57
Design number 590598

3D printer file info

3D model description

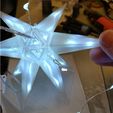
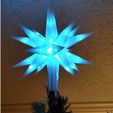
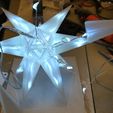
The design is simple using only 3 basic parts: a 20 sided icosahedron Frame, 19 Spikes, and 1 Base (to mount it on a tree).

The Star is approximately 17.6 cm in diameter. The parts of this design can be scaled to any size, using your slicer's scaling options.

I used this Acrylic Cement (https://www.tapplastics.com/product/repair_products/plastic_adhesives/tap_acrylic_cement/130) and this Small BD-25/2 Hypo Applicator (https://www.tapplastics.com/product/repair_products/plastic_adhesives/hypo_type_solvent_cement_applicator/409) to glue everything together.

For the lights I used these Govee fairy lights.
https://www.amazon.com/Govee-Operated-Waterproof-Silver-Plated-Festivals/dp/B07R8V53S4
It took about three 1 meter strands (20 LEDs/strand).

To assemble it, I picked one side of the Frame and ran lights into the center, then using tweezers I pulled about 3 LEDs out each hole in the Frame. Bending the wires so there was one LED at the tip, one in the center, and another towards the base of the spike. Pressing the Spike against the Frame I ran a bead of Acrylic Cement around the three sides of the spike and held it for about 20 seconds. Superglue would probably work too. After repeating this 19 more times, I glued the Base to the last open position on the Frame.

The lights are powered by 2 3V CR2032 batteries in series. The batteries provided 6V, so to power the star I cut off the battery packs, then used a cut off USB cable where I connected the USB cable 5V power wires to the 3 light strings in parallel.Then using a small USB power supply, I attached the star to the end of a string of lights on the tree.

Even with the lower USB voltage (5V) the star was still really bright. In fact, so bright that I added a 100 Ohm resistor in series to the +5V wire to reduce the brightness.

3D printing settings

I printed all the parts using PolyMaker PolySmooth clear filament.

Using the Prusa Slicer, I printed the Frame and Base with the 'Supports on Build Plate only' option. And for the Spikes I enabled a 2mm skirt.

Advertising


Issue with this design? Report a problem.

Would you like to support Cults?

You like Cults and you want to help us continue the adventure independently? Please note that we are a small team of 3 people, therefore it is very simple to support us to maintain the activity and create future developments. Here are 4 solutions accessible to all:

  • ADVERTISING: Disable your banner blocker (AdBlock, …) and click on our banner ads.

  • AFFILIATION: Make your purchases online by clicking on our affiliate links here Amazon.

  • DONATE: If you want, you can make a donation via Ko-Fi πŸ’œ.

  • WORD OF MOUTH: Invite your friends to come, discover the platform and the magnificent 3D files shared by the community!


Sharing and downloading on Cults3D guarantees that designs remain in makers community hands! And not in the hands of the 3D printing or software giants who own the competing platforms and exploit the designs for their own commercial interests.

Cults3D is an independent, self-financed site that is not accountable to any investor or brand. Almost all of the site's revenues are paid back to the platform's makers. The content published on the site serves only the interests of its authors and not those of 3D printer brands who also wish to control the 3D modeling market.

100% secure payment by credit card, PayPal, Apple Pay, Google Pay, etc.
View all payment options.