ETA: 9.5.18 Added an STL for a battery strap hold down thing for those that prefer a strap to straight velcro.
ETA: 8.15.18 Added Simplify3D factory files for all parts except the firewall for PLA. Also did the same with preconfigured G-Codes for i3 style printers. The firewall really needs to be printed with a material other than PLA. PETG, ABS, ASA, Polycarbonate, Nylon would all be much better choices.
ETA: 8.14.18 Cura Profiles for PLA and PETG are now uploaded. They're simple, but contain my optimal settings. Will likely need tuning to match your machine and filament, but they will allow the inner ribs and supports to be sliced.
ETA 8.13.18: Added Simplify3D Factory files for all parts in PETG, as well as preconfigured PETG gcode files for i3 style printers for all parts.
1st off, yes, the whole plane and all the files are available for free. However, if you want to leave a tip, I'd be grateful. This thing was a lot of work. Thanks!
I know this is a long bit of text, but unless you're familiar with thin wall 3D printing specifically for RC aircraft, please read all of it.
For specific RC related, or even printing questions for the model, please refer to this forum build thread:
https://forum.flitetest.com/index.php?threads/36-northern-pike-3d-printed-cuda-clone-it-flies.54579/
https://www.rcgroups.com/forums/showthread.php?3110758-36-Northern-Pike-3D-Printed-Cuda-Clone-%28It-Flies-STL-s-Posted%21%29
A lot of questions have already been answered in the threads above.
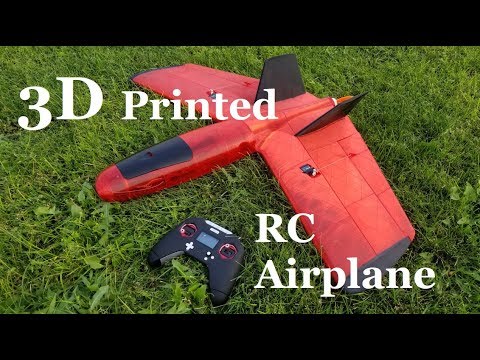
ETA: Maiden Flight Printed in PETG
https://youtu.be/JRH7djd_E_w
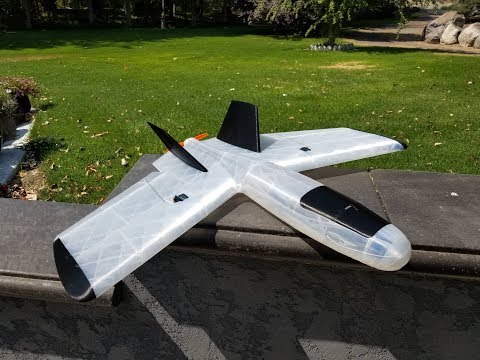
Prototype Maiden Flight Video:
Yeah, first launch was bad... Tried to throw it really hard, then discovered it only takes a gentle toss....
https://youtu.be/1Wrvbb9pe58
Print time is something like 40 hours to do all the parts. Maybe a bit more. Around 700grams of filament is required.
Ok, so settings. This is a thin wall model. You'll need a modern/advanced slicer, either simplify3D or cura. Simplify3D is recommended as you can add multiple processes to different layer heights. I'm just most familiar with it. As things currently stand, I haven't been able to get Slic3r to work with this style of printing. Use a .4mm nozzle and .4-.42mm wall thickness.
All parts except the motor mount and firewall can be printed from PLA. I reccomend something with higher temp resistance for those two pieces. This plane has also been designed to work with PETG, and there is a slot for an 8mm carbon fiber spar in the main wing section. For the spar, you can use a cheapo $2 carbon fiber arrow from walmart, or wherever you can find something close to 8mm that's cheap.
All parts except for the motor mount, firewall, Elevon Section 1 and Fuselage Section 1 should be printed at 0% infill with only 1 perimeter. NO BOTTOM OR TOP LAYERS. Layer Heights for almost all parts are best at .25mm. If your printer can't handle retraction cleanly, or leaves gaps in your print at the start points going down to .2mm may be needed. If you don't use helper discs for the Elevon Section 1 (The Piece with the servo horn) adding 1 bottom layer to just that piece will make the horn way stronger.
The Wingtips and the Vertical stabilizers can have their bottom bits printed at .25mm layer heights, but they will look better if you switch to .1mm layer height for the tops of them.
To aid in bed adhesion and add additional strength, I like to use 2 perimeters for the first 3mm of every part. This is easy to do in simplify3D. I've attached a simplify3D factory file sample (For PLA, PETG will need other settings) that has all of my print settings for thin wall parts as an example. If you need more adhesion, I highly recommend the use of helper discs on the tips of parts (refer to the factory file), or use a skirt of at least a couple MM. PETG will need a nozzle temp around 240C, and a bed temp around 90C. When I get a perfect profile worked out, I'll post it here.
Fuselage Section 1, or the very nose of the plane should be printed with supports enabled, 3 perimeters, and 30% infill. The motor mount and firewall would best be printed solid. Just turn up perimeters to something like 5 with 50% infill and you should be good. For those 3 mentioned parts, you can turn on bottom and top layers. I recommend at least 3 on each.
SCALE: Do NOT SCALE this model without proportionally adjusting the nozzle print size. Also, keep in mind that I will be posting a smaller version of this designed around a .3mm nozzle once it's tested.
Required RC Parts:
Motor: Emax 2306-2400kv or equivalent. This motor weighs around 34 grams and puts out 1700 grams of thrust.
ESC: 35A for the recommended motor
Prop: 6045 HQ Style Prop
Servos: 2x 9 gram. Metal gear recommended, but cheapos will probably work.
Battery: 2200mAh-3000mAh 3-4 Cell Lipo
Pushrods: ~.040 - .060"
Elevon Hinge Wire: 1/16" wire or ~1.7mm
Hatch Magnets : 4 - 10x2mm round or smaller (amazon has them cheap)
Optional: This plane is built for FPV, so there's an included camera mount in the nose. You should be able to fit just about any modern FPV race camera into the nose.
All up weights should be between 1000 and 1100 grams. With the recommended electronics setup, and a 2650 4 cell battery, my weight came in at 1065 grams, or 37.5 ozs. Center of gravity markings are built into the wings. Flight time is estimated between 6 and 10 minutes. Cruises along great at half throttle.
Assembly - Most parts just slot together and can be easily glued. If you have alignment troubles on some parts, taping Popsicle sticks in place temporarily to aid in alignment is very helpful. I recommend medium thickness CA (superglue) and activator. Bob Smith Industries branded stuff works great.
Flight Setup:
This is an intermediate to advanced plane. I estimate the top speed with the recommended electronics to be any ware from 80-100mph. That said, it's quite gentle for the speed, and incredibly stable. Stalls simply make the plane sink, no dropped tips. It glides a long ways and really keeps it's momentum, so keep that in mind when it comes time to land.
As this plane flies with elevons, and doesn't have a tail I'd recommend plugging about 1.5mm of up travel (reflex) into the control surfaces. You may be able to trim some of that out depending on your wing loading after flying it. Total travel for high rates should be around 30mm, and low rates 20mm. I prefer about 50% expo on both high and low rates.
CG marks are built into the wings. I haven't tried anything other than the posted marks, so go outside of that range at your own peril.
Launching isn't bad now that I know it doesn't take a ton of force. A gentle toss straight into the air at about 20-30 degrees up is good. Watch the flight video for what a bad toss and a good toss look like. I'd recommend keeping the throttle down until the plane clears your hand. Once it's clear, about 3/4 throttle will pull the plane up and out with little incident.