Skip to content

Droplet kinematic sculpture

Advertising
Advertising
?
Creation quality: 5.0/5 (2 votes)
Evaluation of members on the printability, utility, level of detail, etc.

  • 14.6k views
  • 153 likes
  • 429 downloads
  • 3 collections

License
3D design format
STL Folder details Close
  • All Rings 0.3 clearence.stl
  • All Rings 0.4 clearence.stl
  • Axis.stl
  • Base.stl
  • CAM 0.stl
  • CAM 1.stl
  • CAM 2.stl
  • CAM 3.stl
  • CAM 4.stl
  • CAM 5.stl
  • CAM 6.stl
  • CAM X.stl
  • Gear(16 teeth).stl
  • HalfBall.stl
  • Knob.stl
  • MotorMount.stl
  • Open Case.stl
  • Ring holder.stl

Learn more about the formats

Publication date 2022-04-23 at 21:26
Design number 703370

3D printer file info

3D model description

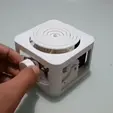
This is a small table top kinematic sculpture, if you build one please send pictures! (the links to buy parts are affiliate links, by using them you help me publish more projects)

Preparation:

  • Print all parts and two of each numbered CAM, and two of "Ring holder.stl".

  • Print with a raft: "Shaft.stl", "Gear(16 teeth).stl" and all the CAMs

  • Sand the back of all of the CAMs that where in contact with the raft.

  • Deburr the first layer of all the holes of the two "ring holder.stl" until all of the rings slide with ease.

  • I used a combination of M3, 6mm screws and 10mm screws but you should be able to use 8mm screws for everything you'll will need 14:
    https://s.click.aliexpress.com/e/_A6bVpt

  • For the motor i used a n20 150 rpm 3v motor but a 50 rpm 3v should be more suitable:
    https://s.click.aliexpress.com/e/_9hg7Lz

  • To make the battery case I used these contacts:
    https://s.click.aliexpress.com/e/_9GYRXH

Assembly: (I also uploaded a few gif to help)

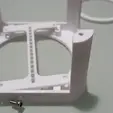
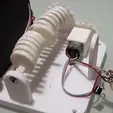
1 - Screw the two "ring holder.stl" back to back on the "open case" model, make sure all of the rings slide easily. (see photo)

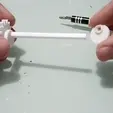
2 - Slide the CAMs to the "Shaft.stl", you might need to sand down the square shaft to make them fit. slide them according to the numbers starting with 0. With the number facing the gear at the end, when you get to CAM 6 slide in CAM X then start putting a new CAM 6 until you get to CAM0 again. (see photo)

3 - try to align the CAMs and the rings to make sure everything mates together.

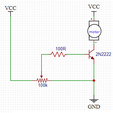
4 - Mount the motor and connect the electronics. I used a single 2222n NPN transistor along with a potentiometer to control (this is fine because the motor is very small, I uploaded the circuit in the photos)

5 - Finally screw the shaft to the base (make sure the shaft spins freely, you might need to enlarge the holes on the posts that the shaft attach to) then screw "open case.stl" to the base.

3D printing settings

Standard print
15% infill
Print with raft : Shaft.stl, Gear(16 teeth).stl and all the CAMs

Advertising


Issue with this design? Report a problem.

Would you like to support Cults?

You like Cults and you want to help us continue the adventure independently? Please note that we are a small team of 3 people, therefore it is very simple to support us to maintain the activity and create future developments. Here are 4 solutions accessible to all:

  • ADVERTISING: Disable your banner blocker (AdBlock, …) and click on our banner ads.

  • AFFILIATION: Make your purchases online by clicking on our affiliate links here Amazon.

  • DONATE: If you want, you can make a donation via Ko-Fi πŸ’œ.

  • WORD OF MOUTH: Invite your friends to come, discover the platform and the magnificent 3D files shared by the community!


Sharing and downloading on Cults3D guarantees that designs remain in makers community hands! And not in the hands of the 3D printing or software giants who own the competing platforms and exploit the designs for their own commercial interests.

Cults3D is an independent, self-financed site that is not accountable to any investor or brand. Almost all of the site's revenues are paid back to the platform's makers. The content published on the site serves only the interests of its authors and not those of 3D printer brands who also wish to control the 3D modeling market.

100% secure payment by credit card, PayPal, Apple Pay, Google Pay, etc.
View all payment options.