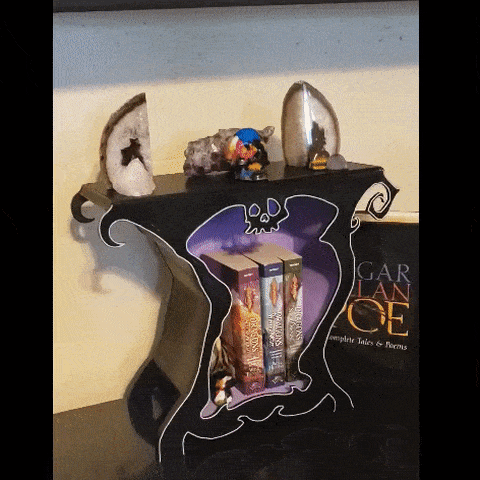
Few films have captured and inspired audiences like Tim Burton's enigmatically adapted claymation production of The Nightmare Before Christmas. It's a holiday classic, but not in the traditional sense. Halloween and Christmas for sure, but it's even popular on Valentine's Day, thanks to the spook-tacular love story between Jack and Sally. It was this very reverence for the movie that inspired us to build our largest 3D printable item to date. And we saved it especially for GetPrinted3D's 100th upload! We present to you...
The Nightmare Before Christmas Console Table
IMPORTANT First things first! This NBC themed end table requires a larger 3D printer to produce at full size. We printed all pieces on Anycubic Kobra Max, which features a 400x400mm print volume. The largest pieces measure 380x317mm.
It is possible to print the table on a standard size 220x220 printer by scaling it to 55%. It won't have as much display space on top or within, but it will still look awesome!
TIP: If you tweak the slicer settings on a standard 220x220 printer to take advantage of the full 235x235 print volume, you can scale the console as high as 60%. This is only suggested for printers with magnetic flex plates that don't use clips, and will require excellent bed adhesion on the edges. Here's a video that shows you how to do it.
STL Files Included
There are 7 STL Files included in the zip folder. (NOTE: The file NBC Table - WHOLE is for previewing purposes on Cults3D and is not meant for printing.) The printable file list includes:
- NBC Console - Back Panel
- NBC Console - Front Panel (No Outline)
- NBC Console - Front Panel (with Outline)
- NBC Console - Middle Wall
- NBC Console - Outline Only
- NBC Console - Top Inner
- NBC Console - Top Outer
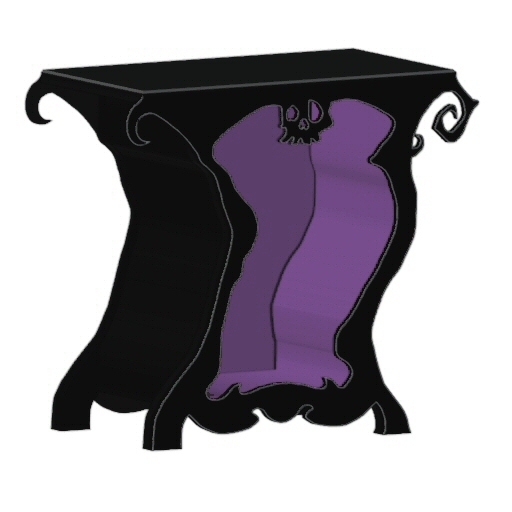
You will only need one Front Panel. The Outline Only file is an optional, thin decorative line that you can print and glue to the edges of the Front Panel. Look at the images and you'll see we've printed the Outline in white. It really makes the table's design "pop" once assembled. If printing the Outline, you'll want to print the file Front Panel (No Outline).
Alternatively, you can print the Front Panel (with Outline) and change the filament color to white at the final moment, or paint the outline once completed. Or, you can print Front Panel (No Outline) and skip the outline edging altogether. The choice is yours.
Assembling the Parts
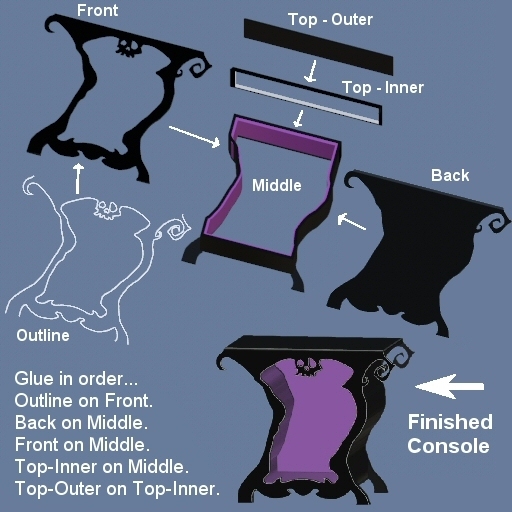
We've supplied an image above that shows all of the parts laid out. Use this image for reference as you go. I'll provide step-by-step instructions here.
Print all of the pieces - Front, Back, Middle, Top Inner and Outer, and the Outline if desired. We recommend printing the Outline in white and all other pieces in black.
Please know that, at full size, this is going to take quite a bit of time - several days, in fact. Don't rush it. You're creating a piece of furniture. Quality over speed, my friend!
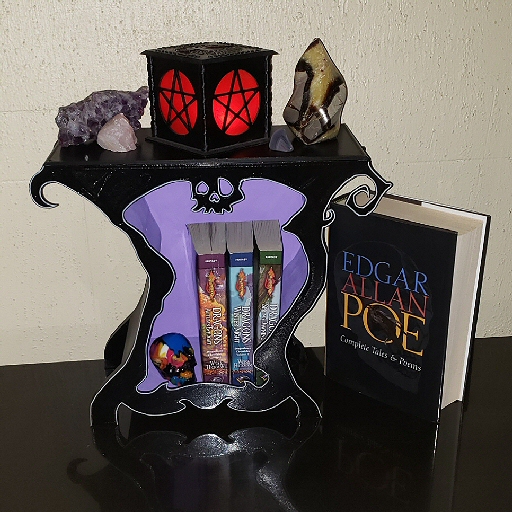
If you wish to paint any pieces, now is the time. We gave the main pieces a coat of Black Gloss spray paint, then painted the inside and back wall of the shelf in Petunia Purple. Use primer if you have it. If not, be prepared to give it at least 4-5 coats of purple, and allow ample time to dry.
If you've chosen to print the Outline Only file, go ahead and glue that onto the Front Panel (No Outline) first. Carefully line up each line segment. It should be very obvious what goes where.
Using a strong glue (e.g. E6000, Gorilla Clear Grip, etc.), adhere the Back Panel to the Middle Wall. Note that the front of the Middle Wall has legs, while the back does not. If you're not sure which way to turn it, the two thinner leg pieces will go together, while the thick legs of the Back Panel stand alone. Make sure all of the edges line up evenly. Once glued, place the two pieces on a flat surface and put something very heavy on top of it to ensure they bond well. I used two stacks of books, side by side. Wait a few hours before moving on to the next step.
Repeat the previous process to glue the Front Panel onto the Middle Wall. Line it up perfectly and place weights on top. Wait a few hours.
Stand the table on its legs. Line up the Top Inner panel on top of the shelf. Look closely at the two short ends. They are not the same. One will line up perfectly with the small curl on the left top of the table, and the other will align with the larger curl on the right. Glue this in place and give it a few minutes to set.
Glue the Top Outer section on top of the Top Inner piece. Turn it so that the flat edge is in back, and the beveled edge in front. Add a little weight to the top to hold everything in place and give it a few more hours to dry.
Decorate and enjoy!
DIMENSIONS @ 100% SCALE (400x400 Print Volume)
Fully assembled, The Nightmare Before Christmas Console Table measures:
X = 38.0cm / 15.0in
Y = 32.1cm / 12.6in
Z = 15.5cm / 6.1in
DIMENSIONS @ 55% SCALE (220x220 Print Volume)
If you have a standard-size printer with a 220x220 print volume (Ender 3, Ender 3 Pro, Voxelab Aquila X2, etc.), you can print the Nightmare B4 Xmas Console at 55% scale. At this size, the assembled table measures:
X = 20.9cm / 8.2in
Y = 17.7cm / 7.0in
Z = 8.5cm / 3.35in
DIMENSIONS @ 77% SCALE (300x300 Print Volume)
If your printer lies somewhere between those volume points, such as the Ender CR-10's 300x300mm build volume. Scale it accordingly. At 77% and fully assembled, the console will measure:
X = 29.3cm / 11.5in
Y = 24.7cm / 9.7in
Z = 12.0cm / 4.7in
Whatever size and color(s) you print or paint it, please upload your makes. We would absolutely love to see them!
If you like our NBC Console Home Furniture Decor, please check out our other GetPrinted3D Creations on Cults3D (including many more classic horror movie-themed items!)
IMPORTANT Copyright Info Unless otherwise noted, ALL GetPrinted3D designs are Copyright protected. When you purchase a file, you do NOT have the right to sell the file or printed model. Files may not be redistributed under any circumstances. The models are for personal and private use, and may not be sold commercially without the explicit written consent of GetPrinted3D.
You can obtain a Commercial License to legally sell our designs here:
- https://www.patreon.com/GetPrinted3D
:format(webp)/https://fbi.cults3d.com/uploaders/26463760/illustration-file/436f4d08-393f-48a8-949b-76cae3e8f4be/NBC-Console-VideoToGif.gif)


/https://preview3d-images.cults3d.com/rwy8jb63qob58o18ieyukl7v8xib)


