Skip to content

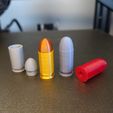
.45 ACP replica and snap cap

Advertising
Advertising
?
Creation quality: 5.0/5 (1 vote)
Evaluation of members on the printability, utility, level of detail, etc.

  • 1.6k views
  • 14 likes
  • 172 downloads
  • 1 collection

License
3D design format
STL and TXT Folder details Close
  • 45ACP_bullet.stl
  • 45ACP_cartridge.stl
  • 45ACP_case.stl
  • 45ACP_info.txt
  • 45ACP_snapcap.stl

Learn more about the formats

Publication date 2023-06-08 at 04:39
Design number 1260245

3D printer file info

3D model description

.45 ACP, also known as .45 Automatic Colt Pistol or .45 Auto, is a centerfire handgun cartridge designed in the United States of America by John Browning in 1904.

Print this for props, display, education, training, just because it's cool, or scale it up to become a container.

Contains 5 files:

  • Accurately sized replica: 45ACP_cartridge.stl

  • Separate bullet and case pieces for easily printing in different colors: 45ACP_bullet.stl and 45ACP_case.stl

  • Snap cap/dummy round for cycle and dry fire practice, with firing pin hole and reduced bullet size: 45ACP_snapcap.stl

  • Information txt file with recommended print settings: 45ACP_info.txt

If you like this model, please consider donating: https://paypal.me/spearmountain

Originally uploaded on Thingiverse: https://www.thingiverse.com/thing:6067306

3D printing settings

  • Material: Tested with PLA and PLA+/PLA Pro.

  • Overall print size: 32.39mm tall, 12.19mm diameter.

  • Layer Height/Quality: 0.16mm or less recommended, 0.12mm works best.

  • Infill: 20% is fine for display, 60% or more recommended for snap cap use.

  • Print Speed: 50mm/s or less recommended. I do 40mm/s for cartridge, snap cap, and case piece; then 30mm/s for bullet piece. I also do 10mm/s initial layer speed.

  • Adhesion: A brim might be needed, depending on the printer and bed type. I have a textured PEI bed, and with proper calibration, additional adhesion isn't needed.

  • Post print: The pieces may require some sanding or filing for proper fitment if the bottom layers bulged out a little. Fitment should be a little snug, but easy to take in and out. A properly calibrated setup shouldn't need additional work.

Advertising


Issue with this design? Report a problem.

Would you like to support Cults?

You like Cults and you want to help us continue the adventure independently? Please note that we are a small team of 3 people, therefore it is very simple to support us to maintain the activity and create future developments. Here are 4 solutions accessible to all:

  • ADVERTISING: Disable your banner blocker (AdBlock, …) and click on our banner ads.

  • AFFILIATION: Make your purchases online by clicking on our affiliate links here Amazon.

  • DONATE: If you want, you can make a donation via Ko-Fi πŸ’œ.

  • WORD OF MOUTH: Invite your friends to come, discover the platform and the magnificent 3D files shared by the community!


Sharing and downloading on Cults3D guarantees that designs remain in makers community hands! And not in the hands of the 3D printing or software giants who own the competing platforms and exploit the designs for their own commercial interests.

Cults3D is an independent, self-financed site that is not accountable to any investor or brand. Almost all of the site's revenues are paid back to the platform's makers. The content published on the site serves only the interests of its authors and not those of 3D printer brands who also wish to control the 3D modeling market.

100% secure payment by credit card, PayPal, Apple Pay, Google Pay, etc.
View all payment options.