MINI 13 Printable Jointed Figure

Copyright Claim

MINI 13 Printable Jointed Figure

Boost
665
1066
198

Print Profile(8)

All
P1S
P1P
X1
X1 Carbon
X1E
A1
A1 mini

0.15mm layer, 2 walls, 20% infill
Designer
1.6 h
1 plate
4.7(71)

0.16mm layer, 2 walls, 20% infill
1.4 h
1 plate
4.8(39)

Weapons,hat,bag,0.16mm layer, 2 walls, 20% infill
30 min
1 plate
4.9(19)

Only Frame,0.16mm layer, 2 walls, 20% infill
51 min
1 plate
4.9(19)
Click to see more

Boost
665
1066
198
29
2.1 k
2.1 k
Released

Description

Mini 13 is now on a CC BY 4.0 license!

This means that you are free to share these files however you like, including selling prints, provided that you give proper attribution. You can give proper attribution by including this notice on your product page:

MINI 13 Printable Jointed Figure © 2023 by Lucky 13 Toys is licensed under CC BY 4.0 

Please help me build my identity as a creator by referring to this design by its original name. Don't pass off my work as your own product.

Want to support future projects with a one-time donation? Make a PayPal donation here!


— 


This is my own work, originally uploaded to Printables.

Introducing MINI 13!

Mini 13 is the next generation of Lucky 13: a fully 3D printable, highly posable, snap-together, modular, customizable, jointed figure - now optimized for faster and easier printing and even easier customization.


With a jointed frame, a simple set of armor, and some example accessories, this starter set contains everything you need to start printing, playing, and making it your own.


Printing

The first three files give you all the parts you need to assemble the frame, armor, and extras. You can also print individual parts; the file name indicates if you will need to print more than one of each part (e.g. you would print 4 of the file mini13-frame-arm-4x.stl).


I recommend PETG or ASA for the frame parts (PLA also works but the joints will weaken faster). The armor and extras can be printed in the filament of your choice.


These are the settings I use for best results (at 100% scale and with a 0.4mm nozzle)

  • Layer height 0.15mm (first layer 0.2mm)
  • 3 perimeters
  • 30% rectilinear infill
  • Slow down the first layer print speed (30% of default)
  • 0.25mm elephant foot compensation
  • Print external perimeters first
  • No brim or support material

You may need to tweak these settings and find what works best with your printer.
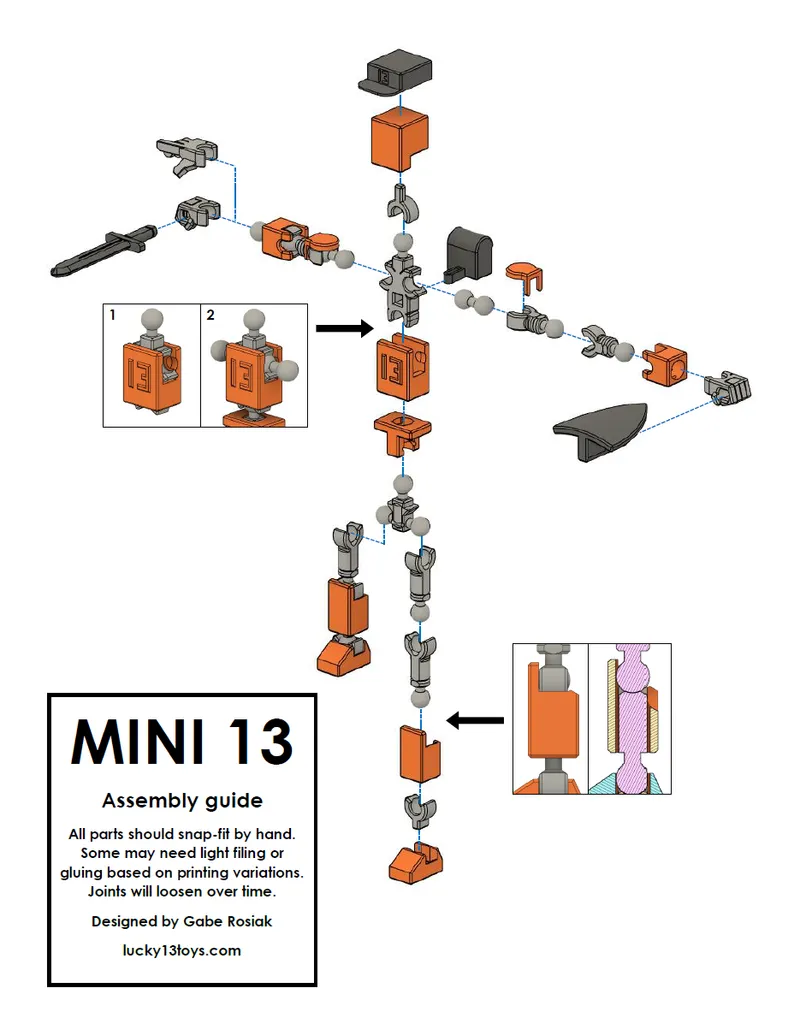
 

Assembly

The video and image below show how to assemble the model. All parts should snap snugly into place - no tools needed!


Customizing

Mini 13 is meant to be customized! I'll be making my own expansions too, but I love seeing community remixes. Here are some tips to get started.

  • Mini 13 uses the same head connection and hand size as Lucky 13, so any existing Lucky 13 remixes for alternate heads and handheld items should also work for Mini!
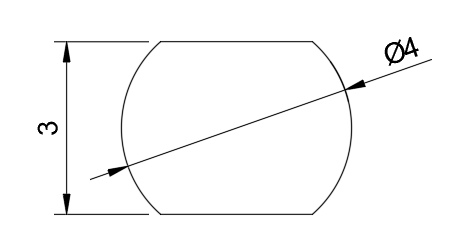
  • The ball joint size is 6mm (also the same as Lucky 13). The handheld accessories use a 4mm-diameter handle with a flat 3mm across:
  • The basic armor provided here is intentionally simple, so you can use it as a starting point for your own designs!

More tips

  • Mini 13 is 3.5 inches or 9cm tall at 100% scale.
  • Printing a lot of small parts can be tricky. In my experience, the best way to keep prints from coming off the bed is to s l o w d o w n the first layer print speed!
  • You can also try adding a brim, printing parts one at a time, and increasing the scale of the parts.
  • The joints will inevitably get looser over time due to wear and the plastic relaxing. One solution is to disassemble the joint and apply a thin coat of super glue or clear nail polish to the ball. Let it dry completely, then reassemble.

Enjoy!

I hope you have a great time with Mini 13. If you enjoyed this print, please consider making a donation here.


Documentation (1)

Assembly Guide (1)
single-page-assembly-guide_236fecd3-41e4-410f-981c-bdc845942132.webp

Comment & Rating (198)

Please fill in your opinion
(0/5000)

These Minis are a favorite with the kids. I've made an army of them. Do use PETG or PLA+ for the body as the joints get a workout. Give these guys a try.
6
Reply
how small are these?
1
Reply
Replying to @jlouisfajardo :
90mm
1
Reply
Replying to @jlouisfajardo :
These are 100% Scale, 90mm
0
Reply
Print Profile
Mini 13 with accessories.
(Edited)
Other Issues:the body part is messed up on A1 mini. not sure what happened. maybe the body parts should be on a separate plate since the A1 mini can hold less than other machines. still appreciate for the sharing
The designer has replied
1
Reply
I recommend to clean the build plate so you have better adhesion.
(Edited)
1
Reply
Replying to @MasterGadget64 :
Thank you! I will try again
0
Reply
Replying to @user_3432503860 :
U should try some paper glue stick (Personally use Tesa) for better adhesion.
(Edited)
0
Reply
My son and I are having a blast with these. He wants to make some stop motion movies with them.... He's 4... so I'll be doing all the work. Groot needs an adventure, though. I printed the frames all in Polymaker ASA, but the clear body's are BBL PETG Basic, the Gold and Brown are both BBL PLA Basic. I ended up chopping of the first two layers on the frames. they would not stay on the bed, thanks to how much they curled, warped and very little contact with the bed, they kept getting knocked loose. If only the P1S's bed went higher than 100C. Gonna try on my Adventurer 5M since that goes to 110C. But the shear amount of overhang on the second layer was crazy. Hence, I cut some meat off. lol Also, the profile from the designer has outside walls first, then inner... change that back to inner/outter if you have trouble with that. With the thinner joints and inner/outter walls, I still had no fitment issues.
1
Reply
Print Profile
Only Frame,0.16mm layer, 2 walls, 20% infill
I love this😍😍😍😍😍😍😍😍😍😍😍😍😍😍😍😍😍😍😍😍😍😍😍😍😍😍
1
Reply
Print Profile
0.15mm layer, 2 walls, 20% infill
Printed in PLA+ everything snap well, amazing design!
1
Reply
Print Profile
Weapons,hat,bag,0.16mm layer, 2 walls, 20% infill
Printed perfectly with PETG on the A1 Mini. Thank you for the accessoires!
0
Reply
Print Profile
0.15mm layer, 2 walls, 20% infill
Lots of fun, Enjoyed the tight snaps and the complexity for something that is so small but also works so well.
0
Reply
Print Profile
0.15mm layer, 2 walls, 20% infill
perfect print profile. I used PETG for the body connections, PLA basic for the accessories
0
Reply
Print Profile
0.15mm layer, 2 walls, 20% infill
Overall just an amazing toy. Really like how simple it is and the movement of it. 5 stars.
0
Reply
Print Profile
0.15mm layer, 2 walls, 20% infill
Printed Body and joints in PETG and Sword/Armour in PLA. just hit print and no issues!
0
Reply