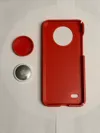
Omnipod 5 PDM case with AirTag
Omnipod 5 PDM case with AirTag


Print Profile(1)
Description
This is a case design for the Omnipod 5 controller. I noticed there are no designs out there that allow for an AirTag to elegantly be placed within the case. I've seen people using epoxy, silicone stickers and all sorts of various other workarounds. I decided to design a simple yet sleek case as well as an option to add an Airtag
The case was designed with PLA printing in mind so it can be as accessible as possible for people. I have not tried it with TPU yet but give it a go and let me know how it goes. There are slits in the case at the top right and bottom right corners to allow some flex taking the case off. I recommend holding the device sideways, with the buttons facing up and pushing the controller out using the opening for the buttons whilst pulling the case in the opposite direction. The device comes out pretty easily this way, should you need to take it out
Please share any makes with pictures! I'd be curious to see them
TO PRINT THE AIRTAG CASE -
Print these two files:
Case - Omnipod 5 case with Airtag cutout.stl
AirTag insert - Omnipod 5 case AirTag insert.stl
Print the case without supports and lay it flat on its back. I recommend printing at the highest temp you can for PLA with the lowest cooling fan amount (don't go above 240 degrees) to improve layer adhesion and case strength. The lower temp you print the more likely the case might split when you take it off and put it on. At 220 degrees I was able to snap the smaller edges off the case with some force but at 240 with lower cooling fan I could not physically break it using all my strength. I also highly recommend printing at double the layer width of your nozzle to improve squish and layer adhesion. So if you have a 0.4mm nozzle, set layer width to 0.8mm. Leave your first layer width at default. Don't use a brim or raft etc otherwise you'll give the case sharp edges and will feel rough in your hand. There is no need for extra bed adhesion
I printed first layer at 220 degrees then the rest at 240 degrees with 50% cooling fan on my Bambu Lab A1 mini. Outer walls at 60mm/s with inner walls at 300mm/s but this will depend on your printers capabilities. Its not necessary to use 100% infill but it gives a nicer finish to the inside of the case and your slicer will only add 1 or 2 layers of infill anyway so might as well make it 100%. I used a 0.4mm nozzle so I opted for a 0.82mm layer width in Bambu Slicer since it defaults to 0.42mm. I left the first layer width at the default of 0.5mm
For the AirTag insert print it with the dome on the top and use tree supports with a spacing of 8mm. The rest of the support settings are up to you as to what works for you normally. Support settings vary from printer to printer so I won't offer too much recommendation here. If you don't have pliers to pull the supports out of the dome then print it in another orientation where supports will be easier to access. I recommend printing it with the dome upwards so the supports are inside and you won't see the rough first layers of overhangs when the AirTag is placed inside
TO PRINT THE NON-AIRTAG CASE -
Print this file:
- Omnipod 5 case without AirTag.stl
This case has a cutout for the camera instead of having an insert for the AirTag. For those who just want a case design without the need for an AirTag.
Use the same settings as described above, copied below for easier reference:
Print the case without supports and lay it flat on its back. I recommend printing at the highest temp you can for PLA with the lowest cooling fan amount (don't go above 240 degrees) to improve layer adhesion and case strength. The lower temp you print the more likely the case might split when you take it off and put it on. At 220 degrees I was able to snap the smaller edges off the case with some force but at 240 with lower cooling fan I could not physically break it using all my strength. I also highly recommend printing at double the layer width of your nozzle to improve squish and layer adhesion. So if you have a 0.4mm nozzle, set layer width to 0.8mm. Leave your first layer width at default. Don't use a brim or raft etc otherwise you'll give the case sharp edges and will feel rough in your hand. There is no need for extra bed adhesion
I printed first layer at 220 degrees then the rest at 240 degrees with 50% cooling fan on my Bambu Lab A1 mini. Outer walls at 60mm/s with inner walls at 300mm/s but this will depend on your printers capabilities. Its not necessary to use 100% infill but it gives a nicer finish to the inside of the case and your slicer will only add 1 or 2 layers of infill anyway so might as well make it 100%. I used a 0.4mm nozzle so I opted for a 0.82mm layer width in Bambu Slicer since it defaults to 0.42mm. I left the first layer width at the default of 0.5mm


