Skip to content

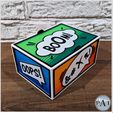
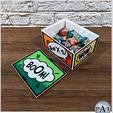
CARTOON STORAGE BOX

Advertising
Advertising
?
Creation quality: 5.0/5 (1 vote)
Evaluation of members on the printability, utility, level of detail, etc.

  • 24.5k views
  • 16 likes
  • 5 downloads
  • 1 collection
  • 1 make

License
3D design format
ZIP Folder details Close
  • CARTOON STORAGE BOX.zip
    • FINAL STL FILES/BAMBULAB FILE/CARTOON BOX - BAMBULAB COMPLETE PROJECT.3mf
    • FINAL STL FILES/BLUE SHADES - SIDE PANEL 001.stl
    • FINAL STL FILES/GREEN SHADES - TOP PANEL.stl
    • FINAL STL FILES/ORANGE SHADES - LONG PANEL 001.stl
    • FINAL STL FILES/PINK SHADES - LONG PANEL 002.stl
    • FINAL STL FILES/WHITE - BOX.stl
    • FINAL STL FILES/WHITE - TOP PANEL.stl
    • FINAL STL FILES/YELLOW SHADES - SIDE PANEL 002.stl
    • PHOTOS/Thumbs.db

Learn more about the formats

Publication date 2024-02-16 at 03:10
Design number 1791831

3D printer file info

3D model description

NOTE: COPYRIGHT PA1Β© - PERSONNAL USE ONLY. COMMERCIAL LICENSE ON MY PATREON. FULL ACCESS AS SOON AS YOU JOIN, MULTI PARTS DESIGNS SO NO NEED FOR A MULTICOLOR PRINTER AND MOST OF THE PROJECTS ARE SUPPORT FREE!!! LINK TO PATREON:

https://www.patreon.com/PA1_MAKER


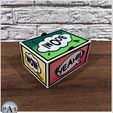
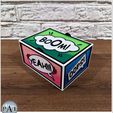
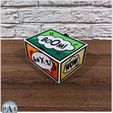
While working in my office, i realized that i needed another storage box for some precious chocolates! So i decided to take a moment to design a nice looking box with some cartoon speech bubbles on it!

And i really love how it turned out!!!

This is a super simple project, that requires no support.

The dimensions of the box are 120mm x 160mm x 80mm High.

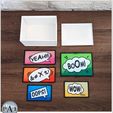
The parts are easy and quick to print. The box is thin (while being strong) and the colored panels are printed in a flat position on the bed, separately. A complete bambulab project file is also included inside the zip folder.

IMPORTANT: YOU DON'T NEED A MULTICOLOR PRINTER FOR THIS PROJECT!

You can print this project on any regular printer.

For the colored panels, a simple color change at the right layer will do the job. If you are not familiar with the procedure, here's some quick links on how to do it. It is for prusaslicer and for cura, but most of the slicers work the same way.

PRUSASLICER: https://help.prusa3d.com/article/color-change_1687

CURA: https://www.instructables.com/How-to-Change-Filament-Mid-print-Using-Cura-48/

That being said, you will print all the parts with a 0.2mm layer height.

With the 0.2mm layer height set, here's the list for the color changes:

SIDE PANELS (All four):

First change at 0.80mm (layer 4)

Second change at 1.40mm (layer 7)

Third change at 2.00mm (layer 10)

TOP PANEL:

First change at 1.40mm (layer 7)

Second change at 2.00mm (layer 10)

Third change at 2.60mm (layer 13)

LIST OF FILAMENTS USED ON THIS PROJECT:

-Pastel Yellow: 3DPrintingCanada house brand - Pastel Yellow

-Dark Yellow: Unfortunately, brand is now out of business, but any dark yellow will work.

-Light Blue: 3DPrintingCanada house brand - Light Blue

-Dark Blue: 3DPrintingCanada house brand - Blue

-Baby Pink: 3DPrintingCanada house brand - Baby Pink

-Pink: 3DPrintingCanada house brand - Pink

-Lime Green: Spectrum Filaments - Lime Green

-Dark Green: Spectrum Filaments - Forest Green

-Light Orange: Polymaker Polyterra - Sunrise Orange

-Dark orange: Unfortunately, brand is now out of business, but any dark orange will work.

-White: Sakata pla 850 - White

-Black: M3D Performance PLA - Black.

LAST BUT NOT LEAST: There are no assembly instructions for this project. It is almost impossible to make a mistake and its only a matter to gluing the correct panels around the box. But in any case, if you are experiencing some problems, feel free to send me a private message. I will try to help you as much as i can!

Have fun my friends! Keep Printing!!! :)

Advertising


Issue with this design? Report a problem.

Would you like to support Cults?

You like Cults and you want to help us continue the adventure independently? Please note that we are a small team of 3 people, therefore it is very simple to support us to maintain the activity and create future developments. Here are 4 solutions accessible to all:

  • ADVERTISING: Disable your banner blocker (AdBlock, …) and click on our banner ads.

  • AFFILIATION: Make your purchases online by clicking on our affiliate links here Amazon.

  • DONATE: If you want, you can make a donation via Ko-Fi πŸ’œ.

  • WORD OF MOUTH: Invite your friends to come, discover the platform and the magnificent 3D files shared by the community!


Sharing and downloading on Cults3D guarantees that designs remain in makers community hands! And not in the hands of the 3D printing or software giants who own the competing platforms and exploit the designs for their own commercial interests.

Cults3D is an independent, self-financed site that is not accountable to any investor or brand. Almost all of the site's revenues are paid back to the platform's makers. The content published on the site serves only the interests of its authors and not those of 3D printer brands who also wish to control the 3D modeling market.
100% secure payment by credit card, PayPal, Apple Pay, Google Pay, etc.
View all payment options.