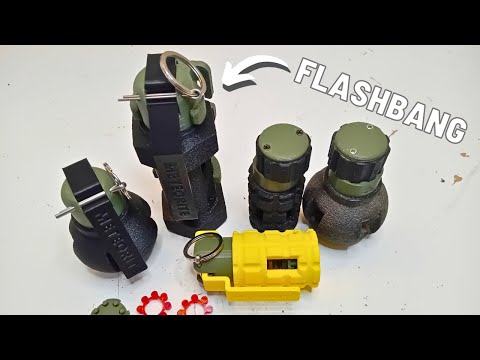
Airsoft Flashbang Grenade Impact Cap Twist Head Fuze Gun Ring MK13 Flashbang Sound Grenade "Meteorite" Reusable Grenade
This is the FULL Meteorite MK13 Flashbang kit!
Already have a Meteorite? Get the body kit here: https://cults3d.com/en/3d-model/game/meteorite-airsoft-impact-cap-grenade-mk13-flashbang-conversion-kit-body-kit-onl
Looking for the Original Meteorite? Find it here: https://cults3d.com/en/3d-model/game/airsoft-impact-cap-gun-ring-grenade-meteorite
The Meteorite, an airsoft impact grenade which uses readily available cap gun 8 shot rings to make a loud bang. I found some caps at my local corner shop at £3 for a pack of 12. Which is £0.25 per shot if you use a whole ring. Much cheaper than disposable airsoft grenades but also a lot easier, safer and lighter than blank firing grenades!
• Can be used for airsoft, gelsoft, paintball, Nerf, re-enactments etc.
• Spring-loaded impact fuze for quick detonation, the enemy has no time to escape! Very sensitive on hard surfaces.
• Very cheap to run, cap gun caps can be found in many shops and online too. You can use individual caps or the whole ring (minimum of 2 caps recommended).
• Easy to reset, no tools needed.
• Rapid deploy Twist Head Impact fuze, twist and throw!
• Styled to look like a Flashbang grenade, designed to look as realistic as possible.
• Easy to print and assemble. Modular design allows for quick replacement of broken or worn out parts. Minimal hardware needed.
Non-printed parts list:
8 shot cap gun caps (obviously).
1x Cut down AEG spring (OD 14mm, ID 12mm MINIMUM), I recommend using an M110 airsoft AEG spring, I found that 35-40mm is the best length, don't worry about the leftover hooked end in fact the cut end helps dig into the plastic and hold it in place. Too weak of a spring won't strike the caps hard enough and too strong of a spring will make the Fuze more insensitive.
1x M5x50mm Roofing bolt for the firing mechanism. Needs quite a low but wide truss head, 12mm head diameter maximum.
2x Small screws for attaching the Lid to the Fuze. I used 2 tiny screws from my massive collection of random screws.
Threadlocker, superglue or similar (recommended).
ASSEMBLY INSTRUCTIONS:
Print parts, remove supports and check fitting, some sanding and trimming of the Fuze heads may be necessary. The Fuze and Body should screw together and undo relatively easily. The Cap Cartridge should be able to drop inside the grenade body without getting stuck. The Striker's smaller end should fit inside the main spring.
Screw the M5x50mm bolt through the Sear. Make sure the Sear sits flush against the underside of the bolt head. The bolt should cut it's own threads. Threadlocker is strongly recommended to prevent the sear spinning loose. If it does loosen you might find it difficult to cock the grenade.
Pass the M5 bolt and Sear assembly through the top hole of the Fuze, the Sear and bolt should slide down through the hole without binding up. Take the cut M100 Spring and slide it over the bolt end sticking out of the bottom of the Fuze, the cut end should rest against the little step in the spring hole. This forces the spring sideways to help the Sear catch on the Fuze, otherwise the grenade would be very difficult to cock. Next take the Striker and screw the M5 bolt through the hole in the Striker, make sure the smaller end of the Striker fits inside the spring. The bolt should cut it's own threads. The spring should be sandwiched between the Striker and the Fuze base. It might be a little tricky. The bolt end should be flush with the bottom of the Striker.
The Striker hole is offset from the centre. This is intentional as you'll need to turn the whole bolt assembly until the larger area of the Striker is pointing the same way as the slot on the side of the Fuze. Once again make sure the cut spring end is sitting on the step inside the spring hole on the Fuze bottom. Once this is done you should be able to compress the spring and the Sear should catch into the sloped area of the Fuze. If at any point the Meteorite doesn't reset properly, check the Strikers alignment. It doesn't need to be perfect, but make sure it's pointing the right way. Once cocked, the mechanism should fire on impact. Performance of impact fuze may vary depending on surfaces, but I found a few inches onto hardwood floor is enough.
Press the Twist Ring onto the Fuze Body top, it will only fit on one way. The Twist Ring should turn approximately 90 degrees. Install the Lid and use the two small screws to fasten it onto the Fuze Body.
The Cap Cartridge can be stored in the Body of the Meteorite. Screw the Fuze into the Body. The Meteorite is complete.
Using the Meteorite:
Turn the Twist Ring to the "A" (armed) position, unscrew the Fuze. Push up on the Striker to compress the spring. The Sear and bolt should lock into place in the Fuze with the sear catching on the sloped trough in the Fuze. Turn the Twist RIng to the "S" (safe) position. Gently press the desired number of caps onto the Cap Cartridge, either individually or a whole 8 shot ring. (I recommend 2 caps minimum but a whole ring is definitely louder). Once the Cap Cartridge is loaded, drop it into the grenade Body, make sure the TOP side is facing upwards. If it's inverted you can jiggle the grenade until it's the correct orientation. Don't worry about the loose Cap Cartridge, once the Fuze is screwed into the Body there is not enough space for the Cap Cartridge to flip or to jam (it might rock around but once the grenade fires it slams down flat) inside the grenade. Screw the Fuze into the Body if you haven't already.
The Meteorite is now loaded. Twist the Ring to "A" and the Meteorite is now armed. A strong enough impact should detonate the grenade. Once fired the caps can be pulled off the Cap Cartridge and fresh ones pressed into place. I recommend carrying many pre-loaded Cap Cartridges to speed up reloading.
With a ring of 8 caps firing at once the Meteorite is very loud, arguably comparable to most airsoft disposable pyro grenades.
Do NOT store the Meteorite cocked! Do NOT dry fire the Meteorite with an empty Cap Cartridge inside or the pins will dent the Body.
For airsoft use ONLY. Use only on private land with permission or at a proper airsoft site. Use responsibly, I'm not responsible for any harm or damage from misuse or malicious use of this device. Check with your airsoft site first. Keep away from ears, this is still a noisemaker at the end of the day. Do not use in confined spaces. Unload/disarm before entering safezones. Wear face protection when playing airsoft. Do NOT store or transport loaded. Be careful where you throw this, it's lighter than a BFG but is still a solid object. FOR CAP GUN CAPS ONLY!
I do not authorise reselling of this design, physical or electronic.
Caps, bolts, springs, threadlocker, pins and key rings not included. Pictures show prototype, final design may vary slightly from illustration.
:format(webp)/https://fbi.cults3d.com/uploaders/21489582/illustration-file/b9a6d960-32ce-4002-86e7-20c9d1196890/20240315_160119.jpg)


/https://preview3d-images.cults3d.com/9oc6sdwwxjxyws0t7ncve6nl23z0)
/https://preview3d-images.cults3d.com/v0uz4z9axzkdy5ses8o16zew911t)
/https://preview3d-images.cults3d.com/x91r5k385k6257hpk5k2vkiw1txi)
/https://preview3d-images.cults3d.com/c00nfrbvsju29ha5jzym28o6s7ao)
/https://preview3d-images.cults3d.com/50afvhz7fygzgosuoxu0l187d0lg)
/https://preview3d-images.cults3d.com/e0u11nrfslbwialyq5nwv9xlifje)
/https://preview3d-images.cults3d.com/h3lw3pbvmw8ss4d5iwe4z6vsdkh0)


